
Showing posts with label weaving problems. Show all posts
Showing posts with label weaving problems. Show all posts
Friday, August 14, 2026


Tuesday, August 04, 2026
Mysterious Weaving Problem
The other day I sat down to weave on my winter leaf motif, and discovered there was a problem with the pattern.


I hadn't changed anything, so what was going on??? I wove through the entire treadle sequence and was able to identify the culprit as treadle #1. But what could it be? I hadn't changed the threading, I hadn't changed the tension, the treadle itself seemed to be in order, nor was the warp caught on something.
Next I inspected the lamms.

The problem, I discovered, is that one of the anchor pins was missing. I found it across the floor. How in the world had it gotten over there?
I didn't have to search far for the answer.

This is Violet, the newest member of our household. She had been playing with the treadle cords but II didn't think she could actually make some mischief! You can read here story here.
Happily, the fix was an easy one and I'm back to weaving the pattern as it should be.
Mysterious Weaving Problem © 2026
by Leigh at Leigh's Fiber Journal
Thursday, June 04, 2026
How To Make a Repair (Replacement) Heddle on a Glimakra Loom
At last, I
tied up the treadles for the new leaf motif draft
and was ready to weave my header. Lo and behold, I had another threading
error! I honestly think part of the problem is my bifocals. Even with
progressive lenses, it's difficult to get that sweet spot for several
activities, such as heddle threading and painting ceilings. I even have
trouble viewing my computer screen comfortably.
I had skipped a heddle, so I searched about for how to add another heddle in
the middle of the shaft. I ran across this video by
Underwood Textile Arts. I'm embedding it here, for future reference!
EDIT to add a link to Peggy Osterkamp's latest blog post, Repair Heddles: New (to me) Methods. It looks like another easy method for adding Texsolv heddles.
Sunday, May 24, 2026
Leaf Motif Draft: There's a Problem
I found the leaf motif draft on handweaving.net. The original draft for this was 8 shafts and 30 treadles. (The links in the caption are to document the source. This will take you to a drawdown if you don't have an account. You have to have a paid account to see the full draft.)
 |
| Original: Draft #80360: 8-shaft version of 79845, 2004-2026 |
Someone later reduced it from 30 to 10 treadles.
 |
| Modified: Draft #80362: 8-shaft version#80360; reduced to 10 treadles, Ruth Barbour, 2004-2026 |
The reduced version requires pressing two treadles per shed. My problem is the mechanics of the countermarch loom, where the shed (opening in the warp to pass the shuttle through) is created by lifting some shafts and lowering the rest. Each shaft is tied to each treadle to go either up or down, depending on the tie-up pattern. In this leaf draft, the treadling pattern requires using treadles simultaneously that have shafts tied opposite. I can't raise and lower a shaft at the same time!
For some reason my brain did not catch this. It feels like it should have been obvious, except it wasn't. I think it's one of those things I had to relearn. (After a 17 year break from weaving, I'm finding there are lots of things in the relearn department.)
So.
It would probably work on an 8-shaft jack loom, because on a jack loom only the rising shafts are tied. Except I don't have an 8-shaft jack loom
I could try a skeleton tie-up. Except I'm not sure I could manage to press four treadles at the same time.
I could look for a different draft. Which is where I'm at now. The warp is already on, with a point twill threading, so I need to find a draft that will work with that and requires only one treadle at a time!
Stay tuned.
© 2026 by Leigh at Leigh's Fiber Journal
Wednesday, May 13, 2026
Leaf Motif Random Color Warp is on the Loom!
Good grief, I never thought getting a warp on the loom would be noteworthy on a project, but I've had so much trouble with this warp that I'm celebrating that it's finally accomplished!

What took so long? Besides not having unlimited amounts of time for weaving anymore, I made so many threading mistakes! Threaded the heddles, checked the threading and found mistakes, corrected the mistakes, checked again, and then found new mistakes! What's annoying is that it's not a complicated threading pattern: 1 - 2 - 3 - 4 - 5 - 6 - 7 - 8 - 7 - 6 - 5 - 4 - 3 - 2 - repeat. I can't believe I had so many errors. And I wasn't even listening to a book while I did it.
And then there were the tangles. What a mess. Changing the color for every warp end to create a random color warp was a disaster. I picked up a different color yarn for each new end which meant there was a lot of crossing over on the first and last pegs on my warping board. I think this was the major reason for the tangles. I've never had so many tangles! In fact, I'm a little surprised that I didn't give up and throw the whole thing away. Perhaps it was the unwelcome idea of having to start the warp again from scratch that was the deterrent. My random color idea didn't work the first time, so likely it wouldn't work a second time either. I just started thinking of it as a puzzle to solve.
Ironically, the very project I hoped would be a relaxing distraction from the several stressors in my life, became a stressor itself. Anyway, it's on the loom! Yay!
Next is tying up the treadles. I'm trying a new system here, and if it works as well as promised, I'll be ready to actually start weaving soon!
© 2026 by Leigh at Leigh's Fiber Journal
Monday, October 07, 2024
Weaving Stool Cushion: Fabric Analysis

The fabric is off the loom, washed, and dried. The finished size is on target, and I love the thickness of the fabric. But I think it is still too loose for the intended purpose, even with the tighter set.
I think the problem is the rag pattern weft. Even though the recipe listed rags as one of the optional pattern wefts, my T-shirt yarn is chubby. Crackle floats skip only three threads, but with two of those threads being t-shirt yarn, the float is quite long and creates a gappy appearance in the warp yarn.

My conclusion is that t-shirt yarn is better suited to plain weave, or perhaps 2-end weft floats, such as in a twill. I'll have to experiment with that.
All in all, it's been an interesting experience. Between this and the failed bathroom rug, I've gotten some important information about weaving with t-shirt yarn. I'm taking it to heart, because I love the idea of t-shirt yarn; what a great way to re-use and re-purpose an often discarded item. More sampling to test my ideas is coming soon.
Tuesday, September 10, 2024
Bathroom Rag Rug: What Happened After I Washed It

Differential shrinkage at its worst! LOL! I machine washed it in warm water and used medium heat in the dryer.
What happened? The orange t-shirts were obviously not the same fiber content, I'm guessing a cotton/poly blend while the others are cotton. I thought the rest of it tightened up nicely. Maybe I'll cut it up to make pot holders. 😂
© September 2024 by Leigh at Leigh's Fiber Journal
Related posts:
Bathroom Rag Rug: Planning
Bathroom Rag Rug: How Many T-shirts Will I Need?
Bathroom Rag Rug: Draft & Calculations For Warping
Tuesday, August 27, 2024
Loom Wrestling
At the end of the day, when all I want to do is to sit down, listen to an audiobook, and weave a bit, loom wrestling is a bit of a put off. But sometimes it must be done. In the case of getting my table loom dressed to start weaving my rag rug, the problem was the extra heddles.

Using the full width of a reed meant the extra heddles were in the way. The warp needs to travel straight back from front to back beams. The extra heddles become an obstacle that push the warp to the side and mess up the tension. The solution is to remove them from the heddle bars.
I find removing heddles super easy on my Glimakra, but the table loom is another matter. Each shaft consists of an upper and lower heddle bar, held in place by a screw.
 |
| Top heddle bar |
 |
| Bottom heddle bar |
Okay, so just remove the screws, remove the heddles, and replace the screws. Piece of cake, right? Except that the screws were pretty much frozen in place. Thankfully, not rusted, but considering the loom is circa 1960s, it's not inconceivable that they are stuck.
I tried oiling them, but that didn't work. So I oiled again and left to sit overnight. Still stuck.

It finally occurred to me to try loosening the screw from the back. I grasped the metal tab with pliers and wiggled it one way and the other until the screw loosened. Then I could unscrew it with a screwdriver. Once the extra heddles were removed, I had to put the heddle shafts back together again. This would have been easier if I had three hands, but eventually I got it.
So, after a bit of loom wrestling, I finally got it warped. And the warp is tensioned and hemstitched.

I'm finally ready to weave.
Loom Wrestling © August 2024
by Leigh at Leigh's Fiber Journal
Related posts:
Bathroom Rag Rug: Planning
Monday, November 13, 2023
Table Runner 2: Problem Solved & Weaving Resumed
I closed my last post with a dilemma and a question. I finally decided to go ahead and unweave the start I'd made so I could remove the visually "offending" section of warp.

As you can see, I fixed the asymmetry somewhat! Now, the crosses look balanced on the edges, but they are offset. That was a "drat" realization at first, but I let it go and really, I can live with it.
Project particulars:
- Structure - crackle in overshot manner
- Warp & tabby weft - 8/2 unmercerized cotton in teal blue
- Pattern weft - 5/2 mercerized cotton in apple green
- Sett - 24 e.p.i.
- Picks per inch - 24 p.p.i.
- Number of warp ends - 340
- Draft - "Scandinavian Favorite," treadling II from A Handweaver's Pattern Book by Marguerite Porter Davison

Saturday, November 11, 2023
Table Runner 2: Weaving Begun, How That Blue Yarn Is Working Out, & A Problem
Weaving just begun.

The green is working well with my new choice of blue.

So what's the problem? The pattern is not balanced at the edges. In the first photo, you can see that the right side pattern isn't the same as the left side. It's not symmetrical and that bothers me.
Shouldn't I have caught that with my samples? Yes, except(!), I either miscalculated or misremembered the number of warp ends in the pattern. It has 58 ends, but I used 38 in my warp calculations. I knew something was wrong when I threaded the warp, but it was just a sample, after all. And the samples turned out with the pattern the same on both sides, so i didn't give it another thought. Now, it's glaring at me and it bothers me.
Eek. What am I going to do? I can just say, "oh well" and weave on. Maybe no one will notice? Or, I can unweave it and remove enough warp threads on the left side to balance the pattern. The unweaving wouldn't be too bad, but before I could remove that section of the warp, I'd have to undo part of the hemstitching with all its tight little knots. Do I really want to do that?
The question before me is, am I willing to do the work to correct it, or can I live with it as it is? That's what I have to decide.
What would you do?
Friday, October 27, 2023
Table Runner 1 Is Done

Project Particulars:
- Pattern: Fibonacci stripes in a 2/2 twill and reverse
- Yarn: 8/2 cotton
- Sett: 24 e.p.i.
- Width on loom: 17.5 inches
- Woven length on loom: 30 inches
- Finished width: 15.75 inches
- Finished length: 28 inches

Weaving Notes
Noteworthy 1: When I was just getting started and weaving the plain weave header, I
noticed that there were warp stripes appearing. They're
especially noticeable in the dark gray warp sections.
Upon a closer look, I discovered that these are the result of the way the reed is threaded. I only have one size reed, which is 10 dents per inch. So far, I've woven my samplers and dishtowels at 20 ends per inch, or two per dent. The sett for the table runner needed to be 24 per inch. That meant I had to thread the reed in a 2 - 2 - 3 sequence. The result is that where there are three threads in a dent, they are bunched up and formed stripes in the plain weave header.
Thankfully, this wasn't a problem when I wove the twill.

Still, it's something to keep in mind and perhaps consider purchasing a 12 dent reed in the future.
Noteworthy 2: As I measured the project length on the loom while weaving, I allowed a couple of extra inches beyond my targeted project length for take-up. When I got it off the loom it was no longer under tension and so was shorter than I expected! Thankfully, length is arbitrary, and so this is one of those "don't point out the mistakes and no one will notice" thingys!
To compensate, I used the plain weave headers like borders for the hems.

I was able to get my targeted length and I'm satisfied with how the plain
borders highlight the twill pattern, Who's to know it wasn't planned?
Now on to plan table runner number two.
Monday, September 25, 2023
A New Shuttle to Help With Two Things
Before I started weaving the overshot-fashion dishtowel of my twill gamp, I wanted to review yarn sizes. My warp was 8/2 and I needed a heavier yarn for the pattern weft. It's that heavier yarn that brings out the pattern. Of course, recommendations vary somewhat, but something I ran across was the idea to simply double the 8/2 to effectively make an 8/4 pattern weft. Since my stash is mostly 8/2s and 10/2s, that idea was certainly appealing. Yarn has gotten so expensive since I started weaving again, that I'm glad to use what I've already got! I can do this yarn doubling a number of ways: winding two 8/2s on the bobbin together, using two individual shuttles, or
 |
| Double bobbin boat shuttle by Handywoman. |
I found it on Etsy, where I had a $5-off coupon. This shuttle will expand my options for pattern weft as I can now easily double what I've already got without having to buy more yarn.
 |
| It came with two plastic bobbins! |
It's so pretty that I just had to share it. The shuttle is expertly handcrafted, beautifully finished, and reasonably priced. I had a choice of woods and chose cherry. I especially like it because it is compact: 12-inches long and only 1-inch high, but it holds standard 4-inch bobbins.
It was designed with rigid heddle looms in mind, which are smaller than floor looms and so benefit from equipment suited to them. I don't have a rigid heddle loom, but my table loom is small as well, and I find that using my taller shuttles means that it isn't long before I can no longer pass the shuttle through the warp shed. This low profile shuttle is not as tall as the more expensive brands, so it will give me a little more weaving room before I have to advance the warp.

Janet's shop on Etsy is here, but if you visit her website - Handywomanshop.com - you'll find a greater selection of items, more choices of woods, and better prices. She carries handcrafted weaving and spinning equipment and tools, including some amazingly unique shuttles, and even weaving themed jewelry!
Even though I wasn't planning to buy more equipment, this shuttle is something I'm glad I bought. It will help with both my yarn stash and my table loom. Many weave structures use a heavier pattern weft—including Summer & Winter, one of my favorites—so I know this new shuttle will get plenty of use in the future.
© Sept 2023 by Leigh at Leigh's Fiber Journal
Related post:
Thursday, October 01, 2009
It Worked!
By Leigh
Remember these?

Remember these?

These are the red warp M's & O's dishtowels I wove awhile back. A way while back. I gave one away, and put the other four in my trunk of handwovens.
It wasn't until after I had problems with another red warp for a waffle weave sampler, that I became concerned about these. The red in that warp bled, (that post here). When I looked at my M's & O's dishtowels later I thought, "Oh gosh, I'll bet these will bleed too."
Actually, I got some good ideas in the comments to that waffle weave post, about various dye grabbing products, though I admit that I didn't try any of them. That is, not until I asked my new DIL about the colors for her kitchen and she mentioned red. I immediately thought of those M's & O's dishtowels and her upcoming birthday. Before I would give them away as a gift, however, I knew I needed to do something about any potential bleeding.
Well, I remembered your suggestions and bought this...

It wasn't until after I had problems with another red warp for a waffle weave sampler, that I became concerned about these. The red in that warp bled, (that post here). When I looked at my M's & O's dishtowels later I thought, "Oh gosh, I'll bet these will bleed too."
Actually, I got some good ideas in the comments to that waffle weave post, about various dye grabbing products, though I admit that I didn't try any of them. That is, not until I asked my new DIL about the colors for her kitchen and she mentioned red. I immediately thought of those M's & O's dishtowels and her upcoming birthday. Before I would give them away as a gift, however, I knew I needed to do something about any potential bleeding.
Well, I remembered your suggestions and bought this...

I popped one sheet into the wash with the dishtowels and....


.... it worked!
I will still tell my daughter-in-law to not wash these with anything they don't want to risk turning pink (definitely not my son's favorite color.)
Paula Burch has some really good information on bleeding dyes - here. Evidently the culprit is the direct dyes used by commercial dyers. Unfortunately I have a lot of commercially dyed weaving yarns, so this is something I'll have to keep in mind in the future. At least I have found help for it.
I will still tell my daughter-in-law to not wash these with anything they don't want to risk turning pink (definitely not my son's favorite color.)
Paula Burch has some really good information on bleeding dyes - here. Evidently the culprit is the direct dyes used by commercial dyers. Unfortunately I have a lot of commercially dyed weaving yarns, so this is something I'll have to keep in mind in the future. At least I have found help for it.
© 1 October 2009 at http://leighsfiberjournal.blogspot.com
Thursday, March 26, 2009
An Unexpected Wrinkle
By Leigh
My Catzee inspired fabric is off the loom.
 I think it looks pretty neat and am happy with it. I'm going to call it "Tortie Trails."
However, after machine washing and drying, it did this.....
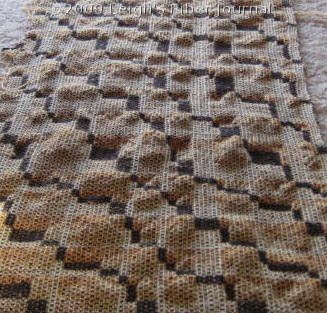 This is the result of mixing the type and fiber content of my yarns. I used both mercerized and unmercerized cottons, and rayon. As a design element, this is referred to as "differential shrinkage," where the different yarns shrink at different rates as a result of wet finishing.
My problem is that differential shrinkage is not really my "thing." I find traditional methods and effects personally more appealing.
What to do. What to do. This is supposed to be for my Complex Weavers Tied Weaves study group. So tell me ....
Posted 26 March 2009 at http://leighsfiberjournal.blogspot.com
Related Posts:
Poll Results & Test Press
Inspired By Catzee
Catzee's Cloth
One Thing Leads To Another
"Catzee's Cloth" Made the Complex Weavers Journal
My Catzee inspired fabric is off the loom.
 I think it looks pretty neat and am happy with it. I'm going to call it "Tortie Trails."
However, after machine washing and drying, it did this.....
 This is the result of mixing the type and fiber content of my yarns. I used both mercerized and unmercerized cottons, and rayon. As a design element, this is referred to as "differential shrinkage," where the different yarns shrink at different rates as a result of wet finishing.
My problem is that differential shrinkage is not really my "thing." I find traditional methods and effects personally more appealing.
What to do. What to do. This is supposed to be for my Complex Weavers Tied Weaves study group. So tell me ....
Posted 26 March 2009 at http://leighsfiberjournal.blogspot.com
Related Posts:
Poll Results & Test Press
Inspired By Catzee
Catzee's Cloth
One Thing Leads To Another
"Catzee's Cloth" Made the Complex Weavers Journal
Tuesday, December 16, 2008
Abandoned Warp
By Leigh
 I have abandoned this project. In less than six inches of weaving I've already had five warp ends break. That's going on one repair per inch! With an intended project length of about 48 inches (times two), that is not acceptable.
This was to be a Pine Tree Table Runner in summer & winter. I adapted the draft from Carol Strickler's A Weaver's Book of 8-Shaft Patterns (#549 page 155).
I bought the warp as a mill end, about 7 or 8 years ago at Holly Bee in Valdese, North Carolina (back in the days when they had a shop and sold weaving yarns). It's an 8/2 unmercerized cotton, and I think I paid only a dollar or two for it. It would be okay weft, but it is too weak to be warp. And there's only so much frustration a body can endure.
Posted 16 Dec. 2008 at http://leighsfiberjournal.blogspot.com
Related Posts:
Summer & Winter: A Basic Definition
Summer & Winter: Structure & Theory
 I have abandoned this project. In less than six inches of weaving I've already had five warp ends break. That's going on one repair per inch! With an intended project length of about 48 inches (times two), that is not acceptable.
This was to be a Pine Tree Table Runner in summer & winter. I adapted the draft from Carol Strickler's A Weaver's Book of 8-Shaft Patterns (#549 page 155).
I bought the warp as a mill end, about 7 or 8 years ago at Holly Bee in Valdese, North Carolina (back in the days when they had a shop and sold weaving yarns). It's an 8/2 unmercerized cotton, and I think I paid only a dollar or two for it. It would be okay weft, but it is too weak to be warp. And there's only so much frustration a body can endure.
Posted 16 Dec. 2008 at http://leighsfiberjournal.blogspot.com
Related Posts:
Summer & Winter: A Basic Definition
Summer & Winter: Structure & Theory
Wednesday, November 26, 2008
A Frustrating Warp
 By Leigh
I had hoped to show you some weaving progress by now, but I can't. And this time I can't blame it on the cat! The problem is the warp itself, or rather, what the warp is doing.
I'm using UKI 20/2s mercerized cottons, which I ordered from WEBS. I've never used this as warp before, in fact I ordered it especially for this workshop.
The problem, which you can see in the photo on the left, is that the bouts want to twist back on themselves. This has created several frustrating problems, including creating a few twist jams at the lease sticks.....
 So I've been having to untwist in order to wind on ....
 .... and while threading the heddles.
*Sigh* At least I can blog about when I take a break. :)
Before wishing all of my American readers a Happy Thanksgiving, I would like to share something that I am thankful for. If you've been following Rascal's medical saga, you'll be interested as well. You can check out his news on his blog.
Posted 26 Nov. 2008 at http://leighsfiberjournal.blogspot.com
Related Posts:
Preparing to Warp (With Help)
Weaving At Last - project details
Ikat/Painted Warp Bookmarks Done - how it turned out
Wednesday, August 20, 2008
Barcode Waffle Weave Update
By Leigh
Let's see. In the last episode of my waffle weave adventure (before my little detour after finding some of my blog posts stolen), I had figured out a way to both correct my waffle weave threading as well as widen it. The warp I added for width has been pretty successful, though not without some problems.
What I have had trouble with has been a curving fell. "Fell", for you non-weavers, is the leading edge of the cloth on the loom; the line of fabric made by the last weft thread. It needs to be perfectly straight, or the weft won't beat in properly. Sometimes it curves upward at the selvedges, so that your weaving looks like it's smiling at you. This is the case if the warp at the edges is too loose, or if the weft is pulled too hard through the shed so as to cause unnecessary draw-in.
Initially, I assumed it had to do with the amount of water in my milk jug weights. However, even after adjusting the amount of water and taking care with the weft didn't completely correct this problem.
In analyzing the problem, I realized that the sticks I added to tie the extra warp to (photo here), are not supported by the front apron strings. I suspect that that may be the problem, because those sticks still flex somewhat under the weight of the warp tension.
My solution was to add a second set of sticks in the tabby sheds......

 Here's a close-up, in which you can really see the problem with the fell. See the upward curve of the bottom cloth? As a beginning weaver I had this problem a lot. Oftentimes it was simply uneven tension in the warp, especially if I didn't wind it under an even tension for its entire length.
The other problem I've had to learn to correct is excessive draw-in. This appears to be related to either the shuttle itself or how I throw it. For finer warp threads like the 10/2 I'm using, I use boat shuttles. My favorite (because it holds the most yarn) is my 13.5 inch Gilmore shuttle. It holds six inch bobbins, which are almost too snug a fit in the shuttle, though they still rotate freely. With all my boat shuttles, I find that I must take care with the amount of weft pulled from the bobbin before I throw the shuttle. If enough isn't pulled out, there is a tendency for the selvedges to pull in too much.
All this means that I need to pay attention to what I'm doing, which is probably a good thing anyway. However, even taking care to correct these two things, I was still having the problem. So far, my added sticks seem to be working, and I don't have anymore curves to deal with. Hopefully that will remain to be the case! I'll let you know how well it actually works.
Related Posts:
Waffle Weave
Light Bulb Moments with Waffle Weave
Barcode Waffle Weave Off the Loom
List of all my Waffle Weave posts
Let's see. In the last episode of my waffle weave adventure (before my little detour after finding some of my blog posts stolen), I had figured out a way to both correct my waffle weave threading as well as widen it. The warp I added for width has been pretty successful, though not without some problems.
What I have had trouble with has been a curving fell. "Fell", for you non-weavers, is the leading edge of the cloth on the loom; the line of fabric made by the last weft thread. It needs to be perfectly straight, or the weft won't beat in properly. Sometimes it curves upward at the selvedges, so that your weaving looks like it's smiling at you. This is the case if the warp at the edges is too loose, or if the weft is pulled too hard through the shed so as to cause unnecessary draw-in.
Initially, I assumed it had to do with the amount of water in my milk jug weights. However, even after adjusting the amount of water and taking care with the weft didn't completely correct this problem.
In analyzing the problem, I realized that the sticks I added to tie the extra warp to (photo here), are not supported by the front apron strings. I suspect that that may be the problem, because those sticks still flex somewhat under the weight of the warp tension.
My solution was to add a second set of sticks in the tabby sheds......

 Here's a close-up, in which you can really see the problem with the fell. See the upward curve of the bottom cloth? As a beginning weaver I had this problem a lot. Oftentimes it was simply uneven tension in the warp, especially if I didn't wind it under an even tension for its entire length.
The other problem I've had to learn to correct is excessive draw-in. This appears to be related to either the shuttle itself or how I throw it. For finer warp threads like the 10/2 I'm using, I use boat shuttles. My favorite (because it holds the most yarn) is my 13.5 inch Gilmore shuttle. It holds six inch bobbins, which are almost too snug a fit in the shuttle, though they still rotate freely. With all my boat shuttles, I find that I must take care with the amount of weft pulled from the bobbin before I throw the shuttle. If enough isn't pulled out, there is a tendency for the selvedges to pull in too much.
All this means that I need to pay attention to what I'm doing, which is probably a good thing anyway. However, even taking care to correct these two things, I was still having the problem. So far, my added sticks seem to be working, and I don't have anymore curves to deal with. Hopefully that will remain to be the case! I'll let you know how well it actually works.
© 20 Aug 2008 at http://leighsfiberjournal.blogspot.com
Related Posts:
Waffle Weave
Light Bulb Moments with Waffle Weave
Barcode Waffle Weave Off the Loom
List of all my Waffle Weave posts
Saturday, July 26, 2008
Waffle Weave Sampler
By Leigh
Well, I'm certainly glad that I did a sample for this waffle weave project. For more reasons than one. You can probably spot one reason right off the bat.

Well, I'm certainly glad that I did a sample for this waffle weave project. For more reasons than one. You can probably spot one reason right off the bat.

The red bled! And this was in a cold water wash. It would have been very disappointing if I had skipped the sampler and just tried to do the towels.
The other thing I decided I didn't like was the the treadling. Usually, waffle weave is treadled the same as the threading, 1 through 4 and reverse. However, I used the treadling from Mary E. Black's The Key to Weaving. The waffle weave treadling from this book called for treadles 1 through 5 and reverse, which makes the waffles a little taller. I think this makes the warp floats too long however. So for my towels, I will use the more common treadling sequence.
The other important bit of information is the shrinkage. Mine was approximately 29%. This is about what several of you have experienced with your own waffle weaving, so I think that 30% is a safe estimate to use in the future. Lengthwise, the shrinkage was 21%.
Using 10/2 cotton and a sett of 30 epi made a fairly thick fabric. I think this would be suitable for a heavy dishtowel or perhaps as fabric for a lightweight vest.
So there you have it. The bother of sampling justified. I'm just not sure what to do with that cone of red however. This is the second cone of red cotton I've had bleed. Does anyone know if it's possible to salvage a yarn like this? Fortunately I got each for only a couple of dollars somewhere, but still, I hate to think that I have to test all my yarns for colorfastness. *Sigh*
Related Posts:
Waffle Weave
Light Bulb Moments with Waffle Weave
List of all my Waffle Weave Posts
The other thing I decided I didn't like was the the treadling. Usually, waffle weave is treadled the same as the threading, 1 through 4 and reverse. However, I used the treadling from Mary E. Black's The Key to Weaving. The waffle weave treadling from this book called for treadles 1 through 5 and reverse, which makes the waffles a little taller. I think this makes the warp floats too long however. So for my towels, I will use the more common treadling sequence.
The other important bit of information is the shrinkage. Mine was approximately 29%. This is about what several of you have experienced with your own waffle weaving, so I think that 30% is a safe estimate to use in the future. Lengthwise, the shrinkage was 21%.
Using 10/2 cotton and a sett of 30 epi made a fairly thick fabric. I think this would be suitable for a heavy dishtowel or perhaps as fabric for a lightweight vest.
So there you have it. The bother of sampling justified. I'm just not sure what to do with that cone of red however. This is the second cone of red cotton I've had bleed. Does anyone know if it's possible to salvage a yarn like this? Fortunately I got each for only a couple of dollars somewhere, but still, I hate to think that I have to test all my yarns for colorfastness. *Sigh*
© 26 July 2008 at http://leighsfiberjournal.blogspot.com
Related Posts:
Waffle Weave
Light Bulb Moments with Waffle Weave
List of all my Waffle Weave Posts
Friday, June 09, 2006
Weaving Progress
By Leigh
I’m pleased to report that after a slow start, I am finally developing a weaving rhythm. Here’s what it’s looking like:
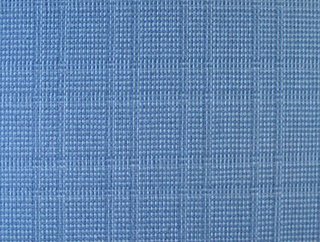
I’m pleased to report that after a slow start, I am finally developing a weaving rhythm. Here’s what it’s looking like:
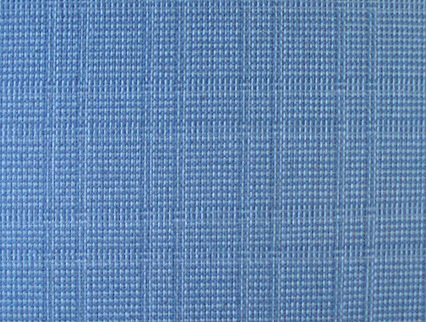
I’ve woven about 52 inches so far. Since this is yardage, I don’t have to worry about joining new weft ends, floating selvedges, or selvedges in general (though why is it that selvedges turn out nicest when one doesn’t have to worry about them? )
My biggest problem in the beginning was randomly skipping under extra warp ends. This proved to be frustrating as I did a lot of unweaving initially. I wondered about uneven tension and sticky warp ends, but in discussing it with Peg, I realized that it had to do with throwing the shuttle. I began to figure out that the extra warp ends coincided with an uncontrolled throw of the shuttle.
Mind you, I haven’t woven the full width of my loom (36 inches) but once and that, several years ago! Most of my pieces are scarves and sample strips, 12 inches wide at the most. In fact when I’m doing sample strips for design boards I omit the shuttle altogether and simply pass the bobbin from hand to hand through the shed.
Once I started concentrating on improving my shuttle throwing technique, things improved rapidly, though not without an occasional wild throw even now.
I’ve realized that one factor in this is that I’ve not fully recovered from Adhesive Capulitis of my left shoulder. It was at it’s worst during the second half of 2005. Not only was I in constant pain, which nothing could relieve, but I had severely restricted mobility of that arm. It isn’t called “frozen shoulder” without reason! I couldn’t weave or knit, though I did manage one handed spinning once in awhile. For the most part I felt quite useless!
About 6 months ago the pain lessened considerably and mobility began to improve. I’m still not 100% however, and can’t move my arm into certain positions, but I'm usually not aware of it anymore except when trying to do certain things such as put on something over my head, or catch the shuttle on that side. I suspect it may interfere with throwing the shuttle from the left, but it isn't anything that I can't overcome.
Looking at the bright side, all of this has caused me to pay more careful attention to my weaving technique: not only how I throw the shuttle, but how I wind the bobbins, and how I treadle. I see the fruit of this care in my weaving. So there is truly a silver lining even in the darkest cloud. Especially if I will be a better weaver for it in the long run.
Next ...... Weaving Right Along
Related Posts:
b2f - Warp Sleyed
b2f Log Cabin Weaving
My biggest problem in the beginning was randomly skipping under extra warp ends. This proved to be frustrating as I did a lot of unweaving initially. I wondered about uneven tension and sticky warp ends, but in discussing it with Peg, I realized that it had to do with throwing the shuttle. I began to figure out that the extra warp ends coincided with an uncontrolled throw of the shuttle.
Mind you, I haven’t woven the full width of my loom (36 inches) but once and that, several years ago! Most of my pieces are scarves and sample strips, 12 inches wide at the most. In fact when I’m doing sample strips for design boards I omit the shuttle altogether and simply pass the bobbin from hand to hand through the shed.
Once I started concentrating on improving my shuttle throwing technique, things improved rapidly, though not without an occasional wild throw even now.
I’ve realized that one factor in this is that I’ve not fully recovered from Adhesive Capulitis of my left shoulder. It was at it’s worst during the second half of 2005. Not only was I in constant pain, which nothing could relieve, but I had severely restricted mobility of that arm. It isn’t called “frozen shoulder” without reason! I couldn’t weave or knit, though I did manage one handed spinning once in awhile. For the most part I felt quite useless!
About 6 months ago the pain lessened considerably and mobility began to improve. I’m still not 100% however, and can’t move my arm into certain positions, but I'm usually not aware of it anymore except when trying to do certain things such as put on something over my head, or catch the shuttle on that side. I suspect it may interfere with throwing the shuttle from the left, but it isn't anything that I can't overcome.
Looking at the bright side, all of this has caused me to pay more careful attention to my weaving technique: not only how I throw the shuttle, but how I wind the bobbins, and how I treadle. I see the fruit of this care in my weaving. So there is truly a silver lining even in the darkest cloud. Especially if I will be a better weaver for it in the long run.
Next ...... Weaving Right Along
© 9 June 2006 at http://leighsfiberjournal.blogspot.com
Related Posts:
b2f - Warp Sleyed
b2f Log Cabin Weaving
Subscribe to:
Posts (Atom)