Monday, January 29, 2024

Su-chan Sample Cap Done

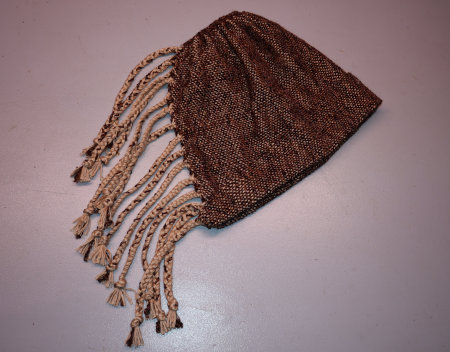
This is a sample cap because I wanted to test drive the pattern before investing handspun yarn on it. I was especially interested in the woven fabric size and final fit of the constructed cap.

The fabric wove up quickly. I'm listening to In the Kingdom of Ice by Hampton Sides on CD, and it's a first class "can't put it down" story. I finished the weaving before I finished the book.

Weaving notes
  • My planned finished length was 23 inches, so I wove it 25 inches to allow for take-up. 
  • On-loom width was 13 inches. 
  • My fringe on-loom was about 10+ inches.
  • I didn't hemstitch, and so had to take care with the first and last weft threads so they wouldn't unravel.

Construction

Three warp threads along one selvedge are separated out on both sides and
 pulled to gather the fabric on that edge. This becomes the back of the cap.

The fabric is folded in half lining up the two selvedges. The fringe
is braided, making sure to use threads from both sides of the cap.

My warp was a plain beige, so to make the braids more
interesting, I added strands of my novelty weft yarn.

The front selvedge of the cap is folded back and the cap is ready to wear.

Trying on for fit

The braided fringe can be worn in the back or on the side.
  • The fit was an exact fit on my head, but I didn't like the snuggness. Wool yarn would have offered more give than the yarns I used, however.
  • Also, I would like less slouchiness, which is a reflection of fabric width.
  • And I'd like the opening from the gathered edge to be less open.
  • I like that it can cover my ears (something my current knitted cap doesn't do).

Changes to make
  • A little longer and narrowier on the loom
  • Wool for warmth and stretchiness
  • A colorful warp for more colorful braided fringe.

The braided fringe is a very fun feature. I can see using beads, bells, feathers, or charms braided in for a dressier look. 

Once again, sampling pays off.

Saturday, January 27, 2024

Su-Chan (Saori) Cap: Begun

This is my test cap, for sizing and fit.

Yarns:
  • Warp - Lion Brand Coboo cotton/bamboo rayon
  • Weft - poly/acrylic novelty yarn
The warp measured 12 e.p.i.  From my red plaid scarf, I knew that a sett of 50% (6 e.p.i.) would probably be too loose, so I dug out Peggy Osterkamp's Winding a Warp & Using a Paddle to review her discussion of calculating set by allowing for purpose (page 93). I decided on 65%, which was 7.8 e.p.i., rounded up, of course, to 8. That meant I got to use one of my new reeds!

The weave structure is plain weave and I made a start on it this morning.

So far, so good.

I also wanted to make a note that I'm going to refer to this project as a Su-chan cap, rather than a Saori cap. This is because I don't feel like I'm actually doing Saori weaving, just borrowing a cap design by a Saori weaver. Hence I call it by her name in her honor.

Related posts

Thursday, January 25, 2024

An Attempt To Repair Moth Damage To a Wool Vest

Well now. Repairing moth damaged crochet may never make it to my list of superpowers, but I'm managed to fix moth holes in a crochet vest that I like to wear over my chore jacket in winter. When it's time to do morning barn chores on a frigid morning, it adds a comforting extra layer of warmth. 

The vest was crocheted from a bulky 2-ply yarn from what was called "beast roving." It's a blend of mixed breed fleeces, mostly gray mill ends but with bits of color here and there. It was fun to spin and quick to crochet into a vest.

Happily, I found some of the leftover yarn when I cleaned out and rearranged my stash of handspun. I also still had the pattern in a notebook. 

The first step was to pull out the yarn back to solid crochet stitches, securing them with safety pins and stitch holders.


Then it was a matter of filling in the hole with the same stitch.

In hindsight, I should have started on the other side, but since I was trying to figure it out, I just accepted my clumsy results and moved on to repair the second large hole. 

The second hole was challenging because it was on the front edge and is the foundation for the reverse crochet edging. I had no idea how I would manage that.

I filled in the eaten away single crochet stitches and then re-did the edging. The result?

No where near invisible mending, but at least the repair matches.

It puts the vest back in service with I am glad of because winter is far from over with.

I confess I had a hard time mustering enthusiasm for this repair. But I pushed on because I like the vest and it is useful to me. In examining it closely, I made the discouraging discovery that not all of the moth damage was holes, but in many places they appear to have nibbled through strands of the yarn so that it looks intact until close inspection. I wondered if I should have tried a different, visible repair, but sometimes, something is worth doing not because of the results, but for what one learns from doing it.

© January 2024 by Leigh at Leigh's Fiber Journal

Related Post

Monday, January 22, 2024

Next Project: Saori Cap?

As I whittle down my mending pile, I start to think seriously about my next weaving project. I have two things to draw on for inspiration: my new reeds and the recent sorting of my handspun yarns. Our cold winter weather is a factor as well, turning my thoughts to things warm and comforting. What I'm drawn to, is weaving a Saori cap (also known as a Su-chan or no-sew hat). 

[SIDENOTE: I can't find a non-copyrighted image to show you the cap, so I'll refer you to photos via a links to Centering with Fiber. And a free PDF tutorial with pictures can be viewed here.]

Maybe I'd better start by explaining Saori weaving. Sometimes described as "zen weaving," "freeform weaving," or "free-style weaving," it's a contemporary idea developed by Misao Jo of Japan. "Saori" comes from the words, Sai, a Zen term which means "everything has its own dignity / beauty," and Ori, which is Japanese for "weaving." Saori looms have only two shafts and two treadles because the Saori philosophy emphasizes color and texture rather than a specific technique, structure, or style of weaving. It embraces individuality, and what others may call "mistakes." Basically, it means the weaver is free from rules and conventions to weave what and how they want.

The Saori cap is credited to Su-chan, who designed it in her Saori studio in Japan. Besides being attractive and perfect for handspun yarn, I think the design is exceedingly clever (as are all garments designed with Saori fabrics). The waste warp before and after the woven fabric is incorporated into the cap as fringe which can be braided or twisted or whatever. I love anything that decreases waste!

Directions and descriptions of weaving and making the cap still leave me with questions, so I decided to try a test cap first. I have quite a few small lots of commercial yarns, and have chosen a couple of possibilities for weaving, making, and sizing a sample cat cap (spell checker didn't catch that one).

The novelty yarn on the left is actually navy blue, not black.


I think any of these color combinations would be fun to weave with. The solid color yarns are  a cotton/bamboo blend, which I'd use for the warp. The textured yarns are poly/acrylic yarn and would probably be best for the weft. Once I get the size right, I'll make one with handspun wool, which will be much warmer!


Related post

Friday, January 19, 2024

Handspun Sweaters and Fixing Cuffs

Two items in my mending pile are sweaters. Both are knit from my handspun and are probably the first two sweaters I knit from it. They are my everyday favorites, but the edges of the cuffs are fraying. 

These are everyday sweaters and so get a lot of wear in winter.

That sent me on a hunt to see if I had any of the original yarn I used for them. And that meant going through and organizing my boxes of handspun. Not a bad project, and useful for reacquainting me with what I have in my stash. 

One of several totes of my handspun yarns.

Much of it is remnants from various projects, and there's quite a few one-of skeins from various fiber breeds I've sampled. I saved it all, even the small bits because who can discard their handspun? Most of it I had taken care to label, but I didn't notate the project it was used for which would have been helpful. 

I found some things I had forgotten about . . .

My very first handspun yarn, a spindle spun thick single
 (4 wpi), because I didn't know I could split the roving.

Some of my sample cards. I kept samples of every sheep breed I spun.

I compared the yarns I found with the sweaters, but none matched color, size, and hand. It's amazing how many nuances of brown and white there are amongst sheep. Even so, it was a useful exercise because I sorted through four sweater totes of yarn, separated the handspun from commercial yarns, and put these in their own totes. 

In the end, I selected the closest matches I could find. 


Since they are everyday sweaters, I reckoned it probably doesn't matter all that much. As my grandmother used to say, 'who will notice from a galloping horse?' The important thing is that they aren't allowed to unravel and fray more than they already are. 

One thing this exercise did, was to get me thinking about getting those handspun yarns out of storage and into projects. I'm thinking weaving, although I'm not sure what. Something else to think about and plan as I try to finish up this month's mending.

Tuesday, January 16, 2024

Reeds For My Table Loom

Last month I was wishing I had some different size reeds, and my dear friend Terry came to the rescue. Terry was the previous owner of my table loom and I'm weaving again because of her! When she managed to rummage up two new sizes to fit it, I was thrilled beyond words. 

8 dents per inch and 12 dents per inch

So, now I have three reeds in different sizes: 8, 10, and 12. The 10 and 12 are probably the most common sizes, with 8 next. Lots of threading possibilities now!

Not much fiber blogging because I'm still working away on my mending pile. I'm gradually getting seams and waistbands repaired, holes mended, and jacket zippers replaced. Being utilitarian mending, none of it seems blog worthy. I have good audiobooks to listen to and am making good progress on my pile. The new reeds are giving me a bit of a boost to get it all done! You can bet I'm going to be planning a new project as I work to finish that mending pile. :)

Thursday, January 04, 2024

January is Mending Month

Mending is on my winter project list, and I have a lot of it. So, I thought it would be a good idea to make it my priority to tackle the pile this month, rather than keep on letting it get bigger and bigger. I set aside my creative projects so that I can get it done. 

Most of the mending is for our everyday chore clothes. Our lifestyle is rough on clothing, and I don't mind getting as much out of it as we can before replacing it. By the time we're done with a garment, it can only serve for the rag box. So, most of it will plain mending: ripped seams, holes to patch, and a few waistbands to repair. I need to replace some zippers on a couple of jackets, and I have handknit socks to darn. Needful stuff.

My reward for finishing the pile will be a new project on my loom! I have a lot of ideas and haven't quite decided exactly what that will be; maybe a rag rug for the bathroom. But deciding what to do will be fun to think about as I work my way through my mending pile. 


Related Posts

Monday, January 01, 2024

Tablet Woven Hat Band

There's been no weaving going on during the last days of December, with all the holiday and family activities. But I did one project that had been on my mind for awhile - a hat band from one of my tablet weaving samples

I haven't done any tablet weaving since I started weaving Christmas gifts last September, so it's been awhile. I've only woven about half-a-dozen sample bands, all fairly short and each with at least one beginner mistake. Even so, I've been wanting to do something with them. I found the hat at a thrift store and thought it would be perfect for a tablet woven hat band.

The band I chose was my Ladoga band. It was longer than I needed, so I unwove both ends until it fit the hat, keeping the weft yarn long. With those loose ends I made a twisted fringe. I used the weft thread to wrap around the two bunches of fringe to tie them together, and lastly poked yarn through the band and hat to tie off on the inside. 

The band fits the hat snugly enough that I didn't need to sew or glue it down. With only one tie down, it easily could be removed and replaced if I wish.

I don't know that I will wish, however, because I like it as it is. I like wearing hats and this one will be nice to shade my eyes when I'm out and around the town.


Related Posts