Saturday, January 31, 2009

New Year's Resolution: 2nd Thoughts (Already???)

By Leigh

My spring cleaning continues sporadically. As I've been sorting and reorganizing my stash, I've started to have second thoughts about my New Year's Resolution. And it's only the last day of January! Why is that? Because of this .....

Sadly, these are all synthetic yarns.
All of these are various synthetic or synthetic blend yarns in my stash, not including the huge box of leftover Red Heart yarns. You may recall that my New Year's resolution was to weave only with natural fibers this year. But if I do that, what do I do about them? Throw them away? That's shameful stewardship. Knit with them? Possible, though not all are suitable for knitting. Give them away? Well, that's a possibility. Wait till 2010? Well....... Revise my resolution to, "I will not buy synthetic yarns in 2009", rather than "I will not weave with synthetic yarns in 2009 "? That's a possibility too.

Almost all of my yarns have come from mill ends and others' leftovers. While this is due to the economic feasibility of my being able to weave, it also suits my curious and exploratory creative style. I love designing from my stash, even though it sometimes requires a lot of deliberation to find colors and textures to suit the design I have in mind. I love that entire process.

But back to those particular yarns. The bottom line is that I can't bear to part with most of these, especially the novelty ones that I always hoped would provide a little visual zing to some of my weaving. Such as the outline weft in this honeycomb M's & O's sample. Or weaving blankets for Project Linus with the Red Heart because washability is a requirement to donate blankets. Then there are gifts for those who like my handweaving, but need something easy care.

*Big sigh*

I am now remembering why I don't make New Year's resolutions.


Related Posts:
2009: International Year of Natural Fibre

Wednesday, January 28, 2009

Spring Cleaning: Find #1

By Leigh

I realize that since it isn't spring yet, then technically I can't be spring cleaning. But with our daughter moving out, moving everything from our rented storage unit in, and rearranging boxes and furniture, it seemed as good a time as any to give the place a little more than it's usual lick and a promise. Besides, if I get started now, then surely I'll finish by spring. Especially since I'd much rather weave/spin/knit/dye/read/blog/anything rather than do housework. I do love a clean house however.

There are rewards. I've re-found some things that I knew I had somewhere , I just wasn't sure where exactly. Things like this....

Find #1:

Madder roots
I know this may look like a pile of old sticks, and you may be wondering, "what in the world is she toting that around for." I'll tell you why, it's madder root! It was given to me by a spinning friend awhile back. A way while back.

Madder is used as a natural red dye. My own previous experiment with madder produced more of a coral color (pic here, madder obviously on the right, indigo on the left). How to get red is something I'll have the opportunity to learn during the Online Guild's April workshop: "Roots, Woods and Bugs: Working with the Red Dyes." (For more information on that, click on over to their Programme Calendar and scroll down to April.)

One thing I'm curious about is the shelf life of natural dye stuffs. These roots are at least four or five years old. I figure that at the very least I will learn something in the process. Hopefully of course, I'll also end up with some good color.


Related Posts:
Natural Dyeing?
Spring Cleaning: Find #2
Spring Cleaning: Find #3
Spring Cleaning: Find #4

Sunday, January 25, 2009

Shetland Sampler Cardigan Ribbing Update

By Leigh

I have pulled out the corrugated ribbing I started on the bottom of my Shetland Sampler Cardigan. It just wasn't working for me: it competed too much with the body of the sweater, it was too bulky, and it wouldn't lie flat. I have started again in a single color.

If you were in on the planning stages of this project, then you may recall that originally, I planned to do the ribbing in black, as I had plenty of that color. In looking at the pieces now that they're knitted however, I wasn't so sure about black bands. In the comments of my last SSC post, Wool Enough and Cyndy suggested the gray might be a better choice. I welcomed this because I had been considering it but just wasn't sure. Here are the results...

SSC with gray ribbing
You probably can't see in the photo, but this is a K2P2 rib. I'm much happier with it and knitting progress has picked up once again. Hopefully I'll get this finished before warm weather arrives!


Related Posts:
SSC: Starting the Bottom Ribbing - first attempt
A Shetland COWYAK - why I'm knitting the bottom ribbing last
Dissecting My Shetland Swatch - calculating yarn amounts
Shetland Sampler Cardigan Complete!

Thursday, January 22, 2009

More On Motifs

By Leigh

When I wrote my last post, "Snowball, Star, or Snowflake?," I was tossing around terms to describe the picture I was seeing in the motif I am weaving; something like a Rorschach ink blot test. But in the comments, Patrick and Jane are correct. "Star" and "rose" are specific weaving terms referring to treadling patterns, commonly found in overshot.

Both stars and roses are block designs and in fact, they are threaded the same. The difference is in the treadling.

I've not woven much overshot so I don't have any photos to show you, but I can graph examples ...

Star

Rose

Bother are threaded the same: A-B-A-B-A. The star is treadled as-drawn-in (i.e. in the same order as the threading): A-B-A-B-A. To convert it to a rose, the treadling is inverted: B-A-B-A-B.

In doing a little more reading about this, I learned that "star fashion" means to treadle as-drawn-in. "Rose fashion," on the other hand, means that the blocks are exchanged in the treadling order, B instead of A and A instead of B.

Now. Back to my own summer & winter table runner with the motif in question (which is technically neither one of the above). Jane, who has a beautiful antique coverlet with the same motif, did some research and found one resource which labeled it "birds nest." You can see a photo of it in this article.

What is interesting is that in all three examples: Jane's, mine, and the one in the article, the birds nest motifs are identical, but the pine trees are different. That's what makes designs like these so exciting. A lot can be done with treadling alone.

However, the question of the hour remains the same. Does this...

Leigh's S&W table runner on the loom..... look like a bird's nest? I have to admit that I'm still leaning toward that snowflake, but I'll let you decide for yourself. ;)

Bibliography:
  • The Weaving Book: Patterns and Ideas, Helene Bress, Charles Scriber's Sons, New York, 1981
  • The Complete Book of Drafting for Handweavers, Madelyn v.d. Hoogt, Unicorn Books and Crafts, Inc., Petaluma, CA, 1993
Posted 22 Jan. 2009 at http://leighsfiberjournal.blogspot.com

Related Posts:
Snowball, Star, or Snowflake?
Summer & Winter Pine Tree Table Runner

Monday, January 19, 2009

Snowball, Star, or Snowflake?

By Leigh

This is the next section of the same draft as the pine trees.

Leigh's S&W table runner on the loomIt is the sort of motif that seems to be common with the pine tree draft. My question is,what is it? Different drafts of the same sort sometimes call them "snowballs" also "roses." I'm not sure what this one looks like. Certainly not a snowball, and doubtful it looks like a rose. Maybe more of a star or a snowflake (my terms), but not quite.

At any rate, they use the same threading draft as the pine trees; they are simply treadled differently. I like the way this version looks (from Carol Strickler's A Weaver's Book of 8-Shaft Patterns, #549 page 155), and if you're glancing at it from your galloping horse, you won't notice the treadling error. Nor the inconsistent beat.

My plan for this table runner is to weave three of these in between pine tree borders.

Posted 19 Jan. 2009 at http://leighsfiberjournal.blogspot.com

Related Posts:
Back to the Pine Trees
More On Motifs
Summer & Winter Pine Tree Table Runner

Tuesday, January 13, 2009

SSC: Starting the Bottom Ribbing

By Leigh

Ready for some Shetland Sampler Cardigan progress? Me too. :)

After I completed the body of the sweater, I was ready to start on the bottom ribbing. That meant cutting off the COWYAK and picking up the left behind stitches.

Remember the COWYAK? (cast on with waste yarn and knit) If not, click here. To remove it, I slipped the needle into each Shetland stitch and then cut off the COWYAK stitch. Like this ....

Picking up COWYAK stitches.
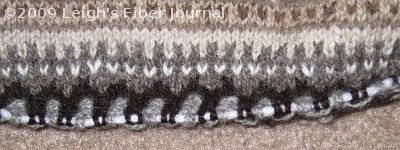
Then I was ready to start on the bottom band. On a whim I decided to try a corrugated ribbing, which is a traditional Fair Isle technique. I chose black and gray, the two colors I have the most of. I had already calculated that I had enough black for all the bands, but I really wanted to try this anyway.

It didn't take long however, for me to realize that it was totally unsatisfactory. Here is a photo of what I mean, taken after I transferred it from the circular needles to some waste yarn....

An unsatisfactory bottom sweater band.
The body of the sweater was puckering and the ribbing was flipping up. I was using a needle two sizes smaller than I used for the body, so I could understand the puckering, but not the flipping up. Isn't a smaller size needle supposed to prevent this? Pooh.

Now thinking that I should have done my homework on this before I started to knit, I figured "better late than never." In searching through my knitting books and the internet, I found the most useful information at Maggie's Rags. Under her "Knitting Tips" I found a whole page on Corrugated Ribbing: Problems and Solutions. Very helpful.

One thing I learned is that because corrugated ribbing is stranded, the end result is very tight. Consequently, a needle two sizes smaller isn't necessary and the same size needle as the body was knit with is recommended.

I also learned the curling is typical of this technique, but there are measures to prevent it. One solution is to use a very tight cast on. However, I'm picking up and knitting downward from the sweater body. Other solution is an off numbered rib pattern such as K1P2 or K2P3.

In thinking through these, I also saw that the two-color ribbing is a lot thicker than the body of the sweater. I'm not sure I like that. So, back to the mental drawing board. I'm going to have to make some decisions and I may end up with all black ribbing after all.


Related Posts:
A Shetland COWYAK
Technically Not Fair Isle
Shetland Sampler Cardigan Complete!

Saturday, January 10, 2009

Back to the Pine Trees

By Leigh

"Back to the pine trees" literally or figuratively? In terms of weaving, a little of both, I think. I have been very busy with family activities and guild business (is anyone else's guild faced with budget problems this year???) Consequently I have really missed weaving. Every day I've looked at my warping board with it's partially measured warp and thought, "tomorrow I'll finish that." Well, you know the saying, "tomorrow never comes," so I finally had to say, "today I'll finish that"!

Here's my modest progress so far

S&W pine tree draft in navy & light green.This is going to be a table runner in a summer & winter pine tree draft adapted from Carol Strickler's A Weaver's Book of 8-Shaft Patterns (#549 page 155). It the same pattern as Jane's antique coverlet.

This is not a brand new project for me, rather it is a second try of this (click here) project, which I ended up cutting off the loom unfinished. I had too many warp ends break the first time. This time I've tied-on a stronger 8/2 cotton, one that I've used before as warp so I know it won't break. The old, weaker navy warp has turned out to be fine for weft. The two navies are slightly different, but together give more color depth to the final cloth.

Even though my first go-round with this pattern was a warp disaster, it still serves a useful function as a sample for my project book. And so far there's been no warp end breakage and I'm really happy about that!

I've missed weaving.

Posted 10 Jan. 2009 at http://leighsfiberjournal.blogspot.com

Related Posts:
Abandoned Warp - the predecessor to this project
Snowball, Star, or Snowflake? - the next motif in this project
Summer & Winter Pine Tree Table Runner
Tying On A New Warp

Wednesday, January 07, 2009

How To Watermark Photos With GIMP

By Leigh

Originally this was supposed to be a weaving post. But then I remembered that I promised to tell Trek how I put watermarks on my photos with the GIMP (GNU Image Manipulation Program). Being a visual person, I realized that I could do this easier with photos, hence a post appeared!

Including copyright information on your photos helps identify you as the owner. True, a copyright or watermark can be cropped off, or erased by someone with some skill with a photo editor. However, many thieves steal entire posts, photos and all. In these cases the copyright is left in tact and may be the only way to trace your material back to you. I learned this when I had my own blog content stolen.

The photo I'm using is what I had on the loom exactly one year ago. It is an advancing twill sampler, and will make a good example for this tutorial.

My instructions use the Linux version of GIMP, but you should be able to figure it out in the Win or Mac versions as well.

Simplest Way to Watermark a Photo

First open the photo in the GIMP. You can click on any photo in this post to enlarge it for a better view.

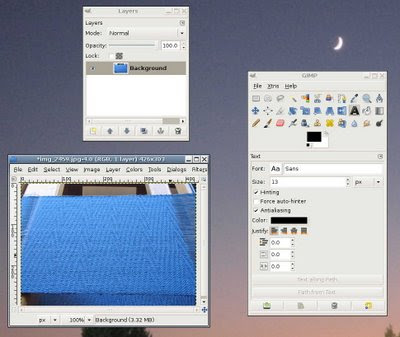
From the GIMP tool box, open the layers dialog box (file > dialogs > layers)

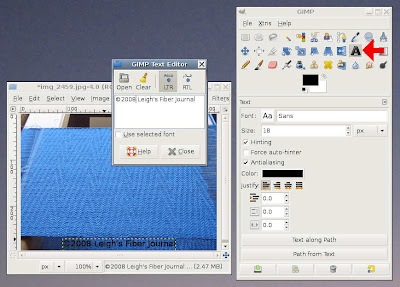
Select the text tool and click on your photo in the approximate spot you want your text to be.

Type your copyright message in the text box, don't close (yet).

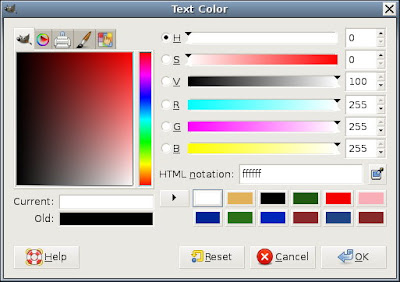
In the GIMP tool box, click on the color bar (black by default) and a text color box will open.

Change color to white. If white isn't handy on your palette, type "ffffff" (6 f's) in the HTML notation box. (ffffff is the html code for the color white.) Click OK.

If you want, adjust size of font on the GIMP tool box.

You can change the font if you want, too.

Move the text box if you need to, by clicking the move icon in the GIMP tool box. The trick here is the cursor symbol when you hover over the text box. If it shows the move icon (big blue plus sign) and the hand, the entire photo will move. To move text box only, you have to get the cursor in a spot where only the move icon shows. Go to edit > undo, to correct move errors.

If you need to work with the text again, double click it to open the text editor again.

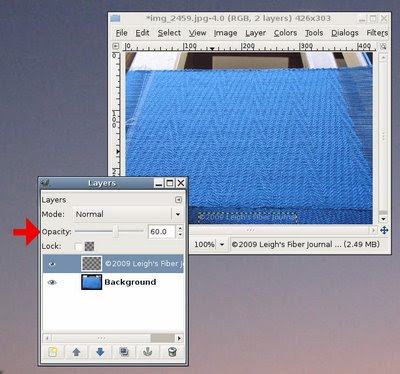
Now click on your layers dialog box.

Make sure your text layer is highlighted, and move the opacity slider until you get the look you want. Your photo will preview the changes for you.

When you're satisfied, save your image and it's ready to upload to your blog or website.

Getting a Little Fancier


You can also bump the image out to give it a 3-dimensional look. To do that follow all the steps above, but do the following before you save it.

First make sure that your text is selected in your layers dialog box.

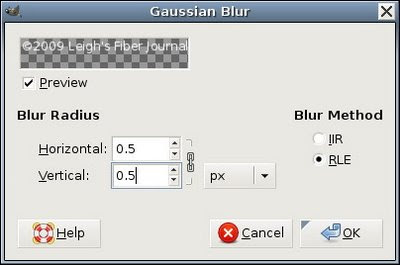
Find the "Filters" menu at the top of your photo. Select Filters > Blur > Gaussian Blur

Change the numbers to 0.5 for both. You can play with these and see if you like different numbers better. When you're satisfied with the preview, click OK.

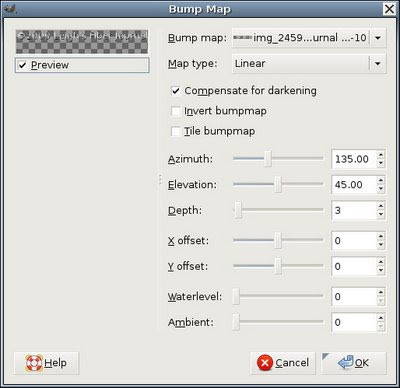
Next, go to Filters > Maps > Bump Maps

Different tutorials suggest different numbers here, but I just use the default settings. Do make sure that the offsets (both X and Y) are zero, or our watermark will be off! Click OK

That's it! Anything you don't like can be undone (Edit > Undo). Of redone (Edit > Redo). Save your photo and it's ready to upload to the Internet.

Questions? Comments? Other suggestions? Let's hear 'em!

Posted 7 Jan. 2009 at http://leighsfiberjournal.blogspot.com

Related Posts:
Stolen Content
Update on Stolen Content (& a little more info)
A Note About Watermarks

Thursday, January 01, 2009

2009: International Year of Natural Fibres

By Leigh

Happy New Year!

I am not one to make much fuss about New Year resolutions. I figure there's no sense making promises to myself that I probably won't keep. The only resolution I do make every year is one I have never broken yet: I resolve not to make any New Year resolutions.

This year however, I am tempted to make one. Why? Because 2009 has been declared by the UN to be the International Year of Natural Fibres. I've never cared to wear synthetic fabrics, but as someone who does a fair amount of weaving with acrylics (especially scarves and afghans), it seems that it would be good to resolve to weave this year with natural fibers only.

So, this is a first for me, a real live New Year's resolution. The best part is, I think it will be very easy to keep.


Related Posts:
New Year's Resolution - 2nd Thoughts (Already???)