Originally this was supposed to be a weaving post. But then I remembered that I promised to tell Trek how I put watermarks on my photos with the GIMP (GNU Image Manipulation Program). Being a visual person, I realized that I could do this easier with photos, hence a post appeared!
Including copyright information on your photos helps identify you as the owner. True, a copyright or watermark can be cropped off, or erased by someone with some skill with a photo editor. However, many thieves steal entire posts, photos and all. In these cases the copyright is left in tact and may be the only way to trace your material back to you. I learned this when I had my own blog content stolen.
The photo I'm using is what I had on the loom exactly one year ago. It is an advancing twill sampler, and will make a good example for this tutorial.
My instructions use the Linux version of GIMP, but you should be able to figure it out in the Win or Mac versions as well.
Simplest Way to Watermark a Photo
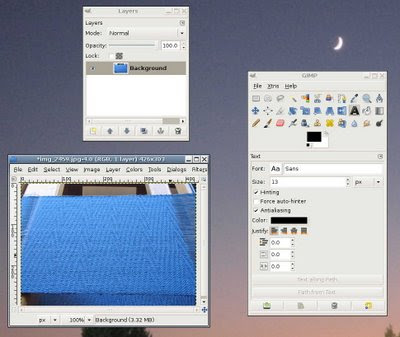 First open the photo in the GIMP. You can click on any photo in this post to enlarge it for a better view.
From the GIMP tool box, open the layers dialog box (file > dialogs > layers)
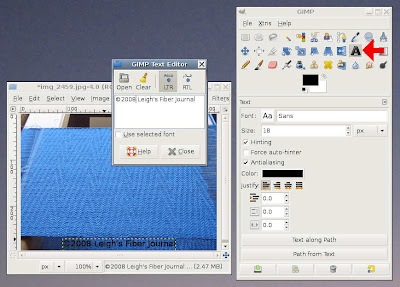
 Select the text tool and click on your photo in the approximate spot you want your text to be.
Type your copyright message in the text box, don't close (yet).
In the GIMP tool box, click on the color bar (black by default) and a text color box will open.
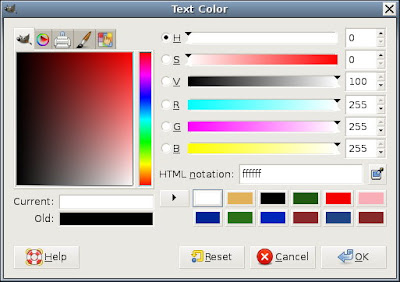 Change color to white. If white isn't handy on your palette, type "ffffff" (6 f's) in the HTML notation box. (ffffff is the html code for the color white.) Click OK.
If you want, adjust size of font on the GIMP tool box.
 You can change the font if you want, too.
 Move the text box if you need to, by clicking the move icon in the GIMP tool box. The trick here is the cursor symbol when you hover over the text box. If it shows the move icon (big blue plus sign) and the hand, the entire photo will move. To move text box only, you have to get the cursor in a spot where only the move icon shows. Go to edit > undo, to correct move errors.
If you need to work with the text again, double click it to open the text editor again.
Now click on your layers dialog box.
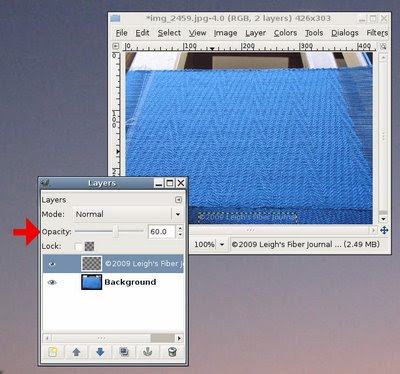 Make sure your text layer is highlighted, and move the opacity slider until you get the look you want. Your photo will preview the changes for you.
When you're satisfied, save your image and it's ready to upload to your blog or website.
Getting a Little Fancier
You can also bump the image out to give it a 3-dimensional look. To do that follow all the steps above, but do the following before you save it.
First make sure that your text is selected in your layers dialog box.
Find the "Filters" menu at the top of your photo. Select Filters > Blur > Gaussian Blur
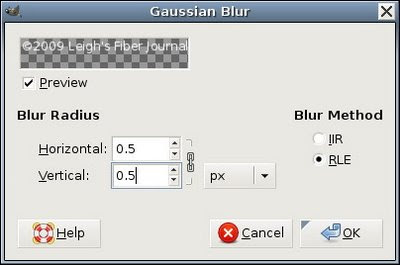 Change the numbers to 0.5 for both. You can play with these and see if you like different numbers better. When you're satisfied with the preview, click OK.
Next, go to Filters > Maps > Bump Maps
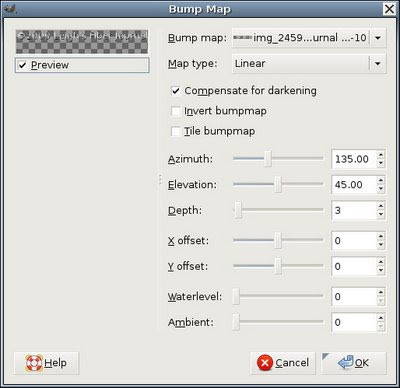 Different tutorials suggest different numbers here, but I just use the default settings. Do make sure that the offsets (both X and Y) are zero, or our watermark will be off! Click OK
That's it! Anything you don't like can be undone (Edit > Undo). Of redone (Edit > Redo). Save your photo and it's ready to upload to the Internet.
Questions? Comments? Other suggestions? Let's hear 'em!
Posted 7 Jan. 2009 at http://leighsfiberjournal.blogspot.com
Related Posts:
Stolen Content
Update on Stolen Content (& a little more info)
A Note About Watermarks
14 comments:
Well, aren't you clever? Thanks.
I figured out how to make Picasa do it for me the other day, too.
In PSP I have saved my watermarks as separate layers. That way they are all ready for me to paste into a photo. I don't have to reinvent the wheel each time. Once pasted, I can resize them if need be. I should think that you can do that with the Gimp as well.
P.S. It was Dave of The Weaving Studio who helped me out here.
So, true, having your watermark is a good step. I've had people comment that I've ruined my photos by putting them on there, but that's just my own protection. As Peg said, using layers makes it much easier to get a consistent look on your fabulous photos. Wonderful tutorial!
I love the GIMP. Great tutorial!
One thing that's worth mentioning is that if you cut out the text layer and past it in again, it will be placed in the center of the image. Then you can use the keyboard arrows to move the text to, for example, the bottom and have it center aligned. Pasting in something is the only easy way to center something in GIMP that I've found.
Trek, you mean I did all this work for .....???????????? (just kidding :)
Peg, I work a lot with layers but havne't tried saving one to reuse. I will have to play around with that. I got my photo editing start with PaintShop Pro, and knew how to record scripts with it, but switching to GIMP has had it's challenges.
Dave, I used to think the same way about those watermarks, but learned the hard way that what you say is absolutely correct!
Frida, good tip! I will have to give that a try.
Great instruction...and a very good idea.
I once found a photo of mine on an online seed catalog! Not that I mind (honestly I was flattered), but it would have been nice to get a little credit for it!
Thanks, Leigh. I just tried it out in Photoshop, and it basically works the same way.
Leigh, you shouldn't have to write a script. Just save it to a folder on your computer that is readily accessible. Even the desktop. I keep mine in the folder where I keep my photos. You should then just be able to click on it to open it, just like you would any image.
I'm still just trying to figure out the whole blogging thing.
very good tute Leigh.
however and don't want to rain on your parade,if someone's determined to steal a photo they will. the clone tool comes in handy for that. :(
i've watermarked my own photos and practiced erasing it with the clone tool. came out so well that i gave up on watermarking.
neki desu
Neki Desu, Yes, you're absolutely correct, and I've seen it done. The only real way to protect our photos is to not put them on the internet at all!
The main reason I started watermarking photos is because of sploggers, who steal entire posts via readers and snatching software. When I had posts stolen that way, I started looking around the website and found that it was 100% stolen content, except for the x rated ads. However, I was able to track down several owners and contacted them. We teamed up, complained to the web host, and shut the splog site down. I found one of the owners solely by his watermark.
Since splogging soltware steals the code, sploggers dont' worry about copyright notices or watermarks. Splogging accounts for the majority of content theft, so to me it's worth safe guarding against that at least.
Some will steal individual photos to be sure, but they'll know it's theft and they'll have their own karma to deal with.
Thanks for you comment though. I know watermarking is a pain in the butt, but I'll keep on doing it anyway.
A person said they just saved their water marks as sepreate layers and just pated them as needed. in gimp you can just copy and paste your watermark you just made into a new canvas then save it in your gimp brush file and you can have it as a brush to just click on to your photo. make sure when your saving you save as a .gbr file though.
Right now I keep a copy of my watermark on a corner of my desktop as it's own .xcf file with a transparent background. But this definitely sounds easier. Thanks for taking the time to leave the tip.
Post a Comment