Wednesday, May 30, 2007

To Ply or Not To Ply

By Leigh

That was my question when I first started spinning the Black Welsh roving from Judy. I toyed with the idea of spinning it as singles for weaving, but since I've been reluctant to jump into the waters of weaving with my own handspun, I thought perhaps it would be better to ply it. Needless to say, it has sat around on a bobbin for months. With another interesting spinning project imminent, I really needed that bobbin and so finally had to make a decision.

What I decided was to go ahead and ply it. I can still use it for weaving if I want, it will just make a chubbier weft. However, singles that aren't freshly plied and that sit around on bobbins for awhile, tend to temporarily set their twist. A single like this won't automatically try to balance itself when allowed to twist back on itself. Without that fresh energy, the question of how much plying twist to add becomes a challenge.

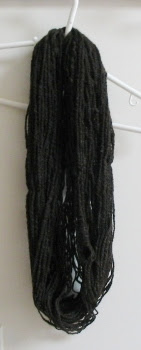
Here is what the single looked like when allowed to twist back on itself:
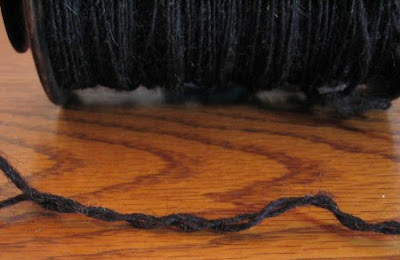
A bobbin of Black Welsh singles, showing it's lack of twist energy.
Looks too loose doesn't it? Of course, it often isn't possible to ply singles immediately after they are spun, so this is why I usually make a sample card. I not only attach a length of the single to the card, but also some freshly spun yarn plied back on itself. This tells me how my plying twist is required for a balanced 2-ply yarn. I also jot down any other information about the fiber: the breed, where it came from, fiber length, crimps per inch, wraps per inch, how I'm spinning it, etc. Unfortunately I lost or misplaced the sample card for the Black Welsh, and with it all that valuable information!

The thing to do was to re-energize the twist.

To do this I discarded several feet off the end of the bobbin. Then I broke off a short length and put it in a bowl of water.

A small segment soaking in water to re-energize it.
It didn't' take long before energy in the single "woke up" and started to twist back on itself. Now the twist was the same as when it was freshly spun. My challenge then, was try to ply so as to match my plying twist to the twist in this sample.

Trying to match the twist.
After I eyeballed a close enough match, it was simply a matter of counting treadles for the rest of the skein.

Here's what it looked like fresh off the niddy noddy:

Plyed skein before washing.
Doesn't look balanced at all, does it! The real test would come with washing the skein. And here's what it looked like then:

Balanced skein after washing.
Balanced! Whew, what a relief.

Monday, May 28, 2007

Fibonacci Overlay 1

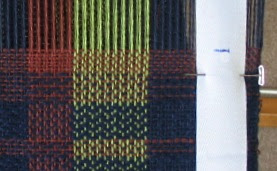
Originally I thought that after I'd woven this set of Fibonacci dishtowels, I'd put on a new warp with a different threading plan. My brain had other plans however. I find that once I get a weaving rhythm going, my mind begins wandering on a "what if" sort of game. So here is the first of two ideas that use the same Fibonacci threading plan. The first idea uses an overlay of even color stripes. Each color group has 20 warp ends in it. You can get an idea of what I mean in this photo:

My color warp stripe idea with Fibonacci threading.You can see from the horizontal lines, that I changed the treadling pattern in the same frequency as the stripes of color. The colors don't match up with the threading blocks, and the result is another complex looking fabric with simple elements.

Here are my results. These are all summer and winter, a two shuttle weave.

Blue tabby and white pattern wefts.Dark blue tabby weft and white pattern weft.

Turquoise tabby and white pattern wefts.Turquoise tabby weft and white pattern weft.

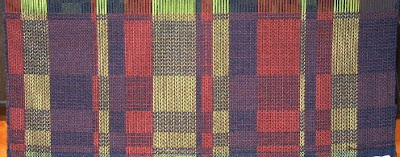
White tabby and white pattern wefts.The color stripes are especially noticeable in this one as both tabby and pattern wefts are white. The white stripes are predominate and what you can't see from these photos is the texture created by the heavier pattern weft. Here is a close up to try and show the subtle visual variations from the texture:

Detail of the above fabric.Color combinations and texture are the two things which intrigue me about the Summer and Winter weave structure. They make the possibilities seem endless!

The last one I did introduced a color which wasn't in the weft:

Turquoise tabby and gray pattern wefts.Turquoise tabby and light gray pattern weft.

This one surprised me. At first I didn't like the gray, but now it's my favorite one.

So that's it for that experiment. I have one more idea to try by tying on to this same warp. After that it will be time to move on to something different.

© 2007 Leigh's Fiber Journal

Related Posts:
Fibonacci Overlay 2
My Fascination with Fibonacci
Summer & Winter: Structure and Theory

Thursday, May 24, 2007

Bowmont Fleece 6 - The Yarn

By Leigh

Today I am pleased to say that I have finished spinning my Bowmont fleece. The pictures are small, but for some reason I couldn't get my scanner to cooperate and give me a better close up.

I managed two different yarns from my sample: a pure Bowmont yarn and a Bowmont/Angora blend.

Handspun Bowmont yarn with dime.This first skein is the straight Bowmont. My singles measured 66 WPI and the 2-ply is 32 WPI. This is amazing for me, and as I spun it I was reminded why I don't usually spin a fine yarn; it takes a long time!

My goal was to get as much yardage as I could, and I ended up with approximately 258 yards. The yarn is quite elastic; I can stretch a 5 inch strand out to 7 inches.

Next I turned my attention to the broken tips I had combed out. These were mixed up with some neps, which I didn't bother to pick out. I figured I would full the yarn and that hopefully this would keep pilling to a minimum. I handcarded the 5 grams of "waste" Bowmont with angora rabbit, using my cotton handcarders.

A basket of Bowmont & Angora blend rolags.My rolags looked like punis, don't they? But my fiber length for this skein was about 1 inch. These were spun long draw.

Bowmont & Angora blend yarn.The blend is about 2/3 Bowmont to 1/3 Angora and it has a lovely hand. I abused the yarn to full it, just like I showed you in this post. The finished yarn is slightly bumpy and measures 26 WPI. I have 43+ yards.

I haven't had time yet to knit swatches of either yarn. I'm not even sure what size needles to use for yarn this fine! Not sure I will get this done over the long holiday weekend anyway. Not sure I'll get anything done. But I hope everybody has a lovely weekend and a safe one.


Related Posts:
Bowmont Fleece 1 - The Breed
Bowmont Fleece 2 - Fiber Assessment
Bowmont Fleece 3 - Spinning
Bowmont Fleece 4 - A Problem
Bowmont Fleece 5 - A Comparison

Tuesday, May 22, 2007

Bowmont Fleece 5 - A Comparison

By Leigh

This post is long overdue. I had promised some folks that I'd publish it last week, but here I am, late as usual.

April's Online Guild workshop was a Bowmont Fleece Challenge. That's when I first started spinning my 50 gram sample, and at last I am happy to announce that it is almost done.

If you read my first Bowmont post about breed history and characteristics, then you may recall that it was developed from Shetland and Merino stock. As I've been spinning away, I've been contemplating that and wondering how my sample compared to the fleeces of these two breeds, especially since I have never worked with either of them raw.

Through Internet friends, I was able to obtain some samples.

Sample staples of Shetland, Bowmont, & Merino.The Bowmont from Lesley Prior is in the middle.
On the left, is clean Shetland from RareFindFarm Shetlands.
On the right, is unwashed Merino from Sheepshepherdess.

Most spinners are familiar with the lovely fineness of Merino. The diameter of it's individual fibers commonly measure less than 24.5 microns; 12.5 to 16.9 from ultrafine wool. (In comparison, human hair measures 60 to 100 microns.) Shetland usually measures 20 to 25 microns in diameter. Bowmont is between 15 to 20, with Lesley's fleeces below 18.

The 75% Merino / 25% Shetland genetic background of the Bowmont breed, have resulted in a lusciously soft fiber from a breed with a good dose of Shetland hardiness.

Unfortunately, Bowmont sheep are only to be found in the UK. If you are interested in purchasing some fleece to try yourself, you can contact Lesley via her website, where she also has her Mohair and Cashmere fibers for sale.

Next - my two Bowmont yarns.

© 22 May 2007 at Leigh's Fiber Journal

Related Posts:
Bowmont Fleece 1 - The Breed
Bowmont Fleece 2 - Fiber Assessment
Bowmont Fleece 3 - Spinning
Bowmont Fleece 4 - A Problem
Bowmont Fleece 6 - The Yarn

Saturday, May 19, 2007

The Gestalt of Weaving (or Spinning, or Knitting, or ......... )

I have had something percolating in my mind, and the comments from my last post have really turned up the heat. Donna (blogless) left a comment on my Fibonacci post with a link to an article entitled "Gestalt Principles and Dynamic Symmetry: Nature's Design Connections to Our Built World". It's a rather scholarly article, which meant that I had to read carefully and think hard, especially in regards to how it applies to textile arts.

When I first read this article, the terms "Gestalt psychology" and "Gestalt principles" roused vaguely stored memories of college psychology classes, but no more than that. A little research, and I came up with this definition from Wikipedia:
Gestalt - A collection of physical, biological, psychological or symbolic entities that creates a unified concept, configuration or pattern which is greater than the sum of its parts.
On one level or another, we're all aware of the interplay between the parts versus the whole. For example, have you ever been complimented on a finished piece only to feel compelled to point out it's flaw(s) or what you don't like about it? Have you ever looked at an item and thought "Ug-LEE!," while the person next to you is sincerely raving over it to the point of actually buying it? Or, have you ever carefully planned out all the details to a project only to not like it once it's finished? I say, blame it all on Gestalt.

What I have been pondering in regards to weaving is the relative importance of the various details versus the overall impression that the finished piece gives. For example, Kate commented that my dishtowels look complex. And they do! This is exciting to me because the individual parts are very simple in themselves. (Gestalt again :)

Consider the parts:

* A simple warp of only three colors counted in a simple sequence ......

32 navy, 20 green, 12 brown, 8 navy, 4 green, repeat
* A simple threading plan repeating only two possibilities on my four shafts......

Summer & Winter A and B blocks.

* A simple tie-up......

Summer & Winter 6 treadle tie-up.

* A straightforward treadling, simply repeating my threading plan.

I think what makes it look complex is the interplay of the stripes and colors. Gestalt.

As makers of textiles, it seems to me that we usually focus more on the details than on the whole. We notice them, analyze them, and fret over them if they don't meet our expectations. When I am unhappy with some part of my work, I am reminded of something my grandmother used to say......
No one will notice from a galloping horse.
I nod to the truth of this statement, but still dilemmize over whether to fix it or not. It ultimately boils down to how much I know it will bug me if I don't. Sometimes the only one it bothers is me.
 
When someone looks at my work and likes it, I realize that they don't see what I don't like. They are responding to the whole rather than to it's parts. I realize too, that people respond to things subjectively. To like or dislike a particular item, whether a skein of handspun designer yarn, a painting, or a handwoven dishtowel, is an emotional response based on one's own personal preferences and cultural tastes. We're all different so we like different things.

So after all that what's my point? I'm not sure. Yet. I suppose that understanding all this should free me from being overly critical of what I create. And it should encourage me out of the rut of working only with what I like. It should free me from a solely analytical response and encourage me to participate in an emotional one. I suspect however, that this may be easier said than done. Still, it's something to work on.

© 2007 Leigh's Fiber Journal

Thursday, May 17, 2007

Summer & Winter: 2nd Dishtowels

By Leigh

Finally, a weaving update. Not that I haven't been busy weaving, but seven dishtowels from the same warp doesn't make for much news. I have been weaving this warp, the multicolor one of navy, lime green, and cinnamon brown in 8/2s cotton.

For the pattern weft, I used a 6/2 navy cotton for all of the dishtowels. My experimentation involved the tabby weft, trying different colors and different color combinations. Here are the results.........

1 - Tabby weft in lime green

2 - Tabby weft in cinnamon brown

3 - Tabby weft in navy blue

4 - Tabby weft in dark green

Then I tried using two colors for the tabby weft, alternating colors with each block.

5 - Alternates lime green and navy blue tabby wefts

6 - Alternates cinnamon brown and navy tabby wefts

7 - Alternates lime green, cinnamon brown, and navy blue tabby wefts

If alternating different colors seems like a lot of work for dishtowels, it is. Of course, my goal was not specifically making dishtowels, but experimenting with summer & winter, and, in this case Fibonacci. Sharon had commented that these looked like they'd make nice sofa pillows and I have to agree with her. Now I am mentally planning a pillow project in the near future.

I have to admit that when I first pulled these off the loom and popped them into the washer, I thought they all looked pretty much the same. Comparing the details of them here though, I can see how different they are, albeit subtle.

What intrigues me about summer & winter is the interplay of color. There are quite a few possible combinations with only four shafts. The warp and the two wefts combine visually in a fun and fascinating way. Even so, I think these are a little dark for dishtowels, though I'm sure that is a matter of personal taste. At any rate, I'm tired of looking at these colors and ready to move onto something else!


Related Posts:
Summer & Winter: 1st Dishtowels
Summer & Winter: Experimenting with Multicolored Warp
Summer & Winter: Structure and Theory
My Fascination with Fibonacci

Monday, May 14, 2007

Painted Roving Yarn Swatches

Here is the progress I've made on the second half of the painted Texel roving.....

Painted roving singles on the bobbin.
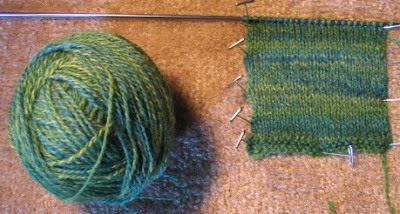
And here is a knitted swatch from the finished yarn......

Knitted swatch from the painted roving yarn.
Washing didn't improve the yarn's loft, so it remained 16 WPI after washing.

Cathy asked
When you paint the roving do you have any sense of how it's going to turn out once spun? I was imagining something more like variegated yarn, but this is sort of tweedy....

Various parts of the painted roving yarn.Yes indeed it does look tweedy, and that was what I was going for. This yarn was plyed from a center pull ball, so that the various colors of the single mix and match at random. I could have gotten the same effect by plying two bobbins of it.

Yarns like this can be subtle if the colors are from the same quarter of the color wheel (analogous) and of similar value (lightness or darkness), or bold if they have more contrast in either color or value.

To get a variegated yarn with purer looking colors, the singles would need to be Navajo plyed. This technique actually chains the singles, much like crochet, so that the individual colors ply on themselves. The result is a 3-ply yarn. Since I still have the painted Norwegian roving to spin, I may ply it in that fashion. That will give me two yarn looks in the same color scheme.

At this point I don't know what I will use this particular yarn for. The modern Texel sheep was developed in Norway from an old British breed. It's wool ranges from medium (being suitable for knitted or woven outer garments) to coarse (which is used for rugs and carpets). My sample is not next-to-skin wearable, but would do nicely for a vest or sweater. I won't have enough yardage for either of those, but mixed with something similar, I might be able to do it. We'll see.

© 2007 Leigh's Fiber Journal

Related Posts:
A Day for Painting Roving - how I painted this roving
A Change of Spinning Plans - how this painted roving spun up

Saturday, May 12, 2007

A Change of Spinning Plans

Yesterday was a disappointing day. My plan had been to drive to the Folk Art Center in Asheville, NC for their annual Fiber Day, and spend the day spinning with the Blue Ridge Spinners. I was all prepared. My wheel was oiled, bobbins cleared, fiber ready to spin. I had a basket packed with my dyed roving, niddy-noddy, ball winder, and camera. I had a bottle of water, my umbrella, and a large plastic bag for my spinning wheel in case I got caught in the rain. I was ready. Unfortunately, my car chose yesterday to be problematic, so I ended up going home. Better to be safe than stranded, I figured.

After I made the mental adjustment of not being able to go, I decided to spend the day doing what I had planned to do anyway, spin. Of the two rovings I painted on Wednesday, I chose the Texel.

Texel is a breed I haven't spun before. It's fibers are about 5 to 6 inches long and it is wonderfully smooth and silky to spin. It has a nice luster. Here is the fruit if yesterday's labors.

Handspun yarn from painted Texel roving.
This is about half of it. It measures 16 WPI unwashed. Bettina asked if I have plans for it yet and I have to say no, not yet. I think it will depend upon how many yards I end up with. Ordinarily I am a project person rather than a sampler, so I usually do have plans for what I spin. Right now I'm just enjoying the color and will wait to see what inspiration presents itself. It will be fun to think about while I spin the rest.

© 2007 Leigh's Fiber Journal

Related Posts:
A Day For Painting Roving - how I painted the roving
Painted Roving Yarn Swatches - how it looks in knitted swatches

Wednesday, May 09, 2007

A Day for Painting Roving

My eyes have been hungry to spin something with color. I do like naturally colored wools and often have a use for white, but I love working with color. I am in need of something easy to spin this weekend, so I decided to paint some roving yesterday.

I knew just what I wanted to paint too, two of the white rovings out of my Fiber Goody Bag from Judy. I chose the white Texel and the white Norwegian. At 100 grams each, they made good candidates for painting.

I'm really not set up for dyeing where we live now. I used to have a big basement to store things, a large kitchen, and a nice carport for mixing, painting, and my simmering dyepot. Now, I have no storage, a teensy kitchen, and an even smaller patio area. I didn't even know where my dye supplies were. Happily I found everything easily, even some leftover dye stock, mixed when I was dyeing the silk carrier rods.

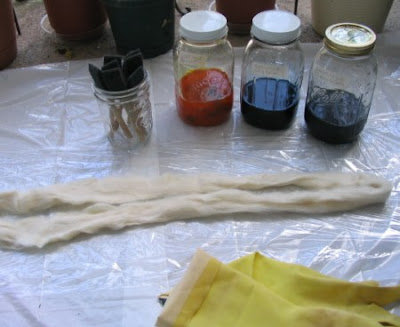
Supplies gathered to paint the roving.
I am not a scientific dyer. I suppose if I ever want repeatable results, then I'll start to keep track of things like measurements and amounts, but for now, I enjoy whatever I get.

My dyestocks are made from Cushing's acid dyes, which come in 1/3 ounce (approximately 10 gram) packets. I mixed these with about a pint of hot water each. Not sure what percentage stock solution that officially is however, let me think.

[Hmm. 10 grams of dye powder to one liter makes a 1% stock solution so 10 grams to 500 mls would also make a 2 % stock solution, right???, so I think 2% is it.]

My stock solution was about 2%. I think.

Applying color randomly with a sponge 'brush'.
After soaking the roving first in warm water with a squirt of dishwashing liquid and then with a large glug of white vinegar, I laid them out and dabbed color here and there. I used Cushings Ocean Green, Sky Blue, and Lemon.

Roving painted & being wrapped in plastic wrap.
I wrapped each up in plastic wrap,

Steaming away in the dye pot.
and steamed them for about half an hour. After that they were allowed to cool and dry.

Dried, fluffed, & ready to spin.
The result is a basket of pleasant colors, ready to spin. Happily, this will keep me entertained for hours.

© 2007 Leigh's Fiber Journal

Related Posts:
A Change of Spinning Plans - how this painted roving spun up
Painted Roving Yarn Swatches - how it looks in knitted swatches

Tuesday, May 08, 2007

Bowmont Fleece 4 - A Problem

By Leigh

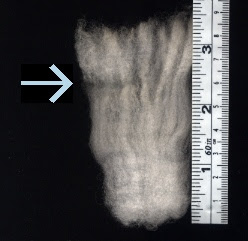
I've been making slow but steady progress spinning my Bowmont fleece. Using the fine toothed dog (flea) comb has worked well to open up this exceptionally fine fiber. It's also helped me catch a problem. I have discovered that there is a break in the fleece in part of the sample. You can see it clearly in the photo below........

Note the break in the fiber.According to In Sheep's Clothing (my favorite and most reached for spinning book), this is caused by illness, trauma, or poor nutrition, all of which effect wool growth. It can be recognized by a thinness in the staple at the same place throughout the fleece. If I were to take firm hold at each end of such a staple and give it a snap, the weak tips would pull off.

My 50 gram fiber sample appears to contain mixed fleece; some of the staples are sound, as in the ones I used to evaluate the fleece, but others are not. For my purposes, the biggest drawback to this flaw is the amount of waste.

The weak tips comb out easily......

The weak tips comb out easily......leaving the rest of the staple in spinnable condition. Woolcombs would accomplish the same thing, but had I wanted to drum card this and didn't remove the tips first, the short bits would remain in the batt and pill out of my yarn after it was worked up into a project.

This is definitely something to look for when considering a fleece for purchase. Ordinarily I would reject such a fleece, though not necessarily. It would depend on the breed, the color, the placement of the break. There would have to be some quality to make the fleece worth the extra effort and waste. And I would certainly expect to barter down the price!

My broken tips are about one inch in length, so I am going to save them and try blending them with another short fiber; perhaps with the cotton lint that I have in my stash, or some of the very short angora that I haven't have the heart to discard.

I also have some baby Suffolk fleece about the same length. It was a gift from a young 4-H'er who was very excited about raising his first lamb. Thanks to a very patient cooperative extension agent, he was allowed to try his hand at shearing for the first time too. Cameron proudly presented me his fleece (mostly 2nd, 3rd, and 4th cuts), so that I could "spin something" he said. His mom told me privately that the agent had said that it was too short to spin, but Cameron was not discouraged by this and wanted to give me the fleece anyway. Always ready to rise to a challenge myself, I promptly spun the the short fibers into a lovely oatmeal colored yarn and knitted Cameron a cap. When I gave it to him as a thank you gift, I told him to be sure and show it to that cooperative extension agent!

And so with my Bowmont, I will not be discouraged by the waste, but will enjoy the challenge of seeing what I can do with it. It's a scrumptious fiber and none of it should go to waste.

Next - comparing Bowmont to Shetland and Merino


Related Posts:
Bowmont Fleece 1 - The Breed
Bowmont Fleece 2 - Fiber Assessment
Bowmont Fleece 3 - Spinning
Bowmont Fleece 5 - A Comparison
Bowmont Fleece 6 - The Yarn

Saturday, May 05, 2007

A Means to Measure

DIY cloth tape measure.About an eon ago, Sharon asked about Peg's idea for measuring the length of a project on the loom. Well, by now I'm sure she's figured it out for herself, but for the record, I've been using this method for measuring my dishtowels and have found it to be the best thing I've tried so far (and I've tried a lot of things.)

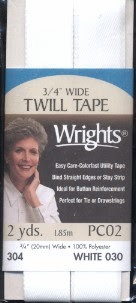
When I first bought the tape, I got to WalMart and only remembered the "tape" part, so I purchased bias tape. This proved to be too bulky, and when Peg reminded me that she actually said "twill tape," I got some of that on my next trip to the store. My choices were 1/4 inch or 3/4 inch, so I opted for the 3/4.

Measuring & adding marks to the tape.For this project I simply put two marks on the tape, one to mark the point where I want to begin measuring, and one at 30 inches, which is the on-loom length that I'm currently weaving. It would be easy to add additional marks if I wanted to place border designs or note the center of the dishtowel.

Permanent marker tended to bleed into the tape, so I'd probably use ball point pen next time.

The bias tape is only two yards long, so I'm reusing it for each dishtowel. I pin it with t-pins at the beginning ......

Lining up the 1st mark at the beginning of the dishtowel.
... and then when I get to the second mark......

I stop weaving when I get to the 2nd mark.
... I stop. Then I weave enough space in between towels to sew and cut, re-pin the measuring tape at the starting mark, and begin again. I'm not letting the tape wind onto the cloth beam, but simply moving the pins as I advance the warp.

So far it's working very well and my dishtowels have been all the same length. Yay!

Oh, and one more tip. No matter how much your cats try to convince you that you need their help.........

Catzee claims my twill tape.
Please note that twill tape in not, I repeat not, cat proof.

Warning: Not kitty proof!

© 2007 Leigh's Fiber Journal

Thursday, May 03, 2007

My Fascination with Fibonacci

By Leigh

Is everybody familiar with this Fibonacci stuff? How in 1202, Italian mathematician Leonardo Fibonacci of Pisa published a hypothetical math problem about multiplying rabbits and came up with a number sequence known as Fibonacci number sequence (though actually this was known about in India about 450 to 200 BC, see the Wikipedia entry, here.) The really amazing thing is that this sequence is found everywhere in nature. You can read more on that at this site.

For those unfamiliar with it, the gist of the sequence is that starting with zero, each number of the sequence is the sum of the two numbers that went before. In other words, start with zero plus one and add them together. Continue adding the second number of the equation with the sum, and voila, you have the Fibonacci sequence. Like this,

0 + 1 = 1
1 + 1 = 2
1 + 2 = 3
2 + 3 = 5
3 + 5 = 8
5 + 8 = 13
8 + 13 = 21
13 + 21 = 34
21 + 34 = 55
34 + 55 = 89
Etc.

Thus, the Fibonacci Number Sequence is:

0, 1, 1, 2, 3, 5, 8, 13, 21, 34, 55, 89, 144, 233, 377, 610, etc.

My own fascination is probably related to the fact that it is logical. I tend to like things like that: puzzle games, music theory, algebra (though I'm not very good at it). Plus, I love stripes and plaids.

Fibonacci gives a quick and easy formula for stripes, rows, or the placement of a repeating motif. It can be applied to width, frequency, changes in color or texture, whatever. Pull a set of numbers out of the sequence and repeat them, or reverse them, and the result is visually pleasing.

My recently handwoven dishtowels and rugs use 1, 2, 3, 5, 8, and repeat. Since I am weaving summer & winter, I used those numbers to determine how may units each block would have.

Leigh's Fibonacci warp sequence.What has made it all the more fascinating, is that by using 3 colors in my warp, each repeat of the sequence begins on a different color, as you can see. As I weave, I can treadle stripes like this, treadle the same 1, 2, 3, 5, 8 sequence as in this rug, or do something else as I did here. So not only can I have Fibonacci stripes, but Fibonacci plaids too.

As I weave I am also experimenting with different colors not only in the warp, but for the weft as well, both for the pattern and the tabby. And as I watch the colors and textures reveal themselves, my mind runs wild with new ideas.

I've also begun to wonder about repeating these squares and rectangles with fabric for quilt squares. Probably not something I'll try any time soon, but something to think about nonetheless.

© 3 May 2007 at Leigh's Fiber Journal

Related Posts:
Fibonacci Overlay 1
Fibonacci Overlay 2
The Gestalt of Weaving (or Spinning, or Knitting, or ........ )
Stripes!

Tuesday, May 01, 2007

Summer & Winter: Experimenting with Multicolor Warp

Even though I've been busy spinning the Bowmont fleece, I've been busy with my weaving too. I'm still experimenting with summer and winter, this time with a multicolor warp.

Multicolored summer & winter warp.I have to say that these are not colors I would have chosen to use if I were designing from color theory formulae or color combinations from inspirational photographs. These colors are the result of designing strictly from my stash. I've picked up a lot of mill ends and leftovers from other weavers. Consequently my stash consists of a hodge-podge of colors and yarns of various fiber contents. On the one hand, as a weaver who feels that a lot of her experiments are flops, this is a good thing as this way I don't fret over wasting yarn if I have a few failures. On the other hand, it limits what I can do, as my odds and ends don't always seem to go together.

My method of choosing color combinations is to pull out all my yarns which are of the same size and fiber content. These are set out somewhere; on shelves, a table, or even the floor, where I can look at them, stare at them, contemplate them. I arrange and rearrange cones of yarn in various color combinations until something finally "works." Sometimes it takes days before I finally decide that I either like what I'm seeing or I don't. I can't explain it.

So, using the above combination of 8/2s navy, lime green and brown cottons, here are the first two in a series of about six.......

One weft color combination.This one is using the green for the tabby weft and navy blue for the pattern weft.

Another weft color combination.And this one is using brown for the tabby weft and navy for the pattern. The colors, I'm afraid, aren't completely accurate. They aren't even consistent with one another, I think because they were photographed at different times of day. These are in the same Fibonacci sequence that I've been using for my other dishtowels and polychrome rugs.

As I sit and weave, another mix of yarns sits on the desk where I can watch it. I weave and think, and weave and plan. What a lovely way to spend the afternoon.