Showing posts with label Fair Isle. Show all posts

Tuesday, January 13, 2009

SSC: Starting the Bottom Ribbing

By Leigh

Ready for some Shetland Sampler Cardigan progress? Me too. :)

After I completed the body of the sweater, I was ready to start on the bottom ribbing. That meant cutting off the COWYAK and picking up the left behind stitches.

Remember the COWYAK? (cast on with waste yarn and knit) If not, click here. To remove it, I slipped the needle into each Shetland stitch and then cut off the COWYAK stitch. Like this ....

Picking up COWYAK stitches.
Then I was ready to start on the bottom band. On a whim I decided to try a corrugated ribbing, which is a traditional Fair Isle technique. I chose black and gray, the two colors I have the most of. I had already calculated that I had enough black for all the bands, but I really wanted to try this anyway.

It didn't take long however, for me to realize that it was totally unsatisfactory. Here is a photo of what I mean, taken after I transferred it from the circular needles to some waste yarn....
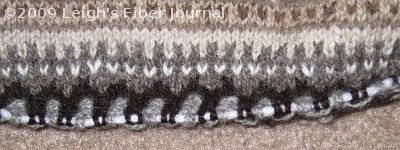
An unsatisfactory bottom sweater band.
The body of the sweater was puckering and the ribbing was flipping up. I was using a needle two sizes smaller than I used for the body, so I could understand the puckering, but not the flipping up. Isn't a smaller size needle supposed to prevent this? Pooh.

Now thinking that I should have done my homework on this before I started to knit, I figured "better late than never." In searching through my knitting books and the internet, I found the most useful information at Maggie's Rags. Under her "Knitting Tips" I found a whole page on Corrugated Ribbing: Problems and Solutions. Very helpful.

One thing I learned is that because corrugated ribbing is stranded, the end result is very tight. Consequently, a needle two sizes smaller isn't necessary and the same size needle as the body was knit with is recommended.

I also learned the curling is typical of this technique, but there are measures to prevent it. One solution is to use a very tight cast on. However, I'm picking up and knitting downward from the sweater body. Other solution is an off numbered rib pattern such as K1P2 or K2P3.

In thinking through these, I also saw that the two-color ribbing is a lot thicker than the body of the sweater. I'm not sure I like that. So, back to the mental drawing board. I'm going to have to make some decisions and I may end up with all black ribbing after all.


Related Posts:
A Shetland COWYAK
Technically Not Fair Isle
Shetland Sampler Cardigan Complete!

Wednesday, December 10, 2008

Sewing & Cutting The Steeks

By Leigh

Do I need a drumroll for this? Here are photos of sewing and cutting the neck and front steeks of my Fair Isle Shetland Sampler Cardigan.

The first thing I did was to test stitch tension on my sewing machine with a small knitted swatch. When I was satisfied with that, I sewed the actual steeks.

Machine sewing the steeks
I followed the instructions in Peg Arnoldussen's Essential Techniques for Serious Knitters (see my review in this post). The stitch is straight and small. I think I set my machine at about 20 stitches per inch.

Close-up of stitch placement.
The line of machine stitches had to go either down the middle or between stitches.

Stitch lines on either side of where opening will be cut.
My front steeks were six stitches wide. For these I sewed three rows of machine stitches on each side. For the wound neck steek (which I actually did first), one row of machine stitches went down the center of the edge stitches, and another along the outside of the edge.

Cutting the steek.
Then came the cutting between the stitched lines. It actually wasn't as scary as I thought it would be. I just reminded myself that this is only fabric after all.

Finished neck (wound) & front (checkerboard) steeks.
Here is the left upper front of the cardigan. You can see how both steeks turned out. I'll repeat this process the sleeve openings and my Siamese Sleeves.

The next step is to block this piece. Then I'll sew and cut the armhole steeks, stitch the shoulder seams, and then I can begin on the bands!


Related Posts:
Spinning & Knitting Update
Steeking So Far
Wound Neck Steek
Shetland Sampler Cardigan Complete!

Thursday, November 20, 2008

Wound Neck Steek

By Leigh

Now that chilly weather has arrived, I have resumed knitting on my Shetland Sampler Cardigan.

Body of Leigh's Shetland Sampler Cardi
You may recall that I put it down for the summer after completing the Siamese Sleeves. Besides the sleeves, the body of the sweater was largely done. Since it is being knit in the round, it was just too hot to work with in my lap. Now it's pleasant to have such a project on my lap (with or without cat).

I first contemplated knitting this project with steeks when it was still in the planning stages. With the help of a little book called Essential Techniques For Serious Knitters by Peg Arnoldussen (click here for more info on that), I've been able to muddle my way through checkerboard steeks for the front and sleeve openings. Those were fairly easy to master but now that I'm to the neck, a different type of steek is in order; a wound one.

Here's a first look at my somewhat sloppy wound steek.......

1st attempt at a wound steek
At first I thought I'd have to wind yarn the length of the neck opening, but it occurred to me, no I don't. The wound yarn ends up as waste anyway, so only a couple of winds around the needle are actually required. Because of that it doesn't lie flat for a photo, but that's okay too.

Since I'm not following a written down pattern, I'm pretty much having to wing it with just a written description of such a steek. I bound off the top of the front checkerboard steek, and also for the front neck shaping.

Now that I've gotten over the mental effort that the figuring out of this took, it's coming along fairly quickly. Before I know it I'll be ready graft the shoulders. I decided to go ahead and graft them, in keeping with Fair Isle knitting tradition (which this project is technically not.) After that comes the dreaded cutting of the fabric! (Or should I cut first and then do the shoulders? More decisions!)

I believe that this is the fastest I've ever knit any sort of sweater. If all goes well with the cutting, sewing, and band knitting, I may actually be able to wear it this winter!


Related Posts:
Sewing & Cutting The Steeks
Steeking So Far
Shetland Sleeve Update - a look at checkerboard steeks
Siamese Sleeves Done!
Technically Not Fair Isle
Shetland Sampler Cardigan Complete!

Friday, June 06, 2008

Technically Not Fair Isle

By Leigh

When I first started working on my Shetland Sampler Cardigan, I referred to it as "Fair Isle." I did this mostly because the chart I'm using is for the "Dyepot Fairisle Sweater" from Anne Field's The Ashford Book of Spinning.

Since then, I've been reading about Fair Isle, and discovered that not all 2-color stranded knitting is actually Fair Isle. I'll tell you what I've learned so far.

Fair Isle Knitting

  • Knitted in the round (traditionally with long double pointed needles). This has a number of benefits:
    • No seams to sew later
    • No purling (except for the bands)
    • Pattern is always on the right side of the work (no having to read charts backwards!)
    • Tension is more consistent
  • The body of the sweater is knitted first and then underarm gussets added.
  • Shoulder seams are grafted and then
  • Sleeves are picked up around the shoulder opening and knitting down to the cuff.
  • Steeks - Extra stitches are added at the front, shoulder, and neck openings. These are later cut open to knit sleeves and border bands.
  • Only two colors are used per round: a pattern color and a background color.
  • The unused yarn is stranded across the back of the work.
  • Strands are usually no longer than three stitches
  • Traditionally, the contrast between pattern and background colors should be consistent throughout the piece. Actual color schemes vary.
  • Designs consist of horizontal bands of symmetrical patterning:
    • x's and o's.
    • Peeries patterns of one to seven rows often separate the larger bands of pattern
    • Border patterns have nine to fifteen rows. These are used at borders or combined with peeries.
    • Stars - These have the same number of stitches and rows, often 21, 25, or 31. They can be single motifs, but often are repeated in a knitted band.
    • All over patterns
    • Seeding patterns which are used to fill in spaces between large patterns
    • Peaks and waves patterns (shaded from light to dark.)
  • Pattern bands usually contain an odd number of rows in a band pattern so that there is a center row. This center row often carries an accent color.
  • Corrugated ribbing. This is a knit 2, purl 2 ribbing which uses different colors for the knit and purl stitches.
So technically, my Shetland Sampler Cardigan doesn't qualify as Fair Isle. Which doesn't mean I like it any less; I just feel more technically correct about it. :)

My progress?

I've knit a few more inches on the Siamese sleeves, but am now very much distracted by the adjacent black and brown rows near the top.


They are just too dark together and keep pulling at the eye.

DH says it looks okay to him and to just keep going. I tried that for another inch or so, but now I just can't stand it.

Frog city, here we come.


Fair Isle Bibliography:
  • Alice Starmore, "Fair Isle Knitting" from Knitting Around the World from Threads, Taunton Press, Newtown, CT, 1993
  • The Celtic Collection, Alice Starmore, Trafalgar Square, Publishing, North Pomfret, Vermont, 1992
  • The Harmony Guide to Aran and Fair Isle Knitting: Patterns, Techniques, and Stitches, Debra Mountford, Editor, Collins & Brown Limited, London, 2000
  • Traditional Fair Isle Knitting, Shelia McGregor, Dover Publications, Mineola, NY, 1981

Related Posts:
What I Learned From My Swatch - Calculating yardage for individual FI color patterns

Thursday, April 10, 2008

A Contemplation On Knitting Sleeves

By Leigh

My Shetland Sampler Cardigan is coming along nicely. I finished spinning the lovely sample from Tina....

Lovely yearn from one of Tina's own Shetlands.
.... and have already incorporated some into the body of the sweater. Here is my progress so far:

Shetland Sampler Cardigan so far.
Since I'm going to add the ribbing last, the bottom of the sweater rolls up quite a bit, so I have to pin it flat to photograph it. It's 8 and 1/2 inches in length, so it's hard to lay it out in a single layer. Pretty soon I'll have to lay it out as a tube and pin the whole thing down in order to take a photo.

As I've been knitting, I've been thinking about the sleeves. There are two ways I could approach them. Since I'm going to steek the sleeve openings, I could wait until the body is completely finished, and then just pick up around the sleeve opening and knit them down to the cuff in the round. The advantage to this is that I would be sure that the sleeve would fit the opening (something I haven't always managed in the past.) Also, I wouldn't have to sew them in later. If I knit them in the round, then I could the jogless two color rounds that Peg Arnoldussen mentions in Essential Techniques For Serious Knitters.

On the other hand, if I knit them as flat pieces apart from the body, I could knit them simultaneously and keep track of which Shetland color I'm using for each row, so they would be the same. Also, I wouldn't have to wait until the entire body of the sweater was done to begin. That way I wouldn't have to worry about running out of a particular Shetland color. The main problem here would be that my gauge wouldn't be the same knitting back and forth. That might change the size of the pattern a bit.

So perhaps I could knit the sleeves in the round as separate pieces and sew to the body? That would keep my gauge the same. But if I want to knit them at the same time, I will need to get another 16 inch size US2 circular needle. Or maybe I could use double pointed needles. I have lots of number 2's. The idea of knitting both sleeves at the same time comforts my fear of running out of any particular color before I get both sleeves done.

One thing's for certain, I will need to knit from the wrist up, otherwise the pattern will be upside down and that won't do! So that means picking up stitches around the arm hole and knitting down is out.

For me, I've made pretty good progress so far. I'm usually a pretty slow knitter, but I'm enjoying this so much that it's easy to pick up and hard to put down. I doubt I'll be finished before our summer heat wave hits, but I'll at least have made good progress by then.


Related Posts:
Ready to Start Those Sleeves - Discovering Siamese Sleeves
Starting the Sleeves - Sleeve Increase Calculator
Shetland Sleeve Update - A look at checkerboard steeks in progress.
Siamese Sleeves Done!
Shetland Sampler Cardigan Complete!

Thursday, March 27, 2008

Rats! A Knitting Boo Boo.

I've been knitting happily along on my Shetland Sampler Cardigan, when I looked back and saw this 


I looked to see if I had somehow dropped a stitch somewhere, but couldn't find it. The rest of the pattern looks just fine.

So what would you do? Frog 3,252 stitches, or individually pull out 20 stitches, one at a time like a ladder, correct it, and then crochet the stitches back in place???

You can see which one I chose to do. :p

© 2008 Leigh's Fiber Journal

Monday, March 24, 2008

Steeking So Far

By Leigh

I've finally made enough progress on my Shetland Sampler Cardigan to post a photo.

First several inches.
I have to admit that I had one false start; there was a problem with gauge. It seems that my back-and-forth gauge is not the same as my in-the-round gauge. In an email conversation with Peg Arnoldussen, I have learned that my style of knitting is most likely the culprit. I knit continental style, holding the yarn in left hand. Evidently, this often results in a tension difference between knit and purl stitches. I've been aware of this for a long time, but never realized what the problem was!

The COWYAK is knitted in yellow (I changed colors when I made my second start), and the natural Shetland color sequence is somewhat random; trying to plan where to use my 15 Shetland yarn colors of varying amounts is more than my poor brain can handle. I felt that I was doing good just to calculate how much I need for the ribbing! What I am doing, is using the colors for which I have the most yards for the larger color sections. Hopefully by the time I get to the end I will have had enough of everything!

Steek from the backside.And the steek? So far I love it! Of course, I haven't had to do anything scary with it yet, but I like knitting it in.

It is placed where the opening of the cardigan will be. All yarns are added and cut off there. Since the steeks will be secured with machine sewing, I won't have any ends to weave in! For that reason, I am leaving my yarn ends fairly short. I'm not sure how practical this is, but to me it means less waste, and that is important with handspun. I find that I have to snug some of them up when I start a new round, but so far the whole thing seems to be holding together fairly well.

I'm a slow knitter so I don't suppose progress will be very rapid. However, I really enjoy stranded knitting, and this project actually isn't too rumply, which is encouraging. My goal is to finish it by next winter; Good Lord willing and the creeks don't rise.


Related Posts:
A Shetland COWYAK - Casting on with waste yarn.
Shetland Sleeve Update - A look at checkerboard steeks in progress.
Wound Neck Steeks
Sewing & Cutting the Steeks
Shetland Sampler Cardigan Complete!

Saturday, February 16, 2008

What I Learned From My Swatch

Fair Isle swatch from my Shetland yarns.By Leigh

WARNING!
This post is loaded with math. Read at your own risk.

I have learned a lot from dissecting my Shetland Fair Isle swatch. And the funny thing is, the process is so logical and so simple, that I wonder why I didn't figure it out for myself.

The Fair Isle pattern is from Anne Field's The Ashford Book of Spinning. The actual sweater in the book is a lovely bulky pullover knitted at 4 stitches per inch. Since I want a cardigan at 6 stitches per inch, I will need a different sweater pattern, but I've always admired this pattern.

For my swatch, I had trouble following the black and white chart, so I colored it in. There are 16 rows in one repeat, using nine colors. To figure out how much of each color I would need, I frogged my swatch and measured each length of yarn in one of these pattern repeats.

The swatch was 3.5 inches wide, so I divided the inches of yarn I used for each color by 3.5 to find inches of yarn I would need to knit for one inch of the pattern. I could then multiply this by the size I wanted for the cardigan (both body and sleeve width), and multiply that by the number of repeats I would need for the length of each.

Formula style, here's what I did:

Inches used ÷ swatch width = Yarn for 1" width

Yarn for 1" width x Sweater circumference
= Inches needed for one pattern repeat.

Yarn needed for one pattern repeat x number of repeats in sweater length = amount of yarn needed for that cardigan piece.

This amount is in inches, so divide by 36 to get yardage.

Calculate yardage for each sweater piece and total these for approximate amount needed for cardigan. Round up generously.

So, using the bottom (yellow) color on the chart as an example:
15" yarn used ÷ 3.5" = 4.3 inches used in one inch
4.3" x 42" circumference = 180.6"
180.6" x 10 pattern repeats = 1806"
1806" ÷ 36" = 50.17 yards
Rounding up, I need 51 yards of that color for the body of the sweater.

Next I'll calculate the amount needed for the sleeves as well. Adding these two together will give me the approximate yardage I'll need of that color.

I'll do the same for each of the nine colors used in the pattern, and then figure out what I need for all the ribbed edgings. From there I can choose the Shetland colors based on the amounts I have of each.

Whew! Did I say this was logical and simple? Well, maybe not simple, but it is logical. Even so, I feel better having at least some idea of the amounts I need. At the moment I'm finishing spinning the leftover Shetland rovings, plus some extra of Nikki's fleece that Cathy sent. After that, perhaps I can actually get started on the sweater.


Related Posts:
Shetland Fair Isle Gazzintas - Do I have enough handspun???
Dissecting My Shetland Swatch - Calculating for bands & cuffs
Technically Not Fair Isle - Fair Isle knitting defined.
Shetland Sampler Cardigan Complete!

Tuesday, February 05, 2008

Dissecting My Shetland Swatch

By Leigh

In the last episode of my Shetland adventure, I puzzled over my swatch, and wondered how to know whether or not I had enough of any one color for the cuffs and bands. I received a lot of encouraging support in the comments to that post, and also some helpful suggestions.

Wool Enough
suggested the "Rule of Three," which was new to me. The formula is this:

Measurement x 3 = approximate yardage per row

So, for one cuff, I'd measure my wrist, which is 6.25 inches x 3 = 18.75 inches, (but I'll round it up to 19). Depending on how wide I want the cuffs, I will need 19 inches per row of ribbing per wrist. Based on the width knitted in the swatch (12 rows), I would need approximately 228 inches, or 6.3 yards of black yarn for each cuff. The hips, neckline, and front bands could be estimated the same way.

Then my spinning and knitting friend Mary, (who isn't interested in having a blog but really should because she is a fantastic lace designer and knitter) showed me some information from June Hemmons Hiatt's The Principles of Knitting - Methods and Techniques of Hand Knitting. What a fantastic resource this book is! On page 429, it describes a way to calculate yardage of each color needed for stranded knitting. This was not especially useful to me because 1) I had already knitted the swatch and 2) I plan to be a little fairly serendipitous in my exact color choices. However, it gave me the idea of how to get an approximate idea of the yarn I would need for each color in the pattern repeat, as well as how much I had used for the ribbing. For that, I decided that I needed to dissect my swatch.

Hiatt's technique calls for knotting the yarn for the swatch at 5 yard intervals and keeping track of how many 5 yard sections are used. Since my swatch is already knitted, all I needed to do was frog the swatch and measure the amount of each color yarn used in the 16 row pattern repeat. From that I could calculate yards per inch, and from that, calculate the approximate yardage I would need for the total width of each border band. Confused? Me too.

To find out how much yarn I had used for the ribbing on the swatch, I unraveled and measured it. I discovered that I had used approximately 4 yards for 9 rows on a 3.5 inch wide swatch. Dividing yardage (4) by width of ribbing (3.5) I calculate that I need 1.14 yards for each inch of ribbing. Multiplying that by my wrist measurement (6.25) equals approximately 7 yards needed.

The two calculations are fairly close. Since I am using a fairly fine yarn, I will use the larger of the two for my yardage estimates. At the moment I am finishing spinning the rest of the black, in order to see about how many total yards I will have. Then I'll be better able to tell if I have enough to finish all the bands on the sweater.

When it comes down to the actual knitting, I plan to take Weaver Annie's advice. I will knit all the pieces using small amounts of black in the pattern, and then knit all the edgings last! I can make narrower bands if I think I'm going to run out of yarn. As you can see, I definitely plan to play it safe with this one.


Related Posts:
Shetland Fair Isle Gazzintas
What I Learned From My Swatch
Shetland Sampler Cardigan Complete!

Tuesday, January 22, 2008

Shetland Fair Isle Guzzintas

Fair Isle swatch from my Shetland yarns.By Leigh

Well, ok. "Guzzintas" isn't a real word. It's something Dan says whenever he's doing calculations for a project. He does his "goes intos," as in, 4 "goes into" 12, 3 times. Anyway, it describes what I'm working on now, as I try to make calculations about all my Shetland yarns.

So far I have measured the yardage of the Shetland yarns I've spun, and have knitted a gauge swatch.

With my swatch, I basically just doodled with my Shetland colors. At first I was concerned about trying to group like colors together, for example grays, fawns, warms, or cools. The more I knit however, the more random I became in choosing the next color. After awhile, I decided that color order really doesn't matter; I like what I see no matter which color comes next! The various natural colors work together very well. I think that overall, I will simply need to focus a consistent ratio of alternating light and dark yarns.

Another thing I noticed, was how the colors from the same color category worked throughout the swatch. For example, the two silvers.......

My 2 silver Shetland yarns.From a yearling fleece on left, and Sass on right.

...... or the three whites .......

My 3 Shetland white yarns.From left: an unknown sheep, Angie, and Aurora.

.... are subtly different when compared with one another. But when knitted randomly in the swatch, one can't be distinguished from the other. The subtle distinctions are lost in the whole.

Next I wondered what kind of yardage I would need in order to knit a cardigan. I found a very handy yarn estimation chart for sweaters at Elann.com (where you can also find lots of great free knitting patterns.) From my Fair Isle swatch, I measured my somewhat inconsistent gauge (after blocking) to average about 6 stitches per inch. (Ordinarily, I tend to knit tightly, but when stranding yarn I consciously loosen the tension to prevent puckering. Often I end up too loose, but hopefully someday I'll be more confident and consistent with stranded knitting.)

Anyway, according to that chart, I would need around 1800 meters (which is about 1980 yards) to knit a pullover or cardigan in my size.

Of the yarns from my Shetland fleece samples, I measured approximately 1809 yards. I also have an additional 4 ounces of Nikki's lovely gray fleece that I can spin if I need more. On top of that, I have the yarns from the three Shetland rovings, of which I've only spun enough to do some swatching. There is still quite a bit more roving left to spin. So overall, I should have plenty of yarn for this project.

My bigger question is, how many yards will I need for cuffs and cardigan bands? Does anyone have a ballpark guesstimate? I have to admit that I am more than a little paranoid after running out of green yarn for my Rare Breed Sweater with only inches to go. I tend favor the black for the cuffs and bands, which don't have to be wide. I may be able to manage enough yardage after I spin the rest of the roving. I'm also considering a traditional corrugated ribbing, but again, how yardage would be required? And wouldn't a corrugated ribbing use more total yardage than a plain one color ribbing? Questions! Questions!

Next, I need to start looking at Fair Isle cardigan patterns. I'm hoping to find something I like using the gauge I'm knitting at, without any further calculations on my part. I made my own design for my Rare Breed Sweater, and I have to admit that every decision was painstaking. I'd like to be able to simply follow the directions for this one. Even so, I usually end up changing something. I'll just have to wait and see.

Comments, suggestions, opinions, and answers to my questions welcome!


Related Posts:
Gallery page of my handspun Shetland yarns
Dissecting My Shetland Swatch
What I Learned From My Swatch
Technically Not Fair Isle
Shetland Sampler Cardigan Complete!

Wednesday, December 13, 2006

Finished Object Non-Gallery

Not much progress to report on the Rare Breed Sweater knitting front. Hmm, an unintentional pun.....

Rare Breed Sweater front, ready to start on the sheep feet.
I'm at a problem solving junction regarding my sheep motif for the fronts of my cardigan. More on that after I get it figured out.

Instead of that, I thought I might post photos of my other stranded finished knitting work. I love Fair Isle and stranded knitting. However, being an all thumbs knitter, I doubt I'll ever feel like I've mastered the technique. I worry over proper tensioning and am always amazed when it finally comes out right.

Many bloggers have a Finished Object Gallery of their work, which I don't have, so this post will be my

Non-Gallery of Finished Objects

2 hand spun hand knitted caps dyed with Easter egg dyes.Wool Caps

These are leftovers from my first stranded/Fair Isle knitting experiments. The wool is an unknown breed, dyed with Easter egg dyes, and handspun . The watermelon cap on the left is my favorite.

Pullover hand knit in black and royal blue handspun yarns.Sweater for Dan

After successfully knitting those caps, I bravely struck out on this more ambitious project. Knitted of handspun commercially dyed black Wensleydale top and hand dyed blue Border Leicester. The Fair Isle patterns comes from Elizabeth Zimmermann's Knitting Without Tears, one of my all time favorite knitting reads. The sweater pattern was just copied from the measurements of one of DH's favorite sweaters.


Navajo-Churro Vest designed from Navajo rugs.Navajo-Churro Vest

Next came my project for the Online Guild's Navajo Churro Challenge several years ago. The vest pattern comes from Cheryl Oberle's Folk Vests. I developed the knitted Navajo patterns from Navajo rugs. The yarns are all handspun and the colors are natural NC colors except for the hand dyed madder.

Norwegian Roses jacket from commercial merinos yarns.Norwegian Roses Cardigan

I finished this one last winter. It's more of a jacket actually. The pattern is from The Green Mountain Spinnery Knitting Book, and the yarn is KnitPicks Merino Style. It's wonderful to wear.

I've also enjoyed experimenting a little with Aran style knitting. But that's another story.

© 2006 Leigh's Fiber Journal

Monday, October 16, 2006

Rare Breed Sweater Swatches

Over the weekend I started working on some swatches for my rare breed sweater.

I have two sets of rare breed yarns to work with, one light and one dark.

The body of the sweater will be Ryeland yarn in natural white. My dark rare breed yarns will work with this:

Naturally dark colored rare breed yarns.From left they are: Ryeland (white), Manx Loghtan, Hebridean, Shetland, Lincoln, Soay, Jacob, and 2 colors of Navajo Churro.

I also have quite a few white and light color rare breed yarns. As a background for these, I dyed some of the Ryeland green:

Light rare breed yarns in natural colors.From left, these are: Ryeland (green), Teeswater, Wensleydale, Tunis, White Faced Woodland, North Ronaldsay, Leicester Longwool, Cotswold, and Karakul.

Using this motif, which measures 16 by 16 stitches, I will have enough different types of yarns for 2 rows of sheep on the body of the sweater.

This is a sketch of the design idea I'm considering:

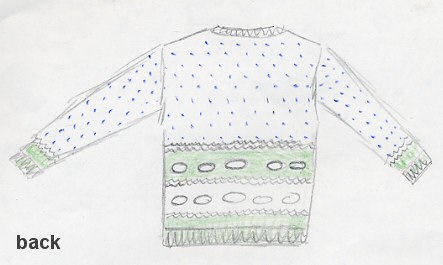
Leigh's sketch for her rare breed sweater.My plan is to knit a cardigan so this view is from the back. I have some dark blue Hog Island yarn which I plan to use for the seeding pattern and as an accent in the transition pattern between the stripes of sheep.

It's been this transition I'm working on at the moment. So I've been knitting strips to experiment with possibilities:

I haven't decided which I like best. Perhaps I'll knit a few more. I tend to want something simple.


I'd like to be able to say I'll finish the sweater this winter, but I know myself too well. I'm pretty much an "all thumbs" knitter and so tend to knit slowly. I'm usually good for one sweater or vest and several pairs of socks each year. And with the kids in college our lives have changed. In the winter my knitting time used to be in the evenings, when we would read aloud rather than watch TV. Our favorite books then were the Little House series, the Ralph Moody series, Watership Down, and Rascal by Sterling North.

So with the daylight hours dwindling and long evenings of dark ahead, perhaps a trip to the library for a good book on CD is in order. Any suggestions?

© 2006 Leigh's Fiber Journal

Related Posts:
Winter Knitting Project
TA-DAH! Rare Breed Sweater Done!