Showing posts with label log cabin. Show all posts

Thursday, December 12, 2024

Of Finished Objects and What To Do With Them

I have an old wooden "trunk" that is filled with my handwoven projects and samples. Lots of samples, and lots of scarves and dishtowels, with a few table runners and mug rugs, plus some yardage. 
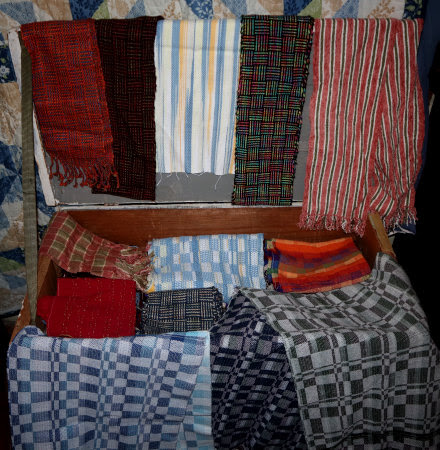
Once upon a time, Dan and I had an Etsy shop for my handwovens and his pyrography. I think something like this is a logical conclusion for artists and artisans. We create because we love to and then have to figure out what to do with it all. We tried craft fairs and then Etsy, but either way we sold little and eventually dropped it. What can't be sold is either given as gifts or packed away after walls and wardrobe are filled to the brim. 

After sorting the trunk contents for the umpteenth time this year, I decided to start using some of it as Christmas gifts. My daughter-in-law and granddaughters are getting scarves for Christmas! 

Christmas scarves in log cabin weave

The two scarves in log cabin weave are for my granddaughters. I alternated black with a variegated yarn of red, white, and green. It is reminiscent of both log cabin and plaid. Ish.
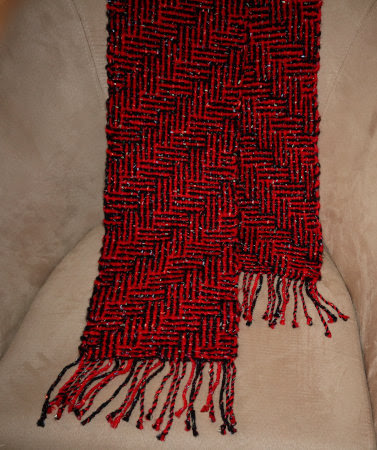
Christmas scarf in shadow weave

The shadow weave scarf is woven with novelty yarns that have fine ribbon plied in. It will be a gift for my daughter-in-law.

I don't even know if they'll like them, but I've got so much stuff in that trunk that I don't care! LOL Time to spread the wealth around. 


Related posts

Saturday, June 24, 2006

b2f Log Cabin Weaving

By Leigh

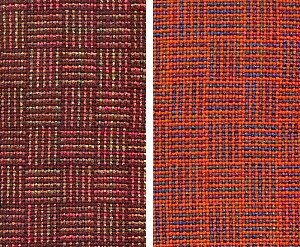
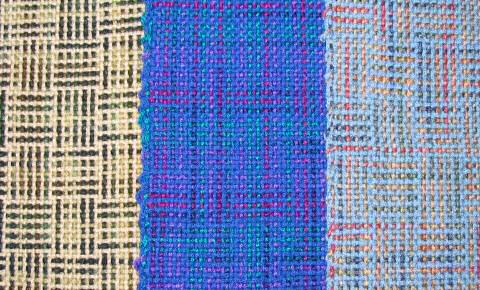
My fabric is off the loom. And not only that, but it’s been washed, ironed, and measured. In fact, here it is:

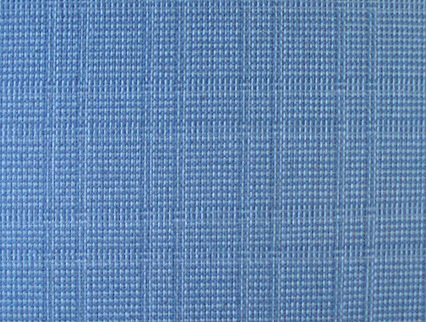
My handwoven log cabin fabrics.


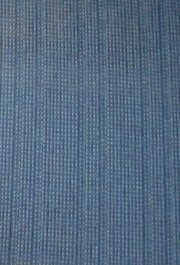
The two are from the same warp of 16/2s cotton sett at 24 epi. I wove the piece on the right first, as drawn in. For the one on the left, I used only the dark blue for weft. Oddly, the two fabrics shrank to different widths, with the stripes measuring 32 inches after washing, and the log cabin at 33 inches. (?)

What I didn't do was put them in the dryer. It's traumatic enough to put my handwoven fabrics into the washing machine; I just couldn't handle the possibilites of what the dyer might do to them! So they were line dried.

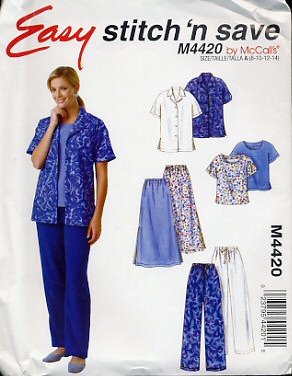
Happily, they didn’t shrink too much and my pattern pieces fit the cloth. I plan to make a striped skirt and log cabin top from this pattern:

Sewing pattern for my handwoven fabrics.


Since I’ve not used this pattern before, I plan to work it up with some dollar fabric before I cut my handwoven. Better to find out about pattern adjustments on the inexpensive stuff!

As I’ve experimented with log cabin weaving for the past two months, I’ve made some observations. I’ve noticed two factors which influence its appearance: first, the number of warp ends in the blocks; second, the joins.

In the photo below, the sample on the left has an odd number of ends and the one on the right has even.

Handwoven log cabin scarvesWhile both give the impression of being woven with striped ribbons, there is a difference in the definition of the "squares." The sample on the left is more flat looking while the one on the right almost looks as though the ribbons cast a shadow; it has a more 3-dimensional appearance. This detail could make an interesting design factor.

Since the example on the left has an odd number of threads in each block, then the first and last warp ends are the same color. In this case dark - DLDLDLD. But the sequence could also begin and end with light threads - LDLDLDL, so that the joins would be light. Compare below:

More handwoven log cabin scarves.A painter is taught that one’s eye is drawn to light and to use it to direct the viewer's attention. But in these samples, I find that my eye is drawn to the dark colors. Perhaps it’s simply because I like the pieces with the dark joins best. I think they define the “ribbons” better. Again, this is another factor I'll keep in mind the next time I weave log cabin.

Beyond color, I wanted to experiment with variations in the block sizes. The result of this experiment is the yardage I’ve just taken off the loom. My inspiration for this was initially Helene Bress’s The Weaving Book page 16, then Margaret Winderknecht’s Color-and-Weave II page 77, and finally my WinWeave software (where I worked out a compromise.) More recently I’ve gotten my hands on a copy of G. H. Oelsner’s A Handbook of Weaves, and discovered some log cabin variations on pages 352 to 355. These too have piqued my curiosity.

But I have problem. It is that whenever I weave, I constantly wonder “how would it look if I did this,” or “what would happen if I changed that.” So before one thing is off the loom, I have already planned the next 2 or 3 variations I want to try. My imagination seems to have no limit as to possibilities and I sometimes think I could spend my entire weaving life exploring one thing. But there are so many weave structures and color effects to explore that eventually I have to make myself stop and try something different. So it is now. Though I still have lots of ideas, I’m going to set log cabin aside and come back to it another day. It's time to explore something else.

Next ...... Evaluating My b2f Warp


Related Posts:
f2b Versus b2f - Beginning of this series
Evaluating My b2f Warp
B2F Warping - Still Tweaking
B2F Vs. F2B - Why I Switched

Tuesday, June 13, 2006

Weaving Right Along

By Leigh

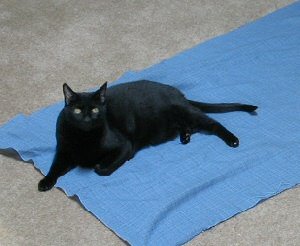
Of the two fabrics I have planned for this warp, I have completed the first and taken it off the loom, as you can see:

My helper is at it again.


I could have left it on and simply started weaving the second, since they are using the same warp, but I was a little concerned about my warp tension, especially on one side. When I first tied my 2-sticks to the front apron rod (see b2f, Weaving the Header, June 4, 2006) I put ties about every 3 inches or so. However, I didn’t feel like I'd gotten all the ties evenly tight, especially on the right side, and in fact the warp was a little loose on that side.

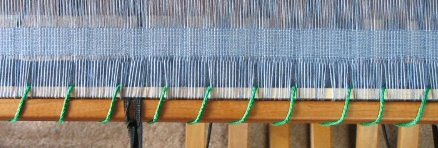
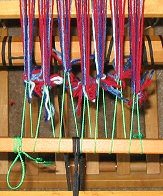
So once I finished the required amount for the first fabric, I wove in two more sticks, and cut off the first fabric. This time lashed the sticks to the apron rod:

This time I lashed, instead of tied, the sticks to the apron rod.


Happily, my tension remains even across the warp as I begin my second fabric. This time I’m using only one color for the weft, the darker blue, creating vertical stripes from the log cabin variation warp pattern. I guess one could call it a log cabin stripe.

My log cabin stripes.Charleen asked what I’m going to do with my yardage. My plan is to make a top with the log cabin pattern and a matching skirt with the stripe, at left. (I wasn’t too keen on a plaid-like skirt, wanting longer, slimming type lines you know ;). Of course, this plan will depend on how well the washing machine cooperates with what I planned for shrinkage!

In regards to shuttle throwing, I’m think I’ve got my problem licked. I’ve worked hard to keep my throw straight and even, (though I do throw a wild one once in awhile.) I’ve learned to keep my warp tension as tight as I can and have also experimented with my different shuttles. I found that my 11 inch Norwood works the best.

With all this, I continue to be very happy with the back to front method of warping my loom. Even so, I'm still holding my breath until I get to the end of my warp!

Next ..... b2f Log Cabin Weaving


Related Posts:
b2f - Warp Sleyed
b2f - Weaving The Header
Weaving Progress
b2f Log Cabin Weaving

Friday, June 09, 2006

Weaving Progress

By Leigh

I’m pleased to report that after a slow start, I am finally developing a weaving rhythm. Here’s what it’s looking like:

A log cabin variation in 16/2s cotton.


I’ve woven about 52 inches so far. Since this is yardage, I don’t have to worry about joining new weft ends, floating selvedges, or selvedges in general (though why is it that selvedges turn out nicest when one doesn’t have to worry about them? )

My biggest problem in the beginning was randomly skipping under extra warp ends. This proved to be frustrating as I did a lot of unweaving initially. I wondered about uneven tension and sticky warp ends, but in discussing it with Peg, I realized that it had to do with throwing the shuttle. I began to figure out that the extra warp ends coincided with an uncontrolled throw of the shuttle.

Mind you, I haven’t woven the full width of my loom (36 inches) but once and that, several years ago! Most of my pieces are scarves and sample strips, 12 inches wide at the most. In fact when I’m doing sample strips for design boards I omit the shuttle altogether and simply pass the bobbin from hand to hand through the shed.

Once I started concentrating on improving my shuttle throwing technique, things improved rapidly, though not without an occasional wild throw even now.

I’ve realized that one factor in this is that I’ve not fully recovered from Adhesive Capulitis of my left shoulder. It was at it’s worst during the second half of 2005. Not only was I in constant pain, which nothing could relieve, but I had severely restricted mobility of that arm. It isn’t called “frozen shoulder” without reason! I couldn’t weave or knit, though I did manage one handed spinning once in awhile. For the most part I felt quite useless!

About 6 months ago the pain lessened considerably and mobility began to improve. I’m still not 100% however, and can’t move my arm into certain positions, but I'm usually not aware of it anymore except when trying to do certain things such as put on something over my head, or catch the shuttle on that side. I suspect it may interfere with throwing the shuttle from the left, but it isn't anything that I can't overcome.

Looking at the bright side, all of this has caused me to pay more careful attention to my weaving technique: not only how I throw the shuttle, but how I wind the bobbins, and how I treadle. I see the fruit of this care in my weaving. So there is truly a silver lining even in the darkest cloud. Especially if I will be a better weaver for it in the long run.

Next ...... Weaving Right Along


Related Posts:
b2f - Warp Sleyed
b2f Log Cabin Weaving

Friday, June 02, 2006

b2f, Warp Sleyed

By Leigh

I feel like I’m finally getting somewhere! My warp is finally sleyed, all 864 ends of it.

My warp is finally sleyed, all 864 end of it.


So far I’m thoroughly sold on warping back to front. Threading the heddles was much, much easier and so was sleying the reed. Although it was a little confusing at first to figure out the order of my ends, since the cross was on lease sticks, I’ve had much less difficulty keeping everything in order.

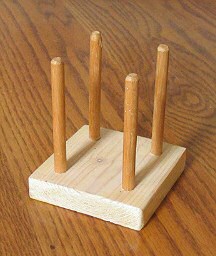
Homemade warp cross holderWhen warping front to back, I would hold the cross either in my hand or in a one of those homemade things pictured at left, (which I’m sure has a name but I don’t have a clue as to what that name is. I would tie it to my breast beam to hold the cross while I sleyed the reed.) However, it didn't matter which way I held the cross, fine or slippery warp ends could slide around or slip down, and I would often have trouble figuring out which one was next.

In warping b2f, the cross is on lease sticks, which not only keep the warp in strict order, but also enabled me to walk away as necessary. I could come back and pick up where I left off with no problem.

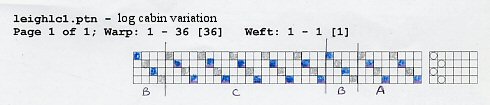
Leigh's log cabin variation draft.


My draft is a log cabin variation which I worked out on WinWeave. I found one log cabin variation in Helene Bress’s The Weaving Book. However, when I worked up its drawdown on WinWeave I wasn’t satisfied with it and began doodling. Eventually I came up with one I liked and am using it. The treadling will be tromp as writ (aka as drawn in. IOW it is treadled the same way it is threaded.) Since the colors alternate across the warp, I was able to measure the two colors together. I only had to take care that I was threading in the correct color order. I have checked, checked, and double-checked, so hopefully I got it right.

Next ....... b2f, Weaving The Header

Monday, May 15, 2006

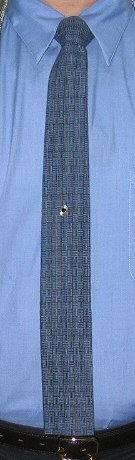
Log Cabin Necktie

Log Cabin Necktie.Over the weekend I finished the first of my log cabin projects, a necktie for my husband. This is the fabric you saw on the loom in my “Log Cabin Project” entry for May 5th. I wove the fabric with 16/2s cotton, sett at 30 epi in order to get a fairly firm fabric for a necktie. I used McCall’s pattern 9469.

This is the first time I’ve sewn with my handwoven, and I had to deal with several concerns. My first was that I couldn’t weave fabric wide enough to cut the tie on the bias, as the pattern called for. My second concern was building up the nerve to put the scissors to it!

Regarding the fabric width, I decided to press on and cut out the pieces lengthwise. I know this goes against conventional sewing wisdom, but in weighing out the possibility of no tie versus a tie not cut on the bias, I went with making the tie the best I could.

Detail of tie fabric.Regarding working up the nerve to cut into my handwoven fabric for the first time, well I relied on the support of several of my weaving friends! I was relieved to discover that it didn’t immediately unravel, but with careful handling behaved nicely until I could stabilize the edges with a straight stitch around the pieces.

The only other thing I decided not to do in regards to the pattern instructions, was to sew right sides together and turn through a small opening left in the seam. I didn't want to put any extra pull or wear on my fabric, so I simply folded the edges and hand sewed the seam.

Dan was pleased to be presented with a tie made to his specifications in a pattern and colors he likes, and I’m just happy that it turned out so well!


Related Posts:

Friday, May 05, 2006

Log Cabin Project

By Leigh

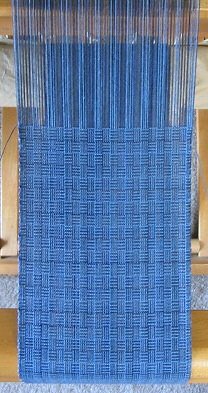
Having explored a number of ideas and woven quite a few log cabin samples, I decided to finish my study with at least one project or two. With the Online Guild’s silk spinning workshop going on this month, I wanted something on the loom for awhile so I could concentrate on spinning. So this seemed a good time to complete my study with a project on the loom.

This is 16/2s cotton, sett 30 epi, a narrow piece of only 192 ends. The dark is variegated navy, dark blue, and dark gray. I don’t know if you can tell it from the photograph, but the close up effect is more three dimensional to me that 2 solid color yarns. I still haven’t decided yet how well I like it! What will it be? Click here to find out.


Related Posts:
Log Cabin Necktie

Monday, May 01, 2006

A Fortunate Mistake

Ann and I had been comparing pictures of our log cabin twills when she commented to me that mine looked different from hers. And it was. Hmm, I wondered, why was that. Several factors came to mind: yarn, sett, or number of “logs”. But I wasn’t sure any of these were the correct answer.

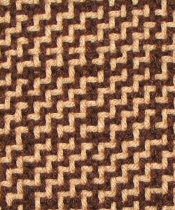
The "real" Log Cabin Twill.After contemplating for a while, it finally occurred to me to go and put my granny glasses on and take a closer look at the draft. Looking more carefully, I realized that the stripes of color on it were not one end each as I first thought, but two. Ahh, so that was it!

I immediately set out to weave another sample, this time following the draft to the letter. As you can see, the effect is different. The cleverness of doubling the end colors is that it preserves the log cabin look, where as mine were single ends of color, resulting in a totally different effect. My warp order was the same as traditional log cabin, but the twill structure revealed an step-like appearance which had fascinated me as I wove it.

My first interp of Ann's draft.Of course, all this only validates the adage that we, as fiber and textile artists, don’t make mistakes, we simply create design elements. I suppose that the transition between the two depends upon how well we can transform that mistake into a desirable outcome. For myself, I only wish all my design elements turned out so well.

Friday, April 28, 2006

Log Cabin Controversy

Well, it wasn’t actually a controversy. It was just a question, something along the lines of “where does blue end and purple begin?” What I was wondering was, at what point does log cabin morph into another color and weave effect?

Peg and I were having an interesting discussion about log cabin, and I started to wonder: What are its absolute bottom line elements? Does log cabin become something else when the weave structure changes, even though it keeps log cabin color patterning in it’s warp and weft? What happens when one starts playing with the colors pattern?

I had only picked up bits and pieces of an answer from various sources, so I shifted into research mode. I discovered that opinions varied somewhat. Not everyone seemed to agree on all the elements, but the consensus was that technically log cabin is a color effect on a plain weave structure.

After all that I pondered, so what, does it really matter? Well, in regards to artistic considerations probably not. In regards to teaching, I’d say yes. In regards to communication about weaving in general, it depends upon the communicators! For example, if you hadn‘t seen my log cabin twill samples, how would I describe them to you? Which explanation would mean more to you: “It’s a two block two color, color and weave with alternating blocks beginning and ending on different colors and the ends within those blocks alternating colors,“ or “It’s a log cabin twill.“?

That said, here are some more of my log cabin effect twills…..and beyond. :)

3 more LC twills
The variegated yarn in the all three samples is the same. The sample on the right obviously used three colors of yarn.

Claimed by Rascal
And as you can see, I was plagued by more than just philosophical questions.

Wednesday, April 26, 2006

Log Cabin Twill

My friend Ann sent me a draft for log cabin in twill, so I decided to explore this direction next. Here is my first set of samples.

BoringSince I had basically used the same color scheme with all my plain weave log cabin scarves , and since I didn’t want to appear stuck in a color rut, I decided to try something different. The colors for my first sample were chosen simply because these were the two I liked together best It is woven in a straight 2/2 twill.

The result is quite unexciting because the log cabin look has disappeared. Even so it is not unpleasant to look at if one likes blue and green.

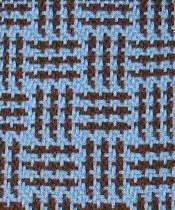
InterestingSo for my next sample, I chose yarns with contrasting color value.

With these color choices the pattern popped out and I was fascinated! Even though I’m not crazy about browns, I really like this sample.

Warming up to the effect, I decided to try a sample in twill and reverse.

IntriguingAnd I'm off and running (weaving!) The more I weave, the more ideas I want to try. Next I will do a little color experimenting. More samples coming soon……………….

Thursday, April 20, 2006

Log Cabin Color Effects

My fascination with color is what keeps me weaving. Watching color patterns and effects unfold before my eyes can keep me entertained for hours. Here is what I’ve observed from using various space dyed yarns with my log cabin weaving.

Classic looking log cabin.

Classic looking log cabin scarves
This used yarns with short intervals of changing colors.

Stripy looking log cabin.

Stripy looking log cabin scarves.
Yarns with a longer, but regular spacing of colors created horizontal stripes.

Pseudo-plaid log cabin.

Pseudo-plaid log cabin scarves.
To me, these are more plaid-like. The color spacing of the yarns was long but irregular. The plaid like effect is strongest in the middle scarf, where the color values of the yarn closest.

Of all these samples I think I like the classic looking log cabin best. Will tuck this preference away in the back of my mind for some future painted yarn weaving project.

Tuesday, April 18, 2006

My Learning Plan

Log Cabin ScarvesI learned to weave 6 years ago. I took a one day workshop which not only introduced me to the steps involved in weaving, but also offered an opportunity to try various types and makes of looms. After that came classes in basic twills, an Atwater-Bronson lace shawl, and doubleweave. Online Guild workshops have included tapestry weaving, triloom weaving, and an introduction to overshot. However, I always felt that I was missing something by this haphazard approach to learning weaving.

It was an Online Guild member who mentioned that she had learned to weave by working her way through Deborah Chandler's Learning to Weave. This sounded like a good idea to me, so I have adopted this plan in hopes of filling in the both my experiential gaps as well as my knowledge gaps.

I decided to start my organized approach to self taught weaving with the log cabin structure. Having seen several examples which used space dyed yarn and because of my love for color, I wanted to do the same. I've been working through a variety of color combinations with a series of scarves.

One of my biggest frustrations when I started weaving were getting the tension even (welcome to the club, right?). I have woven miles of smiles in regards to fell, and miles of frowns in regards to my face!
Lashing on to the front apron rod
The thing that helped tremendously was learning to lash the warp on to the front apron rod instead of tying on. Peg introduced me to this method a couple of years ago, and after a little practice I discovered it was much easier to achieve an even tension with this method. Things improved quite a bit after that, though I still admit that I have occasional problems.

Joining a new weft by unplyingOne new thing I decided to try with this series of log cabin scarves is the way I join a new weft. I've tried overlapping and tucking in, but wasn't completely with the visible results. I've also tried simply leaving weft ends hanging out of the selvedges to be cut off later, but never felt very secure with that, unless the fabric was to be used in a sewing project. I never tried unwrapping the plies because that seemed too fussy, but decided to give it a try anyway. Now I am finding that it gives the nicest visual results, so I'm happy that I gave it a try.