Wednesday, January 18, 2023

Visible Mending: Barn Jacket

Studying Japanese mending seemed to open up a whole new world for me, and I wanted something to experiment on. I had just the thing in mind, too, my old barn jacket. At one time, this denim jacket was my favorite fall and spring work jacket, and I wore it for years. It has a warm fleecy lining and the outer fabric is denim, which I love because it wears well and isn't prone to getting straw and hay stick in it (a huge plus when one works with barn animals!). Gradually, it got torn here and there, and the cuffs began to fray.

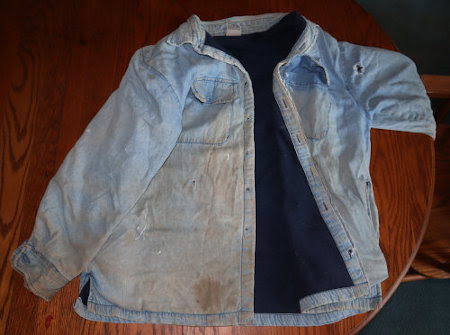
Lots of small holes on the jacket front and sleeves.

But it wasn't until it got a big tear in back that I stopped wearing it. 

Big rip in the back.

By that time, the denim was badly torn, worn, and stained in too many places anyway. The jacket wasn't even fit to donate to the thrift shop, and I decided to discard it. I went so far as to cut off and save all the buttons, but I just couldn't bring myself to throw it away. Instead, I buried it in my mending box.

I pulled it out a few years ago when I needed a mending project for a Permies SKIP merit badge. SKIP is a free online program at permies.com, for learning homesteading and permaculture skills. That link will tell you all about it and what's offered, so here, I'll just add that it's an excellent resource for learning, documenting, and sharing a wide range of skills. In this case, I was working on the first textiles badge and needed to sew on a patch. The jacket was perfect.

A series of tears on the underside a sleeve.

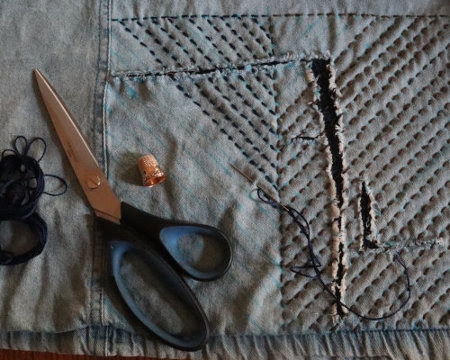
Even then, I got a bit creative in stitching down the large patch.

As I worked on it, I remembered how much I liked this jacket. But there was still a lot that needed mending, so I stuffed it back into the mending box and forgot about it for several more years. Until I was stuck inside due to inhospitable winter weather and came across several interesting YouTube videos about visible mending. I pulled the jacket out again and gave it another look. It would be a good canvas for learning and experimenting!

The next time I was at the thrift store, I found some patching fabric that I liked. Actually, it was a pillow sham that I got for $1. I took it apart and gave it a good pressing. Perfect. 

Then I made a start. The biggest tear was first, although it wasn't too bad when I spread out the jacket and laid the pieces back in place. 


The lining was in good shape, so I sewed the torn parts onto the lining with sewing thread and drew out my top stitching lines with a fabric marker.


From boro, I learned that it's okay to have patches and stitching overlap, like the patch above, which I added to support the pocket.

From sashiko, I find the concept of working only in running stitch intriguing. I like the mental challenge of figuring out my stitching path with the fewest cuts and knots in the thread.


Once the creative ideas started flowing, I added some embroidery to my first sleeve patch (and patched a few more holes). 


Jacket right front with two patched tears.

I stopped thinking about simply covering holes and tears, and began to think more about the overall affect on the jacket.

Below is a patched and embroidered hole on the other sleeve.

In the first picture you can see the hole in the left sleeve.

One problem that developed was because the outer jacket fabric and the lining have different fiber contents. That means they shrank at different rates! It wasn't terribly noticeable before, but the patches and embroidery cause the denim to pooch out in some places.  


On the one hand, this is just an experimental project on a barn jacket, so, so what? But it was a challenge and I wanted to rise to it. As Bill Mollison, the Father of Permaculture says, the solution is in the problem. I thought about this and settled on a sashiko design that I thought would work.

I smoothed out the outer fabric as evenly as I could and pinned it to the lining. Then I added lines with my fabric marker.


With variegated embroidery thread, I'm working a pattern that will distribute the denim more evenly over the back of the jacket without puckering.

A problem becomes a design element! The result will be a quilted look that stabilize the fabrics. 

Another problem is that, apparently, I don't have full ownership of the jacket. 

What's a human to do?

Between mending my jacket and some knitting, my cold and rainy days are interesting and productive. Maybe I'll be able to wear the jacket again this spring. 

Saturday, January 14, 2023

Japanese Mending

Mending is an ongoing job (our lifestyle is hard on clothes), and a good task for when the weather is too cold or rainy to do outside things. It has a utilitarian nature and so tends to be tedious, but I prefer the mindset of longevity through repair rather than buy, buy, buy. Plus, I like hand sewing.

When I discovered "visible mending," I was delighted to realize I can put a creative twist on a mundane chore, because it transforms a potentially boring task into something fun and interesting. Like when I mended my barn gloves, I used variegated embroidery thread and enjoyed the plaid-like patterns it made. Another example, when I hang laundry on the line to dry, I like to hang items in a color pattern, like a rainbow. The challenge is, can I do it? I try, for no other reason than it amuses me during an otherwise tedious job.

Two of the visible mending techniques I've discovered in exploring YouTube videos are boro and sashiko. These Japanese techniques are currently very popular with the needlework crowd, so if you're a stitcher, you're probably familiar with them. As a longtime embroiderer and patchwork quilter, they appeal to me immensely. I was curious to understand them better and started exploring videos. 

The best of these videos are by Atsushi Futatsuya. He is a native Japanese from a sashiko family, who lives and teaches sashiko in New York. He's the most authoritative source I've found. He has a YouTube channel, 刺し子 物語 & Sashiko Story, and website, Upcycle Stitches

From Atsushi's "Sashiko Story" video series, I learned not only about the tools and techniques of boro and sashiko, but was also introduced to the Japanese cultural significance and identity of these skills. 

Public domain image of late 19th century child's boro sleeping mat

Everything that follows below are the beginnings of my understanding.

Here's a close-up of the above

Boro could be translated as "tatters" and describes the overall patchwork look of boro textile repair.

Another close-up

Sashiko means "little stabs," which describes the running stitch used to hold the layers of fabric together. Originally, the stitching served to strengthen and reinforce the fabric (like quilting). 

And another

Fast forward to today, and we see boro and sashiko are still mending techniques that have became more focused on the decorative aspect. They have become an art form in their own right. 

Even so, the precise origin of these crafts is vague, so there is a lot of speculation and opinion out there. Most sources agree it likely developed in rural Japan, at a time when fabric was expensive to buy.  That meant fabric was scarce and valuable. It was used and reused out of necessity. 

This kind of necessity is foreign to us moderns because fabric and clothing are now cheap and readily available. I buy almost all of Dan's and my clothing off the dollar rack at thrift stores. Much of it is never or barely worn! I buy a lot of fabrics at thrift stores too, and because these are so abundant and so cheap, it almost seems to make mending and clothing repair obsolete. Just cut up the old stuff for rags and use them instead of paper towels. 

From many of the videos I've watched, however, I'm seeing a shift of motive toward environmental responsibility. The clothing industry is excessively wasteful and fueled by fads. Mending, repairing, re-using, and re-purposing are ways the consumer can make a difference. And if the process can be creative and fun, so much the better! Hence the popularity of visible mending. 

Besides the cultural importance, what distinguishes sashiko from other forms of needlework?

  • Patterns are built with running stitches, which are stacked on the needle before pulling it through the fabric.
  • Traditionally, special needles, thread, and thimbles are used.
    • Sashiko thread is spun to make it sturdier for repair and longer-wearing than embroidery thread.
    • Needles are sharps and long enough to pick up several stitches before pulling through the fabric.
    • Needle eyes are narrow but long enough to accommodate multi-strand thread.
    • Thimble is a ring aka palm thimble. It's worn like a ring with a metal plate or leather flap on the palm side of the hand. It's used to push the needle through the many layers of fabric.
  • Traditional color is indigo blue, although nowadays, anything goes. 

Bibliography:
Japanese Mending © January 2023

Related Posts:

Thursday, January 12, 2023

Knitting a True Mobius Scarf

Mobius, also known as mobius strip, mobius band, or mobius loop, was named for German mathematician August Ferdinand Mobius, who while probably not the first to discover it, nonetheless gets the credit for it. It is considered a non-orientable surface because the loop contains a half-twist. Clear as mud? Me too, but it's fun to knit, even if it's a bit baffling. Maybe explaining why I'm calling it a "true" mobius will help. 

Some instructions for making a mobius scarf say to knit or crochet a regular rectangular scarf, bind it off, give one end a half-twist, and then sew the two ends together to make a loop. A "true" mobius, on the other hand, knits the half twist into the scarf. After it's cast on, you start knitting and keep going. No beginning and endings; no rows to count. By the time you get to where you started, you've knit both edges of the scarf. So, you just keep knitting and knitting until you decide it's wide enough. Then bind off and it's done. 

For my scarf, I found a lovely yarn in my stash that I was fortunate to receive from someone else's stash remnants purge. The yarn is beautiful and I thought would make a perfect winter scarf.

A lovely space-dyed mohair wool blend worsted single yarn.

The pattern I used was "Knoop" from Knitty.com. The tricky part is the circular needle cast-on because both edges of the scarf are cast on simultaneously. For that, I found Cat Bordhi's wonderful video, Intro to Moebius Knitting.  Since size was arbitrary, I used US8 needles, as recommended on the yarn wrapper. 


Once I got the first couple of rows under my belt, it was easy after that. The amazing thing is, you're knitting both long edges of the scarf as you knit around the circle.

A stitch marker helps keep track of when the circle is complete.

Since there's no official beginning and end to the scarf, it's knit for whatever width is desired.

Casting off

Now you can see the knit in half-twist. 


This makes a fantastic winter scarf doubled, because there are no ends to flop around and fall off your shoulder!


The wool-mohair blend was wonderfully warm. One loop can be worn over the head, with the other around the neck. A shorter mobius could be worn as a cowl. There are a lot of possibilities for how to wear a mobius scarf. 

© 2023 Leigh's Fiber Journal