Showing posts with label fringe. Show all posts

Monday, January 29, 2024

Su-chan Sample Cap Done

This is a sample cap because I wanted to test drive the pattern before investing handspun yarn on it. I was especially interested in the woven fabric size and final fit of the constructed cap.

The fabric wove up quickly. I'm listening to In the Kingdom of Ice by Hampton Sides on CD, and it's a first class "can't put it down" story. I finished the weaving before I finished the book.

Weaving notes
  • My planned finished length was 23 inches, so I wove it 25 inches to allow for take-up. 
  • On-loom width was 13 inches. 
  • My fringe on-loom was about 10+ inches.
  • I didn't hemstitch, and so had to take care with the first and last weft threads so they wouldn't unravel.

Construction

Three warp threads along one selvedge are separated out on both sides and
 pulled to gather the fabric on that edge. This becomes the back of the cap.

The fabric is folded in half lining up the two selvedges. The fringe
is braided, making sure to use threads from both sides of the cap.

My warp was a plain beige, so to make the braids more
interesting, I added strands of my novelty weft yarn.

The front selvedge of the cap is folded back and the cap is ready to wear.

Trying on for fit

The braided fringe can be worn in the back or on the side.
  • The fit was an exact fit on my head, but I didn't like the snuggness. Wool yarn would have offered more give than the yarns I used, however.
  • Also, I would like less slouchiness, which is a reflection of fabric width.
  • And I'd like the opening from the gathered edge to be less open.
  • I like that it can cover my ears (something my current knitted cap doesn't do).

Changes to make
  • A little longer and narrowier on the loom
  • Wool for warmth and stretchiness
  • A colorful warp for more colorful braided fringe.

The braided fringe is a very fun feature. I can see using beads, bells, feathers, or charms braided in for a dressier look. 

Once again, sampling pays off.

Friday, July 03, 2009

Beaded Fringing

By Leigh

I confess. I haven't done anything with those socks. The suggestions and tips you all gave me were extremely helpful, but the fact of the matter is that correcting them will require too much thinking. I'm simply too busy to do much thinking these days.

However, thanks to some very cool fringing instructions over at Lynette's blog, I have this to show......

You may or may not recall that this is the cotton and rayon, summer & winter scarf I wove in an unsuccessful attempt at differential shrinkage. I still liked it however, especially the reversibility.

This is the first time I've tried working with beads like this. The method is easy but I confess thought that it is slow going because I am twisting the fringe by hand. Someday I'll get a fringe twister, but probably not any time soon. Even so, it's a relaxing activity in the evenings, doesn't require too much energy or brain power, and I'm liking the results. I don't usually wear scarves, but this one I think I actually will.

Posted 3 July 2009 at http://leighsfiberjournal.blogspot.com

Related Posts:
At Last, Actual Fiber Content :)
One Thing Leads To Another
Differential Shrinkage Fail
Slo-Mo Fringe Twisting

Friday, September 19, 2008

Plain Weave Shawl

By Leigh

Is finished!

Leigh's handwoven slubby, plain weave shawl.
The particulars:
Structure: plain weave
Yarn: Cotton flake of unknown size
On loom size: 24 by 85 inches
Finished size: 20 by 74 inches, not including 6 inch fringes
Wet finishing: Warm water soak about one hour followed by several minutes of machine agitation. Machine dry on medium for about 30 minutes. Laid flat to complete drying.

Close-up of shawl texture
Here is a close up of the visual textural I got from the slubs in the yarn. The thick and thin of the yarn also gave me a slubby looking, uneven selvedge, which is in character with the shawl overall.

I pondered quite awhile over the fringe. I liked the appearance of the yarn, so I had hopes of a loose fringe. The problem with a loose fringe of course, is unraveling. In the photo below, you can see how I prepared to give loose fringe a try.

Preparing for a loose fringe
On the left, you can see my hemstitching. I used a 10/2 natural cotton, which gave a neater appearance than using the slub yarn. I left about 8 inches of warp unwoven before weaving in another inch of plain weave. After I took the shawl off the loom, I used my sewing machine to run a row of zig zag across that inch of plain weave. This let me wet finish the shawl without messing up the fringe.

After the shawl dried, I cut off that zig-zagged part and knotted the ends of the fringes. Usually knots don't look well on fringes, especially fine yarns. However the yarn was so slubby anyway, I didn't think the knots would be too noticeable, but would still help keep the yarn from unraveling. Here's how it turned out.

Close up of the fringe
I don't know yet how well this will wear, but I think with gentle hand washing and lying flat to dry it should be okay. I also want to mention that it's thicker and heavier than I expected, but it is wonderfully warm and soft.


Related Posts:
Good Ol' Plain Weave
Undulating Shadow Weave 3 - Finishing - one way to cut fringe

Friday, October 06, 2006

Undulating Shadow Weave 3 - Finishing

After my somewhat successful hemstitching experience, I have cut my undulating shadow weave off the loom.

I wet finished it in cold water. I let it soak for about half an hour in the washing machine, agitated briefly, and then put it on the spin cycle. I ironed it while still damp. This softened the fabric beautifully.

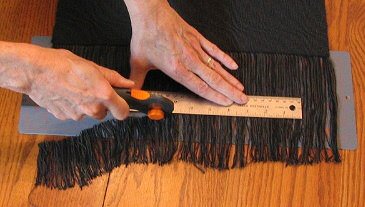
To cut the fringe, I finally broke down and bought one of these....

Rotary cutter & self-healing cutting mat...... a rotary cutter which I found in the quilting department at the local big box store. It made trimming the fringe a breeze.

Using a ruler to make a straight cut.I think this is the first time I actually got even, straight fringe. No more eyeballing with scissors for me!

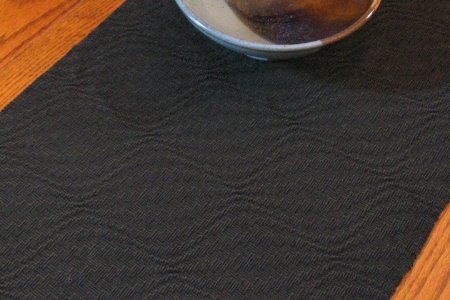
So here it is:

Undulating shadow weave in 8/2s black & 16/2s green cotton.In looking at it I'm now thinking more of a shawl than a table runner. Either way I am very pleased with it and interested in exploring undulating shadow weave a little more. I have a few ideas to vary it somewhat, so hopefully I'll have another project on the loom soon.

Next - Weekend Weaving - Shadow weave with novelty yarn


Related Posts:
Shadow Weave Profiles
Undulating Shadow Weave 1 - Weaving
Undulating Shadow Weave 2 - Hemstitching
Shadow Weave Samples 1 - Begins the series of samples

Tuesday, April 25, 2006

Slo-Mo Fringe Twisting

By Leigh

I really like the look of twisted fringe. Unfortunately, the only directions I’ve seen for making it haven’t suited my all thumbs abilities. The method of “twisting two bundles until they ply back on themselves and then let go and let them twist themselves” hasn’t worked for me.

A fringe twister? Well, I’d rather spend the money on fiber and yarn. :)

Not to be defeated by my own ineptness, I decided to give twisted fringe another try with this series of log cabin scarves. To my delight and relief, I discovered that if I controlled the whole process in slow motion, I could achieve successful results!

Here’s what I figured out:

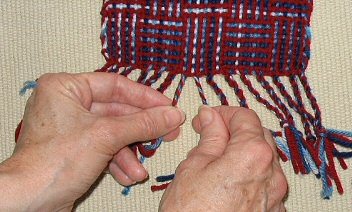
Twisting each bundle to the right.
Twist each bundle to the right (clockwise or Z twist) between the thumb and index finger of each hand.

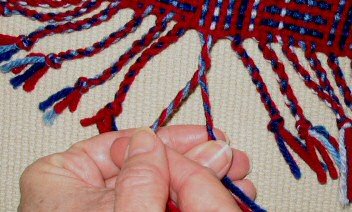
Plying the bundles by exchanging them.  Right hand crosses over left to make the exchange.
Cross my right hand over my left and exchange bundles. This plies them in a counterclockwise or S fashion. Repeat, repeat, repeat. Actually this can be done fairly quickly.

I’m sure this method is written down in some book somewhere, I just don’t have that particular book!


Related Posts: