Thursday, April 30, 2009

Differential Shrinkage Fail

By Leigh

Remember Catzee's Cloth? (If not, click here.)

Remember how surprised I was when I wet finished the fabric and the yarns shrank at different rates, so that the fabric sort of bubbled? (If not, click here.)

Remember how I didn't like it but decided to try and do it on purpose for another project? (If not, click here.)

Remember how I researched rayon and cotton yarns and read that they don't shrink at the same rate and so thought they would be a good choice for an experiment in differential shrinkage? (If not, click here which, BTW, is the same post as the above.)

Well, I did it and the results are in.

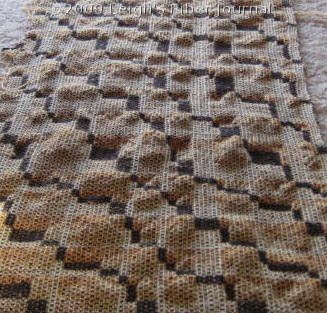
Before wet finishing .....

After wet finishing .....

Both yarns shrank the same! My experiment was a flop.

Project Particulars:
  • Weave structure - summer & winter
  • Treadling - "O's" (see Summer & Winter: Treadling)
  • Yarns -
    • Warp & tabby weft - 10/2 unmercerized cotton
    • Pattern weft - 8/2 rayon
  • Sett - 16 epi
  • Picks Per Inch - 16 tabby & 16 pattern
  • # ends - 244
  • Reed - 8 dents per inch
  • Sley - 2 per dent
  • Wet finishing - cold water wash and hot machine dry
  • Measurements before washing - 53 x 8.75 inches
  • Measurements after washing - 48 x 7.75 inches
So much for that experiment.

At the moment this is just a scarf sized sample. Even though it's a little heavy for a summer scarf, I may go ahead and twist the fringes to finish it off. Might as well make the best of it. :) [UPDATE 3 July 2009 - Click here to see what I did.]


Related Posts:
An Unexpected Wrinkle
One Thing Leads to Another
Beaded Fringing

Monday, April 27, 2009

Measuring Handspun

By Leigh

Once I have an idea of how much handspun I need for a particular project, I can measure whether I have enough on hand, or if I need to spin more. There are a several ways to do this.

One way is to use a McMorrin Yarn Balance, a handy gadget which calculates the length of a yarn based on its weight. Laritza at Yorksett Arts & Crafts wrote an excellent tutorial on that, which you can read here.

Niddy noddies (or swifts, for that matter) can be used to measure yarn as it's wound off the bobbin. The trick here it to know the how many inches it takes for the yarn to make a complete path around the device. This measurement is multiplied by the number of times the yarn is wound around it. This gives a rough estimate, because the yarn piles up on the arms of the niddy noddy. I don't use this method because I prefer to wash my freshly skeined yarn before measuring it. Why? Because there can be some "shrinkage," especially with wool, when the fibers resume their natural crimp pattern after being stretched out on the bobbin and niddy noddy

I calculate the yardage of my handspun with a yardstick and some simple math.

Measuring the skein.Click for a tad bigger

The skein in this photo measures 20 inches. Of course, the skein is actually a loop, or circle of yarn, so what I really want here is the measurement of the yarn all the way around. To find that, I double the measurement, and get 40 inches.

Next I count the strands of yarn in the skein.

Counting the skein.For this skein there are 96.

I multiply these two numbers to get the approximate inches in the skein,

40 inches x 96 = 3840 inches

I divide that number by 36 to get the yards. In this case, 106.66 yards. If I need to round any numbers, I always round down, to give myself a safe minimum amount of yarn.

I do this with each skein and total up the yardage. If my spinning were more consistant, I could probably just use an average for each skein, but it isn't, so I don't.

So far, I have spun a little over 728 yards of 2-ply pol-paca yarn, so I'm close to a fifth of the way to the yards of handspun I need for the Turkish coat. Even so, I could use some of this to start sampling on the loom, as I need to finalize the weave structure and pattern, as well as sett and shrinkage from wet finishing. Since I have plenty of both Polwarth and Alpaca, I can sample to my heart's content.

Obviously this method can be used for knitting and crochet projects as well. You may recall the complex calculations that went into trying to figure out if I had enough various colors of yarn for my Shetland Sampler Cardigan. This post describes how I calculated that, and this post describes how I calculated for the cuffs and bands.

This is not a project I'm in a hurry on, so progress may be slow. At the moment, I'm just happy to be spinning for it. So for now, I'll spin on.

Posted 27 April 2009 at http://leighsfiberjournal.blogspot.com

Related Posts:
Spinning For Weaving, Knitting, Crochet, Etc. An Introduction
Calculating Handspun For Weaving
What I Learned From My Swatch - calculating for stranded knitting
Dissecting My Shetland Swatch - calculating for bands & cuffs

Wednesday, April 22, 2009

Calculating Handspun For Weaving

By Leigh

I decided I would start this series the way I ordinarily would, by looking what I will need for the final product. In the next post, I will show you how I measure my handspun.

If you are a weaver, then you are already familiar with how to measure warp and weft for your projects. If you don't weave, then all of this may be quite foreign to you. My goal is to explain this so that non-weavers can get the gist of what goes into the process. I will try not to get too technical, but I may get long winded!

I've already mentioned that I have my eye on the Folkwear Turkish Coat pattern for the pol-paca I've been spinning. The obvious question is, how much yarn will I need to spin for this coat? As with any sewing project, the first thing I need to know how much fabric is required. Below is the information I found on the back of the package:

Click on above for a better look-see.

I have a 59 inch width loom, but only the first two measurements are possible for me. Why? Because of several factors that aren't apparent at first glance. Besides planning for finished fabric length and width, I also need to allow for loom waste, take-up, draw in, and shrinkage.

Loom waste - the part of the warp that is tied to the front and back of the loom and doesn't get woven. This can be anywhere from 18 to 36 inches depending upon one's loom.

Take-up - the result of the over and under path of the yarn as it is woven. Usually 10% is added to the project length to allow for this.

Draw-in - the pulling in of the selvedges during weaving. Usually 1 to 2 inches is allowed for this.

Shrinkage - From wet finishing (washing and drying) the fabric after it's off the loom. While this varies with the type of yarn, typically 10% is added. However, if the weaver is unsure, it is imperative that a sample is woven, washed, and dried!

Consider too, that the fabric is stretched tightly on the loom during weaving Simply cutting it off the loom causes it to relax and "shrink" somewhat. All these things must be accounted for when planning how much yarn will be needed for any project.

Let's say I plan to go with the second measurement, for a width of 45 inches, and length of 3 and 7/8 yards. I need to consider several things in order to plan the amount of yarn I will need. The formula I need to use looks like this:

Desired finished project length
+ fringe or hem (none here as it is yardage for sewing)
+ take-up (about 10%)
+ shrinkage (another 10%)
+ loom waste (I allow 24")
= total warp length.

I usually calculate in inches, and then convert to yards for measuring. Without boring you with all the math, I can tell you that to weave 3 and 7/8 yards of fabric, I will need a warp length of a tad over five yards. I will round this up to a minimum of 5.5 yards for the project.

What about weft? The formula for that is:

Desired finished width
+ draw-in (10%)
+ shrinkage (I'm allowing 2")
= total warp width

Taking all that into account, I need to plan on a width of about 52 inches on the loom, to end up with 45 inch wide fabric. If I wanted to weave the 54 inch fabric mentioned on the pattern, I would need to plan on a 62 inch width on the loom. With my loom only accommodating a 59 inch width, you can see why this isn't a possibility for me.

However, this doesn't tell me how many warp threads I'm going to need in order to put a 52 inch width of warp on my loom. For that, I need to decide how many threads per inch I want my fabric to be. Here are a few more terms to help explain that:

EPI - Ends Per Inch, i.e. threads per inch

Sett (noun), Set (verb) - referring to ends per inch.

Obviously, the more ends per inch, the thicker and heavier the fabric will be.

Calculating sett is a science in itself. I often use charts, such as these. Or methods such as these or this. But for this example, I'm going to rely on experience, and choose a sett of 8 epi. This is based on my working similar size acrylic knitting yarns for twill afghans. I will weave a sample before actually warping for the pol-paca cloth, and this will let me know if adjustments need to be made. If the sample is too thick or too heavy for a coat, I will try a lower sett. If it isn't thick enough, I will increase the sett.

Armed with that number (8 epi), I can figure out how many warp ends I will need.

52 inch width on loom
x 8 epi
= 416 ends

Multiply this by the 5.5 yard length I need to warp, and I come up with a total of 2288 yards of handspun required for the warp.

And for the weft? First, a few more terms:

Pick - term for individual weft threads

Shot - same as pick

PPI - Picks Per Inch

If I plan to make a "balanced" cloth, i.e. with as many weft picks per inch as warp ends per inch, then I will use 8 (the EPI), to multiply by the number of inches in 3 and 7/8 yards.

52 inch width on loom
x 8 PPI
x 140 inches in 3 and 7/8 yards
= 58,240 inches, which rounds up to 1618 yards needed for the weft

Assuming I've calculated correctly then, I will need approximately 3906 yards of handspun yarn to weave the fabric for this coat. Plus a little more for the sampling.

So, how much handspun do I have so far? We'll look at that next time.

Posted 23 April 2009 at http://leighsfiberjournal.blogspot.com

Related Posts:
Spinning For Weaving, Knitting, Crochet, Etc. An Introduction
Calculating Sett
Another Way to Calculate Sett

Monday, April 20, 2009

My Weekend: "Cotton & the Charkha"

By Leigh

Fiber Forum was fantastic. It was the first time I'd ever been to an actual fiber conference, and as you can imagine I enjoyed every minute of it. Unfortunately, I didn't get any photos, so you'll have to put up with a pretty much pictureless description of my weekend.

Mostly I want to share about the class I took; "Cotton & the Charkha" with Eileen Hallman. If you've ever taken a class with her, then you know what a great teacher she is. We had time for about four class sessions, so we covered a lot of territory and I learned a lot. For example:

Did you know that:

  • There are approximately 35 species of cotton in the world
  • Only four of these are cultivated commercially
  • Most non-cultivated cottons are not white
  • Many of these produce very little lint
  • All cottons do not spin the same
  • The only difference between cotton and hibiscus is gossypol
  • The natural colors of cotton are pH sensitive
  • A single cotton fiber is made up of only one cell
Charkha spinning wasn't as difficult as I thought. My biggest concern was that I would have difficulty drafting with my left hand. I'm a right-handed spinner, but the spindle on a charkha is on the left. Thanks to Eileen's teaching method however, left-handed long draw was a pretty easy transition for me. We used book charkhas, and this is what we learned to do:

  • Set up the charkha for spinning
  • Spin singles
  • How to use the charkha's skein winder
  • How to Navajo ply and
  • Make a center pull ball directly off of the charkha spindle
I can show you the fruit of my labors....

That's my cute little mini-center-pull ball on the bottom. We also got to spin a variety of cottons, from the 31 samples in the notebook we received in class. Below are the ones I chose to try.

You can click on this one to biggify a bit. Of course, these are freshly spun and the twist is not set, but it did give me an opportunity to feel how differently they spun.

Eileen does a lot of weaving with her handspun cotton, mostly as weft from singles. Working with Bluster Bay, she has developed a clever boat shuttle that holds charkha spindles for weaving without winding! Very nifty.

As you can well imagine, a book charkha has been added to the top of my wish list, especially considering my cotton stash enhancement last year. And if I forget what I learned by then, I can get Eileen's DVD. Fortunately, she's a member of my guild, so anything I might need will be handy to get indeed!

Posted 20 April 2009 at http://leighsfiberjournal.blogspot.com

Related Posts:
Fiber Forum 2009
Southeast Fiber Forum
Fiber Forum Weekend

Thursday, April 16, 2009

Fiber Forum Weekend

By Leigh

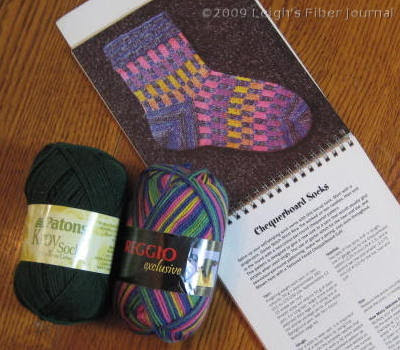
This week has absolutely flown by. Except for a little knitting and weaving, I've been very busy with non-fiber activities. I didn't even finish the next post in my "spinning for" series, and missed my 3rd blogiversary. Now Fiber Forum weekend is upon us and I have to pack for that. However, I can show you the project I'm packing to take along, the Lucy Neatby Chequerboard Socks...

Chequerboard Socks in progressIf you will be at Fiber Forum this weekend, I would love to meet you. I'll be easy to find as I'll be giving a welcome Friday evening on behalf of the WNCFH/G. Do come tell me hi.

Posted 16 April 2009 at http://leighsfiberjournal.blogspot.com

Related Posts:
Fiber Forum 2009
Southeast Fiber Forum
My Weekend: "Cotton & the Charkha"

Monday, April 13, 2009

Spinning For Weaving, Knitting, Crochet, Etc. An Introduction

By Leigh

I haven't had a spinning update in awhile because there really isn't anything new to report. I'm still working on my Pol-paca blend for weaving. Last update on that here. I have about five or six more skeins, but basically it's just more of the same.

Cyndy made a comment on that last spinning post however, that got me to thinking. She said,

I am making my own head spin wondering how you tabulate how many yards of yarn to spin for the number of yards in the fabric...

In turn, I'm going to tell you a story, and then show you how I measure and calculate handspun for projects. I will do that over a couple of posts, so let's just say that this one is the introduction.

I had an experience when I first started spinning that has left me a tad paranoid ever since. I created my first 2-ply handspun (pictured on left) from two pounds of Brown Sheep mill end roving (aka "beast" roving.) My yarn was quite bulky and I was very pleased with it. Being the project person that I am, I decided I wanted to make a sweater with it. I chose the "Stone Circles" pattern from Sylvia Cosh's Crochet Sweater Book, and spent many happy hours working on it.

Imagine my dismay when I ran out of yarn before I finished the sweater. But, being a rather determined sort, I recalculated and tried some modifications. No luck. Next I tried a different pattern. Same results so I tried again.

Now, my husband will be the first one to tell you that if anyone can fit ten pounds of potatoes into a five pound bag, I can. Even so, I could not make that yarn stretch enough to get a sweater out of it.

In the end, I chose a crochet vest pattern; one I found on a Lion Brand skein wrapper from a project long before I learned to spin. I added a reverse stitch crochet for the edging, and omitted the pockets. I've been happy with that vest ever since, and don't regret that it didn't become a sweater. I love to wear it over a denim jacket when the weather turns extra chilly.

All's well that ends well, but I learned something valuable from that experience: that I need to calculate project needs before I ever get started. I admit that I'm still always a little nervous about this. With careful measuring and calculating, I usually end up with yarn leftover.

So how much pol-paca yarn will I need to weave a coat? I'll start figuring that out next time.

© 13 April 2009 by Leigh at http://leighsfiberjournal.blogspot.com

Related Post:
Calculating Handspun For Weaving

Thursday, April 09, 2009

Socks: One Pair Done & Another Begun

By Leigh

And just in time too. I need them for next weekend.

Project Particulars:
Sock Pattern - SpinCraft Toe Up Socks
Yarns - Silja (solid color) and Regia Self-Striping Sock Yarns
Stripe Pattern - Alternate yarns to create a unique stripe pattern
Gauge - 8 stitches/inch and 11 rows/inch
Needles - US 2 DPNs

I've got the summer sock knitting bug (already), so here are the ones I'm working on next...

This is Lucy Neatby's Chequerboard Socks pattern from Cool Socks Warm Feet. It's a pattern I've had my eye on for quite some time. Now seems to be the time to knit it. I've just gotten started on the first garter stitch short row toe. More photos soon.

Posted 10 April 2009 at http://leighsfiberjournal.blogspot.com

Related Posts:
Next In Knitting
Fiber Forum Weekend

Tuesday, April 07, 2009

One Thing Leads To Another

By Leigh

My samples for the Complex Weavers Tied Weaves Study Group Sample Exchange are ready to go.

Each one is attached to a weaving record sheet which includes the draft on the back, plus a write-up of how I developed the idea. Because my barcode name draft was too large to print out, I included only part of that, but added a complete profile draft. I called my draft "Tortie Trails," in honor of its source of inspiration.

Initially, I planned to move on to something else entirely after I mailed the samples. However, this image .....

How it shrunk after washing & drying..... got me thinking along other lines. I didn't intend for the sample to shrink like that, but the unexpected result made me wonder if I could do it on purpose.

This sample is a 10/2 unmercerized cotton for warp and tabby weft, and an 8/2 rayon for pattern weft. I read that rayon tends to shrink more than cotton, so hopefully this will give me a similar effect to Catzee's cloth. This one is more in the proportions of a scarf, so if it works, I can wear it!

As with many of my sources of inspiration, one idea leads to another. The result of this is that my weaving experience seems more like a journey than a classroom experience. But it's hard not to follow the evolution of ideas. In fact, I doubt I could do it any other way.

Posted 7 April 2009 at http://leighsfiberjournal.blogspot.com

Related Posts:
An Unexpected Wrinkle
Poll Results & Test Press

Saturday, April 04, 2009

Red Is To Dye For

By Leigh

The Online Guild's April workshop is called "Roots, Woods and Bugs." We are going to be exploring natural dyeing to obtain the color red. We are going to be working specifically with...

Madder rootsMadder
(the roots)

Brazilwood
(the wood)

Cochineal
(the bugs)

and Lac. I have the first three, but the last was added to the workshop via an interesting OLG discussion last month. I will have to get some of that. The workshop is being led by Debra Bamford, who is amazingly knowledgeable about natural dyes, and especially their historical uses.

I had problems finding Brazilwood. Earth Guild was out for a couple of months, as were a couple of online shops I frequent. One said they needed to find a new supplier. I finally found some from The Woolery. I had hoped to obtain it sooner, as one experiment for the workshop is that or how color strength is effected by the soaking time of Brazilwood. I can still do that; I just won't have results to show at the end of April. Of course, that's the beauty of doing workshops with the OLG, everything is done from the comfort of our own homes, so we can set our own schedule!

April promises to be a very busy month for me anyway, especially with the WNCF/HG. Not only is Fiber Forum this month, but also committee meetings for the same, the kick-off meeting for 2010's Blue Ridge Handweaving Show, and our first guild meeting at the Folk Art Center and all the arrangements that entails. However, it should be a fun month too.

Now, off to read the first set of recipes for cochineal. Results soon.

Posted 4 April 2009 at http://leighsfiberjournal.blogspot.com

Related Posts:
Natural Dyeing?

Wednesday, April 01, 2009

Sock Progress & An Award

By Leigh

First, progress on my latest socks .....

Second, an award from both Minikat and Sharon.

"This blog invests and believes in the PROXIMITY-nearness in space, time and relationships. These blogs are exceedingly charming. These kind bloggers aim to find and be friends. They are not interested in prizes or self-aggrandizement! Our hope is that when the ribbons of these prizes are cut, even more friendships are propagated. Please give more attention to these writers!”

To think about what that actually means makes this award quite an honor. In turn, I would like to pass it on to Renee, Jackie, Bonnie, Bettina, Dorothy, Sue, Peg, and Susan.

Posted 1 April 2009 at http://leighsfiberjournal.blogspot.com

Related Posts:
Next In Knitting
Socks: One Pair Done & Another Begun