Thursday, June 29, 2006

Silk Spinning Update

I am still spinning away on my silk samples. I received a lot of good comments on how I might possibly use the yarns. At the moment, the finished ones are residing in a basket. Once I complete all the samples, I will put some of those ideas to work (assuming I can wait that long : ) The original post & pic about my silk goody pack is here .

Yarns completed so far:
* B2 silk brick
* Mulberry silk noil
* Tussah noil
* Clean noil
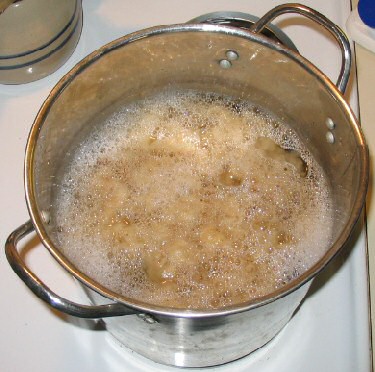
* Throwsters waste (and here)
* Silk caps
* Carrier rods
* Alpaca/silk blend
* Bluefaced Leicester/tussah silk blend

Silk samples yet to be spun:
* Silk hankies
* A1 silk brick
* Tussah silk sliver
* Merino/silk blend
* Homemade silk caps
* Soy silk

I also still have cocoons to try reeling and noil with which I want to try silk fusion.

What’s currently on the wheel:

Spinning camel down silk blend fiber


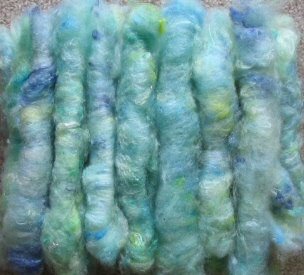
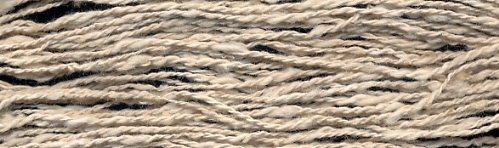
This is carded camel down/tussah silk blend. It’s so lovely that it practically spins itself. I would love to have more than an ounce of this stuff! It’s absolutely begging to be put to some knitting needles.

Also, because I have had so many encouraging comments (both public and private) about my various silk photos, I’ve put them in an album on Flickr. You can find the link on my sidebar as Leigh’s Silk Photos. I’ve included my pix of the process of making and working with silk caps, dyeing and spinning throwsters waste, and working with the carrier rods. I added a few extra photos to these categories to better explain the steps of each process.

So as you can see, I'm making good progress on my silk samples. I'm learning a lot and will have a lot of lovely sample yarns to have fun with.

Tuesday, June 27, 2006

An Interesting Blog

My friend from North Carolina, Carol, sent me the link to an interesting embellishment blog, In a Minute Ago by Sharon Boggon.

Carol is always finding interesting things on the web. This one is not specifically a weaving, spinning, or knitting blog, but it deals with textiles (both contemporary and historical), fiber arts in general, quilting (especially crazy quilting), needlework, and embroidery. It also has a fantastic stitch dictionary, which all embroiderers and embellishers will be interested in.

I like this blog because quilting and embroidery were two of my first textile loves. Quilting is part of my family heritage. I remember my great grandmother hand sewing quilt after quilt.

My record UFO was my one and only crazy quilt. It took about 22 years to complete:


I defense of myself, I have to say that for the first 10 years I didn’t know it was going to become a quilt. The bird embroideries were gifts to my parents and grandparents at various times for many years. When my grandparents died, and my step mom inherited all the embroideries, she asked me to make them into a quilt. Then my daughter was born and life turned to raising children. The quilt was packed away. My dad used to love to tease me about it. His first question when he called would always be “How’s the quilt coming along?” We would both laugh, but that quilt nagged at my conscious. There were other things I was interested in, such as learning to spin, but for some reason the quilt kept me from moving on. (For close-ups of all my bird embroideries, click here. )

Sara Lamb has an interesting comment on her blog about being a single project person (an SPP). I’ve thought about that and wondered how it applies to me. I usually have a project on one of my spinning wheels, something on the loom, and one or two knitting projects at hand. But I finish what I start. There was a time in my early life however, when I started many things and finished none. My problem was that I didn’t have the self discipline to finish anything. When a new impulse struck, I was off and running.

Somehow the crazy quilt was my turning point. My enthusiasm for it as a project was long gone, but I knew that I had to finish it. I knew that I could never go on to anything else until it was done. I lamented having ever agreed to do it. I agonized that there was still so much to do on it.

Finally, my family had a conference and told me I had to finish the quilt. Everyone vowed to help with cooking and dishes and housework to give me time to finish it. So, roughly 12 years after I started it, I finished that crazy quilt. Then I packed it carefully in a box and mailed it off to my folks. I had such a sense of relief! I felt free! Shortly after that I bought my first drop spindle. Later came my first spinning wheel, then my second, then the loom. I haven’t made a quilt since.

Sorry for the digression, but crazy quilting does bring back memories. So, back to In a Minute Ago. Sharon updates her blog frequently with all kinds of interesting textile related links. Currently, she is presenting “A 100 Details for 100 Days.” Every day for the next 100 days she plans to feature a different stitch, embellishment, or seam treatment. Today she is on day 8.

But …………be forewarned. If you do visit her blog, you’ll find that it’s easy to spend hours here!

© 2006 Leigh's Fiber Journal

Monday, June 26, 2006

Response to Some Thought Provoking Comments

From Peg:
I know the tension between pursuing in depth and exploring everything ...............If you constantly jump around, you will never discover the depth of your own creative abilities.

Good point. Which makes me think that I’ve probably never verbalized my original goal for starting this weaving project. It is to familiarize myself with a variety of basic weave structures. A secondary goal is to understand how color effects them.

Basically I've just been a monkey-see-monkey-do sort of weaver. I can follow a draft and weave it accordingly, but I’ve never really understood what I was doing. I can’t tell you why summer and winter is what it was for example, nor huck, nor crackle, nor very many other weave structures. Of course, simply becoming familiar with them obviously isn’t the same as mastering them. And it won’t mean exhausting all the possibilities either. Not at this point anyway.

Part of my motivation to do this is because I still feel rather ignorant as a weaver, even after six years of weaving. I have a desire to weave well, but also to intellectually comprehend I‘m doing. I want to be able to ask intelligent questions about weaving and have intelligent conversations with other weavers. I want to stop feeling out in left field in regards to experience and terminology.

So hopefully I’m not jumping around so much as I am working my way toward a goal of generalized understanding. From there I will be able to approach both the familiar as well as the new with a depth of knowledge and experience which will open doors creativity for me.

From Jackie:
…… how about a painted light and solid dark, or using think and thin yarns. Think bunching and spacing.

This is interesting because actually, I think this is the general direction I've already been heading in. One thing about log cabin is that the technical definition is pretty narrow. My plan is to start exploring shadow weave, which seems a logical extension of log cabin. So perhaps I’m not leaving log cabin behind but rather moving into their larger color-and-weave category.

At some point I plan to weave that Oelsner log cabin variation, but I think I'll wait until I can apply it to a project. I find that when something like that really catches my attention, I mull it over and over in my mind until I finally have act on it. When that variation reaches this point, then it will materialize! (pun intended : )

But.......will I ever find an actual weaving niche???? I wonder.

© 2006 Leigh's Fiber Journal

Saturday, June 24, 2006

b2f Log Cabin Weaving

By Leigh

My fabric is off the loom. And not only that, but it’s been washed, ironed, and measured. In fact, here it is:

My handwoven log cabin fabrics.


The two are from the same warp of 16/2s cotton sett at 24 epi. I wove the piece on the right first, as drawn in. For the one on the left, I used only the dark blue for weft. Oddly, the two fabrics shrank to different widths, with the stripes measuring 32 inches after washing, and the log cabin at 33 inches. (?)

What I didn't do was put them in the dryer. It's traumatic enough to put my handwoven fabrics into the washing machine; I just couldn't handle the possibilites of what the dyer might do to them! So they were line dried.

Happily, they didn’t shrink too much and my pattern pieces fit the cloth. I plan to make a striped skirt and log cabin top from this pattern:

Sewing pattern for my handwoven fabrics.


Since I’ve not used this pattern before, I plan to work it up with some dollar fabric before I cut my handwoven. Better to find out about pattern adjustments on the inexpensive stuff!

As I’ve experimented with log cabin weaving for the past two months, I’ve made some observations. I’ve noticed two factors which influence its appearance: first, the number of warp ends in the blocks; second, the joins.

In the photo below, the sample on the left has an odd number of ends and the one on the right has even.

Handwoven log cabin scarvesWhile both give the impression of being woven with striped ribbons, there is a difference in the definition of the "squares." The sample on the left is more flat looking while the one on the right almost looks as though the ribbons cast a shadow; it has a more 3-dimensional appearance. This detail could make an interesting design factor.

Since the example on the left has an odd number of threads in each block, then the first and last warp ends are the same color. In this case dark - DLDLDLD. But the sequence could also begin and end with light threads - LDLDLDL, so that the joins would be light. Compare below:

More handwoven log cabin scarves.A painter is taught that one’s eye is drawn to light and to use it to direct the viewer's attention. But in these samples, I find that my eye is drawn to the dark colors. Perhaps it’s simply because I like the pieces with the dark joins best. I think they define the “ribbons” better. Again, this is another factor I'll keep in mind the next time I weave log cabin.

Beyond color, I wanted to experiment with variations in the block sizes. The result of this experiment is the yardage I’ve just taken off the loom. My inspiration for this was initially Helene Bress’s The Weaving Book page 16, then Margaret Winderknecht’s Color-and-Weave II page 77, and finally my WinWeave software (where I worked out a compromise.) More recently I’ve gotten my hands on a copy of G. H. Oelsner’s A Handbook of Weaves, and discovered some log cabin variations on pages 352 to 355. These too have piqued my curiosity.

But I have problem. It is that whenever I weave, I constantly wonder “how would it look if I did this,” or “what would happen if I changed that.” So before one thing is off the loom, I have already planned the next 2 or 3 variations I want to try. My imagination seems to have no limit as to possibilities and I sometimes think I could spend my entire weaving life exploring one thing. But there are so many weave structures and color effects to explore that eventually I have to make myself stop and try something different. So it is now. Though I still have lots of ideas, I’m going to set log cabin aside and come back to it another day. It's time to explore something else.

Next ...... Evaluating My b2f Warp


Related Posts:
f2b Versus b2f - Beginning of this series
Evaluating My b2f Warp
B2F Warping - Still Tweaking
B2F Vs. F2B - Why I Switched

Wednesday, June 21, 2006

Silk Carrier Rod Yarn

The carrier rods: picture here

How I dyed them: click here

The rolags:

Rolags from silk carrier rod fiber.


The yarn:

Yarn from dyed silk carrier rods.


This was a lot of fun to spin. The fiber length for the rods was about an inch, but I had about a dozen cocoons stuck in the rods, for which the fiber length can be more than an arm’s length! I cut this as I could and spun mostly long draw, but had to work the long cocoon fibers in the inch worm fashion. The hand and luster of the finished yarn are lovely.

My problem is that I am compiling quite a collection of yarns from the various forms of silk, each yarn only about an ounce. Not that the collection of itself is a problem, but I am wondering what to do with it all. I would like to not see these yarns end up in a tub or a drawer, I want to use them for something!

Related Posts:
Guess the Objects
Silk Carrier Rods

Monday, June 19, 2006

Lost Lace Found

While trying to find places to put my newest stash acquisitions from the Silent Auction, I found my first and only (so far) lace knitting!

Knitted lace scarf in progress.


It’s whereabouts had been unknown for about a year (due to two long distance moves.) To be honest, I’d pretty much forgotten all about it.

The pattern is "miniature leaf pattern," from Patterns for North Ronaldsay Yarn by Elizabeth Lovick of Northern Lace. The yarn is my handspun, from Samoyed fiber sent to me by my friend Ann in the UK. This is the first dog fiber I’ve ever worked with and it as soft as bunny angora. It was a dream to spin, but a challenge to knit!

Unfortunately, I don’t have a clue as to where I left off in the pattern. I tried to keep track of which row I was on, but you know how that goes. The best laid plans mice and cats and all that. Well, it’s too hot to think about it anyway.

Sadly, all of this points to some rather glaring discrepancies between my self image and the real me. I like to think of myself as being organized, neat, and efficient. In fact, I continually tell myself that this is the “real” me, and that once I simplify my life I really will be like that.

This self imagined me has all my books and magazines shelved and arranged according to subject; neatly labeled boxes for my fleeces, rovings, and yarns (all catalogued with samples of course); my weaving caddy neatly arranged with my tools organized in their own drawers; my knitting needles and crochet hooks displayed in beautiful handcrafted pottery and baskets; and all of my fiber and textile magazine articles organized in a data base on my computer, ready for me to find with the type of a keyword and the click of the mouse.

The real me uses the pile system of organization. I have a pile for knitting, a pile for spinning, two piles for weaving, a pile for sewing, a pile for web design, and a pile of things I need to file. When DH begins to comment on the mess, I simply straighten up the piles and rearrange them so that they look like I’ve actually done something with them.

The self imagined me has complete records of all my finished weaving, knitting, dyeing, and spinning projects with samples attached. In my self imagined world these are all neatly organized on their own bookshelf. The self imagined me also has a filing cabinet, where paper instructions and projects are systematically filed so that I can find them whenever I want.

The real me has four notebooks of various designs and project plans. When inspiration strikes, I grab the nearest one and start putting ideas down in it. Unfortunately, these don’t usually find their way back to their appointed pile, so I often don’t have a clue to their whereabouts. And the reason I have 4 notebooks is not because each one is dedicated to it’s own subject matter, but because I keep having to start new ones because I can’t find the old.

Somehow the 2nd law of thermodynamics always comes into play here. No matter how well I organize my messes, and no matter how well intentioned I am to keep things orderly, sooner or later (usually sooner) things deteriorate into chaos. Oh, I can make excuses (I moved two times in the past year. I’m in a hurry right now, I’ll put it back later. This is how I organize things, if I straighten it up I’ll never be able to find anything again. If only I had more boxes I could keep it neat. If only I had more shelves I could keep things orderly. If only I had a bigger room, then I would………)

For now, I’m just happy to have found this UFO. So after admiring it I’ll carefully put it back in it’s knitting bag. But this time I’ll put it where I can find it again.

© 2006 Leigh's Fiber Journal

Saturday, June 17, 2006

Silk Carrier Rods

Silk carrier rod.The curious objects are silk carrier rods. They are a waste product from commercial silk spinning. As silk from the cocoons is unraveled, it is carried over rods on its way to the reel. Silk fibers build up on the rods and they must be removed and cleaned off periodically. This silk waste is known as carrier rods. They are stiff with sericin and can either be used as is for various craft projects, or degummed.

I received about 28 grams of carrier rods in my silk sample pack for the Online Guild's silk spinning workshop. I decided to use mine to see what kind of yarn they would produce.

First things first. I degummed them with 3 squirts of Ivory dishwashing liquid and about 7 grams of washing soda in a large pot of water. Here’s what they looked like after simmering for an hour:

Degummed silk carrier rods.


There is even a bonus silkworm (that little dark thingy in the lower right hand corner of the pot) floating in the pot. Actually, I ended up with about a dozen dead silkworms, which indicates that some cocoons were stuck in the carrier rods as well.

Once the fiber was washed but still wet, I wanted to color it. So after rinsing it I soaked it for a couple of hours in strong vinegar water. Then I divided it into 4 parts, placed each part on a piece of plastic wrap, and sprinkled dye powder over them. On two I used Cushing’s acid dyes and on the other two I used koolaide.

Sprinkling dye powder over vinegar soaked silk.


I folded the plastic wrap over and poked at the places which were still white. This helped work the color through the fiber.


Poking the packet to make sure the white spots are covered with dye.


Then I rolled them up into little packets. I steamed them for about an hour and let cool overnight. The next day I rinsed and laid them out to dry. Here’s what I have to card and spin:


Dyed silk, ready to blend and spin.


To see the yarn I got from this, click here.


Related Posts:
Guess the Objects
Silk Carrier Rod Yarn

Thursday, June 15, 2006

Guess the Objects

mystery objects


They are about 5 - 6 inches long.
Any ideas as to what they are?

(Click here for the answer.)

Tuesday, June 13, 2006

Weaving Right Along

By Leigh

Of the two fabrics I have planned for this warp, I have completed the first and taken it off the loom, as you can see:

My helper is at it again.


I could have left it on and simply started weaving the second, since they are using the same warp, but I was a little concerned about my warp tension, especially on one side. When I first tied my 2-sticks to the front apron rod (see b2f, Weaving the Header, June 4, 2006) I put ties about every 3 inches or so. However, I didn’t feel like I'd gotten all the ties evenly tight, especially on the right side, and in fact the warp was a little loose on that side.

So once I finished the required amount for the first fabric, I wove in two more sticks, and cut off the first fabric. This time lashed the sticks to the apron rod:

This time I lashed, instead of tied, the sticks to the apron rod.


Happily, my tension remains even across the warp as I begin my second fabric. This time I’m using only one color for the weft, the darker blue, creating vertical stripes from the log cabin variation warp pattern. I guess one could call it a log cabin stripe.

My log cabin stripes.Charleen asked what I’m going to do with my yardage. My plan is to make a top with the log cabin pattern and a matching skirt with the stripe, at left. (I wasn’t too keen on a plaid-like skirt, wanting longer, slimming type lines you know ;). Of course, this plan will depend on how well the washing machine cooperates with what I planned for shrinkage!

In regards to shuttle throwing, I’m think I’ve got my problem licked. I’ve worked hard to keep my throw straight and even, (though I do throw a wild one once in awhile.) I’ve learned to keep my warp tension as tight as I can and have also experimented with my different shuttles. I found that my 11 inch Norwood works the best.

With all this, I continue to be very happy with the back to front method of warping my loom. Even so, I'm still holding my breath until I get to the end of my warp!

Next ..... b2f Log Cabin Weaving


Related Posts:
b2f - Warp Sleyed
b2f - Weaving The Header
Weaving Progress
b2f Log Cabin Weaving

Sunday, June 11, 2006

WNCF/HG Silent Auction

By Leigh

Yesterday I was able to go to the Western North Carolina Fiber/Handweavers Guild Silent Auction. This was the guild I belonged to before I moved to Florida, so it was nice to be able to go to this event once again.

Members and guests make bids on various yarns.


The auction serves as a fund raiser for the Blue Ridge Handweaving Show.

Weaving and spinning equipment and books were also up for auction.


The best part of going was being able to see my friends from the Blue Ridge Spinners: Carol, Mary, Eva, and Gail. I was also able to see Betsy, who first taught me to weave, and Pat, whom I first met through Betsy’s classes, as well as other WNCF/H guild members.

I like silent auctions. I like browsing slowly through the items and writing down my bids. In my mind I keep a limit for each item, depending on what value I think it has to me. Sometimes I’ll write down my name if no one else has bid on an item. After all, I can probably find something to do with that cone of yarn if it’s only $1.

I wasn‘t looking for anything in particular, I just went to see what there was and bid. This suits me because my weaving yarn stash is completely made up of mill ends and other oddments, just a hodge-podge collection. Occasionally I purchase yarn specifically for a weaving project I have in mind, but more often I enjoy the challenge of designing strictly from what I have at hand.

What makes a silent auction interesting is that unless one keeps track of the status of all the items one has bid on, the outcome is unsure! Who’s to know which items will get one more bid when that final warning sounds. So, I was surprised that I “won” so many of the things I’d bid on. In past I’ve gone away with less than half of what I bid on.

My booty:

I bid mostly on yarns and books.


My husband, who is my best and most encouraging enabler, didn’t even ask how much I’d spent nor where I was going to find room to put it all! Even so, I’m pleased to say that my cost turned out to be less than $1.40 per item. I do confess that where to put it is a problem at the moment. But I'm very happy with my bargains so that consideration will just have to wait until tomorrow!


Related Posts:
The Shuttle-Craft Book of American Hand-Weaving

Friday, June 09, 2006

Weaving Progress

By Leigh

I’m pleased to report that after a slow start, I am finally developing a weaving rhythm. Here’s what it’s looking like:

A log cabin variation in 16/2s cotton.


I’ve woven about 52 inches so far. Since this is yardage, I don’t have to worry about joining new weft ends, floating selvedges, or selvedges in general (though why is it that selvedges turn out nicest when one doesn’t have to worry about them? )

My biggest problem in the beginning was randomly skipping under extra warp ends. This proved to be frustrating as I did a lot of unweaving initially. I wondered about uneven tension and sticky warp ends, but in discussing it with Peg, I realized that it had to do with throwing the shuttle. I began to figure out that the extra warp ends coincided with an uncontrolled throw of the shuttle.

Mind you, I haven’t woven the full width of my loom (36 inches) but once and that, several years ago! Most of my pieces are scarves and sample strips, 12 inches wide at the most. In fact when I’m doing sample strips for design boards I omit the shuttle altogether and simply pass the bobbin from hand to hand through the shed.

Once I started concentrating on improving my shuttle throwing technique, things improved rapidly, though not without an occasional wild throw even now.

I’ve realized that one factor in this is that I’ve not fully recovered from Adhesive Capulitis of my left shoulder. It was at it’s worst during the second half of 2005. Not only was I in constant pain, which nothing could relieve, but I had severely restricted mobility of that arm. It isn’t called “frozen shoulder” without reason! I couldn’t weave or knit, though I did manage one handed spinning once in awhile. For the most part I felt quite useless!

About 6 months ago the pain lessened considerably and mobility began to improve. I’m still not 100% however, and can’t move my arm into certain positions, but I'm usually not aware of it anymore except when trying to do certain things such as put on something over my head, or catch the shuttle on that side. I suspect it may interfere with throwing the shuttle from the left, but it isn't anything that I can't overcome.

Looking at the bright side, all of this has caused me to pay more careful attention to my weaving technique: not only how I throw the shuttle, but how I wind the bobbins, and how I treadle. I see the fruit of this care in my weaving. So there is truly a silver lining even in the darkest cloud. Especially if I will be a better weaver for it in the long run.

Next ...... Weaving Right Along


Related Posts:
b2f - Warp Sleyed
b2f Log Cabin Weaving

Tuesday, June 06, 2006

Spinning Tussah Silk Noil

Now that I’ve got my weaving project underway, I can resume working on my silk goody pack.

The last of the silk noils is tussah. Tussah differs from mulberry mostly by it’s color. Mulberry silk is spun by domesticated silkworms whose diet consists of mulberry leaves. This produces a lovely white. Tussah refers to the silk spun by wild silkworms whose diet consists of mainly oak leaves. The tannin in these leaves colors the silk, so that it is a lovely warm honey color.

Since my goal has been to experiment as many ways as possible with my various forms of silk, I decided to blend this with some raw cotton lint.

The noil was quite clean but the cotton was not, so I had to scour it. For each 28 grams of cotton I used 1 liter of water, ½ tsp. of Ivory dishwashing liquid, and 2 tsp. of washing soda. I simmered it for about 2 hours. When scouring raw cotton, it is amazing how much dirt comes out of the stuff.

I’ve been blending on cotton handcards, about a 2 to 1 (cotton to noils) eyeball blend. I am spinning it long draw, quite pleasantly.


The particulars:
* Weight, 14 grams
* Fiber length was ½ to 1 inch
* Abundant bits & noils
* Spinning ratio 10:1
* Spun woolen method
* Singles, 30 WPI
* 2-ply, 18 WPI
* Yardage, 52

The challenges:
* None actually. It was enjoyable to spin. The only thing I’m wondering about is what to do with it.


Related Posts:
Mulberry Silk Noil - handcarding & spinning
Dyed Silk Noil/Alpaca Yarn - blending noils & alpaca
Silk Fiber Fusion - using dyed silk noils

Sunday, June 04, 2006

b2f, Weaving the Header

By Leigh

Once the heddles and reed were threaded, I felt that I was in more familiar territory and proceeded to lash the warp onto the front apron rod as usual. That night, for some light bedtime reading, I turned to chapter 6 in Peggy Osterkamp’s Warping Your Loom and Tying On New Warps, “Weaving.”

There I discovered two new (for me) ideas, one revolutionary, and one downright shocking.

Idea #1 - Using a 2-stick heading

Close up of the 2 stick header.This idea involved weaving about an inch of plain weave and then inserting a first stick in the one shed and then a second stick in the next shed. The attraction here was that it is supposed to even out irregularities in the warp tension. Since I’ve had an ongoing battle with tension (and indeed, it was the primary factor to convince me to try b2f warping) I decided to give this a try. After all, if I didn’t like whatever happened, I could always unweave and take it out.

So I started with my usual 3 unbeaten shots, beat, and continued in plain weave. I had two leftover warp separator sticks which were just the right length. I carefully positioned the first, beat and changed sheds, and positioned the second. I continued weaving and as promised, all the potential trouble spots had evened out beautifully! I was delighted. “This idea is a keeper,” I thought.

Idea #2 - Making a smooth base on the cloth beam

This one involves cutting off the knots and retying the warp to the front apron rod after the 2-stick heading is in place. (WHAT!!!!!!!!!!!!?????????!!!!!!!!!!!!). I had to stop reading because I didn’t think I could handle that. The 2-stick heading was one thing, but idea #2 would be irreversible once that warp was cut. I could envision my beautifully tensioned 5 yard warp lost forever.

Admittedly the idea of a smooth cloth beam is appealing. After all, anyone who has ever forgotten to wind paper on as they wound on their freshly woven fabric, knows how those knots can displace the weave structure and permanently mar one’s cloth (gee, ask me how I know about that. ;)

I finally decided, what the heck. If I’m trying new things I might as well try this too. So here’s what I did (after a lot of hemming and hawing and procrastinating ) :

Cutting the knots off the warp.  This took nerve!


Even though I had good success with cutting my tie fabric, I decided to tape the header cloth “just in case.” This will be yardage, so I don’t need the fringe. If I had wanted fringe however, I would simply untie the slip knots I used to prepare the warp for lashing onto the apron rod.

The taped edge is folded to the underside:

The warp is folded between the header sticks. Taped side is underneath.


Then the sticks are tied to the front apron rod using a strong, doubled carpet warp. The ties are spaced about every 3 inches or so across the rod:

The header sticks are then tied to the apron rod at 3 inch intervals.


I wove a little more of my header weft to even it out.

Then I held my breath.

Now for the real test:

Weaving started, at last.


Taking into account the lens distortion of my camera, I’m pleased with my first five inches. Now I can relax and enjoy weaving!

Next ...... Weaving Progress


Related Posts:
f2b Versus b2f - Beginning of this series
b2f Log Cabin Weaving - finished fabric from this series
Evaluating My b2f Warp
B2F Warping - Still Tweaking
B2F Vs. F2B - Why I Switched

Friday, June 02, 2006

b2f, Warp Sleyed

By Leigh

I feel like I’m finally getting somewhere! My warp is finally sleyed, all 864 ends of it.

My warp is finally sleyed, all 864 end of it.


So far I’m thoroughly sold on warping back to front. Threading the heddles was much, much easier and so was sleying the reed. Although it was a little confusing at first to figure out the order of my ends, since the cross was on lease sticks, I’ve had much less difficulty keeping everything in order.

Homemade warp cross holderWhen warping front to back, I would hold the cross either in my hand or in a one of those homemade things pictured at left, (which I’m sure has a name but I don’t have a clue as to what that name is. I would tie it to my breast beam to hold the cross while I sleyed the reed.) However, it didn't matter which way I held the cross, fine or slippery warp ends could slide around or slip down, and I would often have trouble figuring out which one was next.

In warping b2f, the cross is on lease sticks, which not only keep the warp in strict order, but also enabled me to walk away as necessary. I could come back and pick up where I left off with no problem.

Leigh's log cabin variation draft.


My draft is a log cabin variation which I worked out on WinWeave. I found one log cabin variation in Helene Bress’s The Weaving Book. However, when I worked up its drawdown on WinWeave I wasn’t satisfied with it and began doodling. Eventually I came up with one I liked and am using it. The treadling will be tromp as writ (aka as drawn in. IOW it is treadled the same way it is threaded.) Since the colors alternate across the warp, I was able to measure the two colors together. I only had to take care that I was threading in the correct color order. I have checked, checked, and double-checked, so hopefully I got it right.

Next ....... b2f, Weaving The Header