Showing posts with label mending. Show all posts

Thursday, January 25, 2024

An Attempt To Repair Moth Damage To a Wool Vest

Well now. Repairing moth damaged crochet may never make it to my list of superpowers, but I'm managed to fix moth holes in a crochet vest that I like to wear over my chore jacket in winter. When it's time to do morning barn chores on a frigid morning, it adds a comforting extra layer of warmth. 

The vest was crocheted from a bulky 2-ply yarn from what was called "beast roving." It's a blend of mixed breed fleeces, mostly gray mill ends but with bits of color here and there. It was fun to spin and quick to crochet into a vest.

Happily, I found some of the leftover yarn when I cleaned out and rearranged my stash of handspun. I also still had the pattern in a notebook. 

The first step was to pull out the yarn back to solid crochet stitches, securing them with safety pins and stitch holders.


Then it was a matter of filling in the hole with the same stitch.

In hindsight, I should have started on the other side, but since I was trying to figure it out, I just accepted my clumsy results and moved on to repair the second large hole. 

The second hole was challenging because it was on the front edge and is the foundation for the reverse crochet edging. I had no idea how I would manage that.

I filled in the eaten away single crochet stitches and then re-did the edging. The result?

No where near invisible mending, but at least the repair matches.

It puts the vest back in service with I am glad of because winter is far from over with.

I confess I had a hard time mustering enthusiasm for this repair. But I pushed on because I like the vest and it is useful to me. In examining it closely, I made the discouraging discovery that not all of the moth damage was holes, but in many places they appear to have nibbled through strands of the yarn so that it looks intact until close inspection. I wondered if I should have tried a different, visible repair, but sometimes, something is worth doing not because of the results, but for what one learns from doing it.

© January 2024 by Leigh at Leigh's Fiber Journal

Related Post

Thursday, January 04, 2024

January is Mending Month

Mending is on my winter project list, and I have a lot of it. So, I thought it would be a good idea to make it my priority to tackle the pile this month, rather than keep on letting it get bigger and bigger. I set aside my creative projects so that I can get it done. 

Most of the mending is for our everyday chore clothes. Our lifestyle is rough on clothing, and I don't mind getting as much out of it as we can before replacing it. By the time we're done with a garment, it can only serve for the rag box. So, most of it will plain mending: ripped seams, holes to patch, and a few waistbands to repair. I need to replace some zippers on a couple of jackets, and I have handknit socks to darn. Needful stuff.

My reward for finishing the pile will be a new project on my loom! I have a lot of ideas and haven't quite decided exactly what that will be; maybe a rag rug for the bathroom. But deciding what to do will be fun to think about as I work my way through my mending pile. 


Related Posts

Wednesday, January 18, 2023

Visible Mending: Barn Jacket

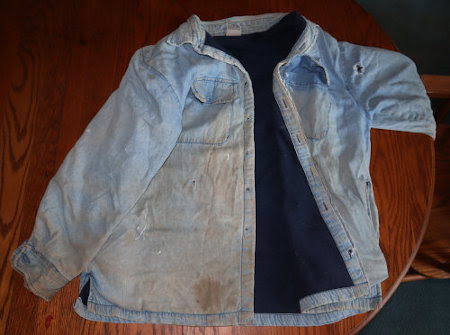
Studying Japanese mending seemed to open up a whole new world for me, and I wanted something to experiment on. I had just the thing in mind, too, my old barn jacket. At one time, this denim jacket was my favorite fall and spring work jacket, and I wore it for years. It has a warm fleecy lining and the outer fabric is denim, which I love because it wears well and isn't prone to getting straw and hay stick in it (a huge plus when one works with barn animals!). Gradually, it got torn here and there, and the cuffs began to fray.

Lots of small holes on the jacket front and sleeves.

But it wasn't until it got a big tear in back that I stopped wearing it. 

Big rip in the back.

By that time, the denim was badly torn, worn, and stained in too many places anyway. The jacket wasn't even fit to donate to the thrift shop, and I decided to discard it. I went so far as to cut off and save all the buttons, but I just couldn't bring myself to throw it away. Instead, I buried it in my mending box.

I pulled it out a few years ago when I needed a mending project for a Permies SKIP merit badge. SKIP is a free online program at permies.com, for learning homesteading and permaculture skills. That link will tell you all about it and what's offered, so here, I'll just add that it's an excellent resource for learning, documenting, and sharing a wide range of skills. In this case, I was working on the first textiles badge and needed to sew on a patch. The jacket was perfect.

A series of tears on the underside a sleeve.

Even then, I got a bit creative in stitching down the large patch.

As I worked on it, I remembered how much I liked this jacket. But there was still a lot that needed mending, so I stuffed it back into the mending box and forgot about it for several more years. Until I was stuck inside due to inhospitable winter weather and came across several interesting YouTube videos about visible mending. I pulled the jacket out again and gave it another look. It would be a good canvas for learning and experimenting!

The next time I was at the thrift store, I found some patching fabric that I liked. Actually, it was a pillow sham that I got for $1. I took it apart and gave it a good pressing. Perfect. 

Then I made a start. The biggest tear was first, although it wasn't too bad when I spread out the jacket and laid the pieces back in place. 


The lining was in good shape, so I sewed the torn parts onto the lining with sewing thread and drew out my top stitching lines with a fabric marker.


From boro, I learned that it's okay to have patches and stitching overlap, like the patch above, which I added to support the pocket.

From sashiko, I find the concept of working only in running stitch intriguing. I like the mental challenge of figuring out my stitching path with the fewest cuts and knots in the thread.


Once the creative ideas started flowing, I added some embroidery to my first sleeve patch (and patched a few more holes). 


Jacket right front with two patched tears.

I stopped thinking about simply covering holes and tears, and began to think more about the overall affect on the jacket.

Below is a patched and embroidered hole on the other sleeve.

In the first picture you can see the hole in the left sleeve.

One problem that developed was because the outer jacket fabric and the lining have different fiber contents. That means they shrank at different rates! It wasn't terribly noticeable before, but the patches and embroidery cause the denim to pooch out in some places.  


On the one hand, this is just an experimental project on a barn jacket, so, so what? But it was a challenge and I wanted to rise to it. As Bill Mollison, the Father of Permaculture says, the solution is in the problem. I thought about this and settled on a sashiko design that I thought would work.

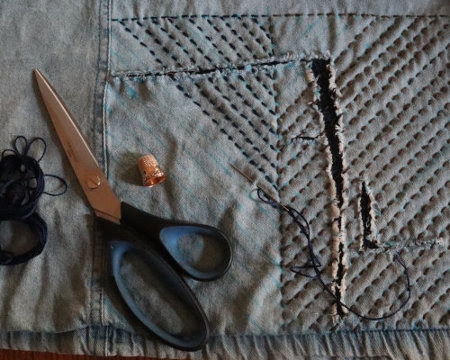
I smoothed out the outer fabric as evenly as I could and pinned it to the lining. Then I added lines with my fabric marker.


With variegated embroidery thread, I'm working a pattern that will distribute the denim more evenly over the back of the jacket without puckering.

A problem becomes a design element! The result will be a quilted look that stabilize the fabrics. 

Another problem is that, apparently, I don't have full ownership of the jacket. 

What's a human to do?

Between mending my jacket and some knitting, my cold and rainy days are interesting and productive. Maybe I'll be able to wear the jacket again this spring. 

Saturday, January 14, 2023

Japanese Mending

Mending is an ongoing job (our lifestyle is hard on clothes), and a good task for when the weather is too cold or rainy to do outside things. It has a utilitarian nature and so tends to be tedious, but I prefer the mindset of longevity through repair rather than buy, buy, buy. Plus, I like hand sewing.

When I discovered "visible mending," I was delighted to realize I can put a creative twist on a mundane chore, because it transforms a potentially boring task into something fun and interesting. Like when I mended my barn gloves, I used variegated embroidery thread and enjoyed the plaid-like patterns it made. Another example, when I hang laundry on the line to dry, I like to hang items in a color pattern, like a rainbow. The challenge is, can I do it? I try, for no other reason than it amuses me during an otherwise tedious job.

Two of the visible mending techniques I've discovered in exploring YouTube videos are boro and sashiko. These Japanese techniques are currently very popular with the needlework crowd, so if you're a stitcher, you're probably familiar with them. As a longtime embroiderer and patchwork quilter, they appeal to me immensely. I was curious to understand them better and started exploring videos. 

The best of these videos are by Atsushi Futatsuya. He is a native Japanese from a sashiko family, who lives and teaches sashiko in New York. He's the most authoritative source I've found. He has a YouTube channel, 刺し子 物語 & Sashiko Story, and website, Upcycle Stitches

From Atsushi's "Sashiko Story" video series, I learned not only about the tools and techniques of boro and sashiko, but was also introduced to the Japanese cultural significance and identity of these skills. 

Public domain image of late 19th century child's boro sleeping mat

Everything that follows below are the beginnings of my understanding.
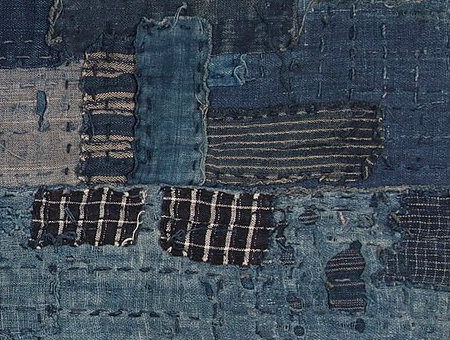
Here's a close-up of the above

Boro could be translated as "tatters" and describes the overall patchwork look of boro textile repair.
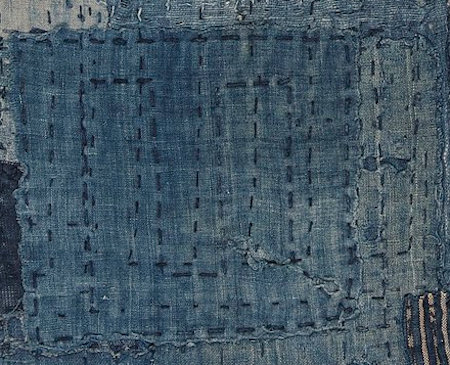
Another close-up

Sashiko means "little stabs," which describes the running stitch used to hold the layers of fabric together. Originally, the stitching served to strengthen and reinforce the fabric (like quilting). 

And another

Fast forward to today, and we see boro and sashiko are still mending techniques that have became more focused on the decorative aspect. They have become an art form in their own right. 

Even so, the precise origin of these crafts is vague, so there is a lot of speculation and opinion out there. Most sources agree it likely developed in rural Japan, at a time when fabric was expensive to buy.  That meant fabric was scarce and valuable. It was used and reused out of necessity. 

This kind of necessity is foreign to us moderns because fabric and clothing are now cheap and readily available. I buy almost all of Dan's and my clothing off the dollar rack at thrift stores. Much of it is never or barely worn! I buy a lot of fabrics at thrift stores too, and because these are so abundant and so cheap, it almost seems to make mending and clothing repair obsolete. Just cut up the old stuff for rags and use them instead of paper towels. 

From many of the videos I've watched, however, I'm seeing a shift of motive toward environmental responsibility. The clothing industry is excessively wasteful and fueled by fads. Mending, repairing, re-using, and re-purposing are ways the consumer can make a difference. And if the process can be creative and fun, so much the better! Hence the popularity of visible mending. 

Besides the cultural importance, what distinguishes sashiko from other forms of needlework?

  • Patterns are built with running stitches, which are stacked on the needle before pulling it through the fabric.
  • Traditionally, special needles, thread, and thimbles are used.
    • Sashiko thread is spun to make it sturdier for repair and longer-wearing than embroidery thread.
    • Needles are sharps and long enough to pick up several stitches before pulling through the fabric.
    • Needle eyes are narrow but long enough to accommodate multi-strand thread.
    • Thimble is a ring aka palm thimble. It's worn like a ring with a metal plate or leather flap on the palm side of the hand. It's used to push the needle through the many layers of fabric.
  • Traditional color is indigo blue, although nowadays, anything goes. 

Bibliography:
Japanese Mending © January 2023

Related Posts:

Friday, January 15, 2021

Visible Mending : Repairing My Work Gloves

I'm still darning and patching my way through a pile of socks, but I took some time out to mend my work gloves. They badly needed repair! 


My winter chore gloves are actually two pairs. The outer gloves are lined cotton work gloves, and the inner gloves are a fleecy fabric glove. If I wear only one or the other, my hands are cold. But when I wear them together, they keep my hands warm. However . . .


I let them get too worn out! But I hated to throw them away, so I thought, well, why not see what I can do to fix them? The first option was plain mending, but the hole is pretty big. Plus, I can't control myself when it comes to working with color, so why not do something prettier than plain and more fun to do?


I decided to patch the hole in the lining and darn the outer shell holes with embroidery thread. For the patch, I used one of the too-far-gone socks that I cut into rags


I didn't worry about finishing the edges or making it pretty. 


I just did the job, making sure the unfinished edges were sewn down. To darn the other holes, I used two strands of embroidery thread and a paint stirrer as a darning board.


The paint stirrer worked quite well, giving me a firm surface for weaving the threads to make the darn.


It was a lot to do, and it's not perfect, but the variegated blues of the embroidery thread made it fun and the darns sort of match the inner gloves. Plus, I didn't have to throw them away and spend money on new ones. Best of all, my hands are warm again!

If I'd used dark brown embroidery thread, the darning would be almost invisible. But the latest trend is "visible mending," which creates beautiful decorative elements from holes, stains, and tears; very fun. More on that in upcoming posts. For now, I'll close with a link to a page on the Collingwood-Norris website, "Visible Mending: Gloves." Lots of creative ideas there. ❤                                      

Mending Gloves © Jan 2021 

Sunday, January 10, 2021

Mending: Visible

Traditionally, the goal of mending was to repair in a way that wasn't noticeable. But the times have changed, and mending has become not only functional, but decorative as well. It has become an art form in its own right. Techniques include embroidery, applique, and top-stitching are popular, as well as the Japanese techniques of boro and sashiko. 

Here are some examples of my own visible mending:

Saturday, January 09, 2021

Plain Mending: Darning and Patching Socks

Does anyone keep a mending basket? A basket full of clothing items that need a ripped seam sewn, or a patch for a hole? Apparently, mending is the latest cool, sustainable thing to do. Keep old clothes out of the landfill! Of course, I agree. But because I remember a time when mending was looked down on as totally uncool, I feel a little smug that it's something I've always done. 

Winter is a fine time to keep a mending basket handy. Lately, mine has been filled with socks. Of course, hand knit socks must be mended. Too much much time, heart, and soul goes into making them!

The is one of my most frequently worn pairs.

To mend: sock yarn, darning egg, and tapestry needle.

This is just plain darning.

Actually, weaving a patch where the hole used to be.

Done. Inside view.

How it looks on the outside. It's on the bottom.

The socks I really seem to go through, however, are everyday cotton socks. And because I buy a large pack, they all seem to wear out at the same time. I've never been a fan of the buy&throw-away cycle, so since I was doing socks anyway, I decided to mend some of those cotton socks too. 

Plain darn with matching carpet thread.

Small holes are easier to darn. I used carpet thread in the above photo because I had it. Embroidery thread is a popular option because it comes in all colors (easy to match) and is inexpensive. Sometimes though, the holes in the heels are too large to darn, like the socks in the photo below.

Cutting cotton socks into rags.

These I usually cut into rags, so at least they are still useful. The other day, however, I wondered if it would be possible to patch the holes in the heels. Most of the socks with the heels gone still have good toes.

Sock toe to be used as a patch.

Why wouldn't these make good patches? So, I started cutting off the toes, cutting them in half, and then using them for heel patches.

Patched heel on sock.

I put the sock on my darning egg and pinned the patch in place. A running stitch holds it in place and a whip stitch further secures the edges. A blanket stitch in a colorful embroidery thread might be fun too. I also stitched around the holes to help secure the patch. 

How well will it work? Time will tell! But they're comfortable and I feel really good about getting more wear out of my old socks. 


Related post:

Monday, January 04, 2021

Mending: Plain

I wonder how many textile artists think of mending as part of their skill set. Especially, in our modern consumer society, where it's easier and cheaper to discard old clothing and buy new. Even so, the techniques of plain mending are given their very own chapter in Thérèse de Dillmont's classic Encyclopedia of Needlework.

Encyclopedia of Needlework is now public domain and available
 as a free download from Project Gutenberg or the Internet Archive.

"How best to disguise and repair the wear and tear of use or accident is quite as valuable an art, as that of making new things."

 Thérèse de Dillmont, Encyclopedia of Needlework 

A page from Encyclopedia of Needlework.

I do think mending is making a come-back because people are becoming more environmentally conscientious, and mending is a valuable way of keeping discarded clothing out of the landfills. But also, it is becoming an art form in it's own right, and it's been exciting to rediscover the old techniques and explore the new. 

Plain mending utilizes basic sewing skills and generally includes patching, darning and seam repair. While it may not be considered a creative outlet, I still think it's important to master the techniques and take pride in one's work. Since I have an overflowing mending basket, I'm going to do just that.