Friday, July 26, 2024

Non-fading Pokeberry Dye Part 1


I've experimented with natural dyes in the past, but until now, I've never tried pokeberries. This is because pokeberry dye is notoriously not color fast, so I thought, why bother? Then I ran across Carol Leigh's Non-fading Pokeberry Recipe and was able to snag a copy of the free PDF before her website disappeared. Happily, it's still available on her old blog, here.

Last summer, I started collecting pokeberries for this experiment. Because I didn't have enough plants to collect gallons at a time, I froze them as I picked them. I ended up with about a gallon and a half of de-stemmed berries.

The other day I was ready to try it. But the recipe itself is more of a description than a formula, so I had some figuring out to do.

"Carol Leigh's Non-fading Pokeberry Recipe" calls for approximately
  • 8-ounces of fiber
  • 1 - 2 gallons pokeberries, de-stemmed and crushed
  • 1.5 to 2 gallons fresh water
  • 4 ounces of 56% acetic acid
I couldn't find the 56% acetic acid, so I used what I could find, a 75% vinegar concentrate for DIY diluting. The link will take you to Amazon.

Carol Leigh's key points for color fastness are:
  • high ratio of pokeberries to fiber
  • high degree of acidity of the baths (both mordant and dye baths) 
  • long length of time for fibers to remain in each step of the process

She states that by following these points, her samples have remained color-bright for several years without fading. Which is why her recipe is so popular!

Day 1

Mordant fiber: 

I'm using a Dorset fleece that was previously scoured.
  • Mix 4 ounces acetic acid in 1.5 - 2 gallons of water (enough to comfortably float the fiber)
  • Thoroughly wash and rinse the fiber (or yarn or fabric)
  • Place damp fiber into acid water, bring to a high simmer (180-190 degrees F) for two hours
  • Leave over night to cool

Prepare dyebath:

  • Make acetic acid solution with 4-oz acetic acid per 1.5 to 2 gallons water
  • Add the crushed pokeberries, heat to low simmer 
  • Steep for 30 minutes
  • Let cool overnight

Notes:
  • I substituted 75% acetic acid in the same amount.
  • On a whim, I tossed in another cup of 5% acetic acid (household vinegar) into both baths
  • All sources agree that the best color is obtained by keeping the berries and dye bath below boiling.

Day 2

  • Remove fiber from mordant bath
  • Strain berries from dye bath
  • Mix mordant and dye baths together
  • Return fiber to the pot
  • Steep at a medium high temp (160 degree F) for two hours. 
  • Turn off heat and leave fibers in bath over night.

Day 3
  • Remove fibers from dyepot
  • Gently squeeze out excess liquid. Do not rinse yet. 
  • Lay fiber out on screens or towels out of the sun for several days to set the color. 
Freshly dyed damp fiber laid out on a screen to dry.
Notes:
  • The inconsistency of color tells me I had too much fiber for that size pot.
  • I can either blend it, or sort it by shade for spinning.
Apparently, the temperature of the dyebath has a lot to do with the color that results: red, fuchsia, pink, etc. My dyepot was maintained around 130°F (54°C) for an afternoon, so that's what I got. 

I will let it sit for at least several days before rinsing out the excess dye. 
I'll report on that here ⇒ Part 2.

Recipe Resources
EDIT: to add

Related post

Tuesday, July 23, 2024

Accidental Corkscrew Nub Yarn

With the gift of the lovely white Shetland roving I received last May, I was motivated to get out one of my spinning wheels and spin some yarn. This was my first time in quite awhile, so I had to get used to the wheel and do a bit of experimentation. The wheel has several "speeds" with which to spin, and I settled on one that quickly added a fair amount of twist. 

As singles, highly twisted yarn stores a lot of energy, which will cause a skein of singles to twist. To balance the yarn, it must be plyed with an equal amount of counter twist. So to ply, two singles are spun together in the opposite direction. If correctly done, the newly spun, washed and dried skein won't twist. It will hang straight, like in the photo on the left. If the yarn isn't balanced, the skein will twist to one side or the other. 

With a faster speed, the trick is to draft out the fibers to match the speed of the wheel. This is what I need to practice on because I ended up with small over-twisted bits that look like little corkscrews in the finished yarn. 


I'm guessing somewhere, in somebody's book, this is a deliberate design feature, but I don't recall running across it. I do like the look of them, but I wonder how it will work up. Unbalanced yarn tends to skew knitting, for example. 

Because one thing leads to another, I'm going to finish the rest of the roving the same way. That will give me enough to play with and see what happens.

Actually, I'm thinking it would be pretty neat if all the corkscrew nubs were different colors. Hmm. Another experiment is brewing in my brain incubator. 

Thursday, July 18, 2024

Tie-On Project: Lap Robe

Never one to waste a good threading, I've been been measuring warp for a lap robe using the same draft as my throw rug. This is going to be a gift for someone in assisted living, so I'm using washable yarn from Hobby Lobby. They have excellent sales, and that's the time to buy anything there.  

The warp yarn was on clearance, so I bought up what I could. I ended up with two different colorways to get enough, but they coordinate. 

When I calculated length, I found I had enough to make it a generous length, probably more afghan size. The weft is ivory. 

This post marks the beginning of the project. Hopefully, tying on the rest of the warp won't take long and I'll be weaving soon. 

Tie-On Project: Lap Robe © July 2024 

Related post

Tuesday, July 16, 2024

Pumpkin Heads / Chain of Hearts Samples Comparison

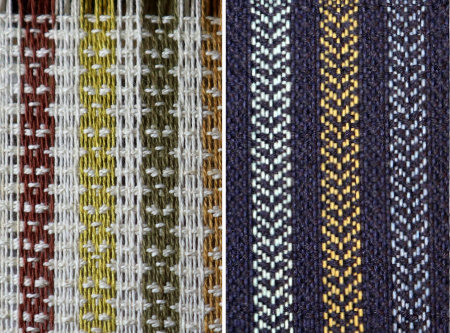
After a spinning prep break, it was time to finish the evolving pumpkin head samples. They have fascinated me because of the difference the yarn makes in the woven pattern. 

Here's the chain of hearts draft. 


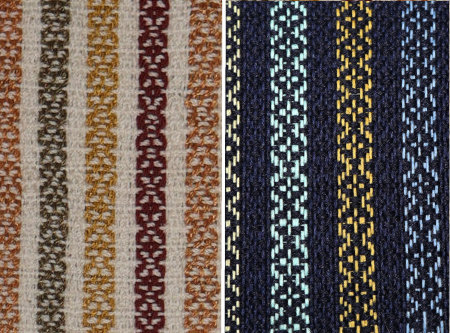
Here's a side by side comparison of the two samples woven with that draft but different yarns. 

Same threading, same tie-up, same treadling, different yarns.

Because the hearts in the sample on the right are flattened, I tried again with a lighter beat. 


The hearts look more proportional, but I can see how the beat very much makes a difference in how my eye interprets the motif. The two outer columns look like hearts, but the center column and its neighbor on the right begin to morph to faces where the beat didn't pack the weft in just right. 

Next, I tried the circle and cross draft. This one has the same threading and treadle tie-up as chain of hearts, but it has a different treadling.


Here's a side-by-side comparison with the two different yarn weights.

Same threading, same tie-up, same treadling, different yarns.

As with the chain of hearts, the sample with the heavier yarn looks more like the pattern in the draft than the sample with 10/2 yarns.

One more sample. This one is the circle and cross pattern with alternating weft colors. 


Here is my side-by-side comparison.

Same threading, same tie-up, same treadling, different yarns.

And here's the entire sample.


Observations
  • For whatever reason, the finer yarn didn't translate the pattern as well as the heavier yarn. I assumed I'd have the pattern in miniature, but different elements became visually prominent instead. 
  • Beat is an important element, obviously, especially consistency of beat.
  • The cotton yarns produce a flat looking fabric, whereas the knitting yarns are loftier so the fabric has more texture. 
  • For the plaid sample, I think I'd prefer better weft color contrast. Perhaps make the warp stripes very light in color, and use darker weft colors for the horizontal stripes.

All in all, I found this experiment extremely interesting, and perhaps the stuff of more study someday. 

Saturday, July 13, 2024

Fiber Doings & Spinning

Summer is a busy month for the garden and outdoor projects. But I still take time every day for some fiber and textile play. At the moment, that's been fleece prep and spinning. 

For spinning, I'm still working on the beautiful Shetland roving gifted to me. Spinning isn't exactly something one forgets, but I did have to practice a bit to re-learn the right treadle pressure, rhythm, wheel tension, and best amount of twist (still working on that one).

I got my first bobbin filled, and wanted to ply it from a center pull ball. But my ball winder is missing the thumb screw that attaches it to a table. I'm sure it's around somewhere, but in the meantime, I decided to try my hand with a nostepinne. 

A nostepinne is a Norwegian tool for winding yarn into center pull balls. It's basically a tapered dowel, often with a notch or two. It looks something like this. 


This isn't a true nostepinne, but rather a pirn for an end feed shuttle. It's not as thick as the nostepinnes I've seen demonstrated on YouTube, even though I've seen pirns like this being sold on Etsy as nostepinnes. It's what I have, so I decided to give it a try. For a first ball, I'm calling it "not bad," with room for much improvement. 

I'll let you know how the plying goes.

My other fiber project has been completing the requirements for a textiles merit badge at permies.com. I've blogged about these virtual badges before, and what makes them fun, is the challenge of accomplishing a skill. This badge requirement is for preparing 8-ounces of sheep wool for spinning. So it's been a great way to get back into the swing of things. 

Here are my documentation photos. 

unwashed fleece

Unfortunately, I'm not sure what breed this is from. It was stuffed into a large trash bag and once upon a time was labeled with a piece of masking tape. Alas, that fell off, so I'm clueless, which is too bad because it's a lovely fleece. 

skirting, sort of

Since it was a jumble, it's hard to tell what's what. But I picked out all the dirty bits and second cuts, and sorted it according to crimp and length.

scouring

This fleece had been in storage for probably 20 years, so the lanolin was pretty hard! One good point about storing it in the grease was that fiber moths never touched it. 

washed and dried

The requirements call for preparing half-a-pound, so here's 8 ounces of it, washed and weighed out.  

To prepare for spinning, I decided to use my hand cards. This is primarily because my drum carder needs its belt replaced. But since the badge requires that I state why I chose my processing method, I'll add that the crimp and staple length recommend it for woolen spinning. Hand carding is a traditional prep for this, so hand carding is a good choice.

I will say that the tips were still a little stiff, so I used my bunny dog comb to open them up before loading the hand cards.


It was nice that it only took a little practice to feel like I know what I'm doing again. It's slow going, however, (relaxing) so I'm listening to Anna Karinina from the Internet Archive while I work. I like the reader so it's all very pleasant. 

I'm not quite done yet, but my basket of rolags is growing!

After I finish this, I'll get back to finishing my evolving pumpkin heads sampler and start measuring warp for the next project for my floor loom. 

Fiber Doings & Spinning © July 2024 

Monday, July 08, 2024

My Dornik Herringbone Throw Rug is Done

Here it is in it's new home . . .


The particulars
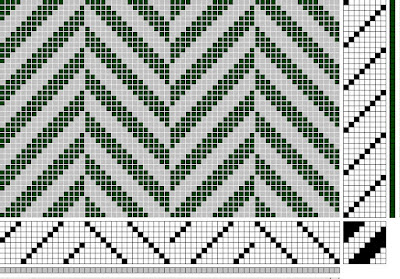
  • Pattern: Recipe for Dornik Herringbone  - for tweeds from Mary Meigs Atwater's Recipe Book, Series IV, No. 12.
  • Draft:
Screenshots of the original pattern can be seen in this post. 
  • Loom: Glimakra 8-shaft countermarch
  • Yarn: 4-ply medium weight cotton
    • Warp: Peaches & Creme in "Happy Go Lucky" (variegated)
    • Weft: Sugar 'n Cream in sage green
  • Ends: 352
  • Sett: 8 e.p.i.
  • P.P.I.: 15
  • Width 
    • in reed: 43⅝ inches
    • on loom: 39⅜ inches
    • off loom: 39"
    • wet finished: 35"
  • Length
    • on loom 71¾"
    • off loom: 68" without fringe
    • wet finished: 64" excluding fringe
  • Fringe: twisted
Thoughts
  • The draft was a good choice for a throw rug.
  • The selvedges turned out well (always a concern).
  • I chose the pattern from a photo of a sample. The tweedy look of it appealed to me. 
  • However, my variegated warp yarn delivered a different effect, which is neither right or wrong, just different from what I was thinking.
  • For example, the long wavy stripe left of the rug center. Not planned, just the fate of how the warp was measured. It definitely catches the eye and becomes a design feature (planned or not!). 
  • Even so, I can live with it, and overall, I'm satisfied. 

Wednesday, July 03, 2024

Dornik Herringbone Throw Rug: Almost Done!

It's off the loom and I'm twisting the fringe. 


As I'm working, I'm thinking about what else I can do with the remnant of the threaded warp. 

The first thing I'd like to do, is to tie on for a lap robe as a gift for someone in an assisted living situation. I can make it the same width, but not so long. I have some pretty yarns to work with and I think it will make a nice gift.

I'm also thinking about make a runner rug with the same threading. It will be narrower and treadled differently, because I'm curious about this . . .


. . . as a possible design feature.

This occurs because where the herringbone diagonals reverses direction, the warp ends are threaded on shafts 4 and 8. 


The reason for this is to prevent long skips in the pattern. The doubled warp threads aren't noticeable in the herringbone pattern, but really stand out in the plain weave header. 

My thought at the moment is to thread this doubled warp with the sage green, and the rest with the variegated white. Use the same variegated yarn as weft, treadle for plain weave, and I should have a cross hatch design with long green stripes. I'd have a coordinated runner rug in the same colors, while getting to play around a bit with a "what if."

So that's the plan at the moment. I'll weave the lap robe next because it will be the same width. The runner will be after that because I'll make it narrower than the throw rug.