Sunday, August 06, 2023

Table Loom Sampler: First Set of Samples

I've made a start on my sampler. Initially, I was going to follow the sampler directions in  Learning To Weave, but then changed my mind. I wanted to weave a sampler, but after learning how to adapt weaving drafts for a direct tie-up table loom, I was more interested in experimenting with this and putting the loom through its paces. (Or maybe putting me through my paces.)

Finding that blog post about lashing on the warp reminded me about the two-stick header. 


I have found this to even out tension across the warp wonderfully. 

My first tentative inches looked pretty good, except for the right-hand selvedge. 

Then I started pulling in the weft a little more before beating and it was better after that.

So far, I have five, three-inch samples to show you. Both warp and weft are 8/2s cotton. Sett is 20 epi. Threading is straight draw (1, 2, 3, 4, repeat).

Sample 1

Plain weave

Lever lift sequence:
1-3
2-4
repeat

Sample 2

2-2 twill
Lever lift sequence:
1-2
2-3
3-4
1-4
repeat

Sample 3 

Vertical herringbone from Marguerite Porter Davison's
A Handweaver's Pattern Book.

Lever lift sequence:
3-4
1-4
1-2
2-3
1-4
2-4
2-3
1-2
repeat

Sample 4  

Swiss twill from Marguerite Porter Davison's
A Handweaver's Pattern Book.
Lever lift sequence:
4
1-2
2-3
3-4
repeat

There are a couple of things to note on this sample. One is the weft bump in the center of the sample.

Freyed weft thread.

Since this was just a sample, I didn't worry about it.

The other is the warp float on the selvedges. 


This is common with twills, and the solution is usually to change the direction that the shuttle is thrown. For this pattern, that simply shifted the warp float from one selvedge to the other. The answer would be a floating selvedge. 

A floating selvedge is a warp thread on the outer edge of the warp, which is not threaded through a heddle. That means it isn't subject to the lift pattern and potential warp floats. Discovering this is an excellent reason to always sample!

Sample 5

 Ribs 3 & 1 from Marguerite Porter Davison's
A Handweaver's Pattern Book.

For a seemingly simple pattern, I had trouble with this one. My selvedges, for one thing. The other is inconsistent beating. 

Lever lift sequence:
1
2-3-4
1
2-3-4
repeat

Observations so far:

  • I need practice but the sampler is turning out better than I thought!
  • I especially need to develop consistent beating. Part of what I need to get used to is that there are two positions for the beater bar. I'm not really sure when to change, but I suspect this affects my weaving.
  • The loom is quiet
  • Nice clean shed
  • No tension problems! (notable after using the no tension to wind on the warp method)
  • I need a taller stool (or a shorter table)

Related posts:

Friday, August 04, 2023

Table Loom: Direct Tie-Up & Reading Drafts

On most floor looms, the last step in preparing the loom is tying up the treadles. They can be tied up in multiple configurations and allow multiple shafts to be lifted with one treadle. With a table loom, each shaft is permanently attached to its own lever. Each lever operates only one shaft. 

As I've been weaving my sampler, I find myself wondering about this. Can I do the same things on a table loom that I could do with my floor looms? Or am I going to be limited? How do I read a draft and translate it for my table loom?

Threading the heddles is the same on any loom with shafts. To weave the above pattern, I'd thread the heddles in shafts 1-2-3-4-3-2-1, etc. But I don't have treadles to tie up, so the tie-up and treadling instructions will have to be looked at differently. I'll still read the treadling graph, but instead of tromping a treadle, I'll follow the column up to the tie-up. From the tie-up, I'll manually lift the shafts indicated in that column. I wonder if it's possible to memorize it from continuous repetition!

This seems a wee bit more complicated than simply treadling, but I'm sure I'll get used to it.

© Aug. 2023 by Leigh at Leigh's Fiber Journal

Related post:

Thursday, August 03, 2023

First Warp on the Table Loom

The Rasmussen table loom is assembled and ready to go!

Try as I might, I could not find a manual for this loom. But while it would have been nice, I figured a table loom is a loom, right? I've never worked on one before, but was guessing I could figure it out.

For my first warp, I decided to weave a sampler. For one thing, I don't want to be overly confident climbing back into the weaving saddle again. For another, I need to learn this loom. I figured a smaller piece for practice would likely mean fewer frustrations if I run into problems. 

To refresh my skills (and memory), I dusted off my copy of Learning To Weave by Deborah Chandler. Ironically, this is the book I was working my way through when I first started this blog!

I don't have a raddle for this loom, so my first warp will have to be front to back. This is how I learned, but I had a lot of trouble with tension, so I later started warping back to front. That helped a lot! (You can learn the details in my post, B2F vs F2B: Why I Switched.) 

Instructions for the sampler recommended two contrasting colors. I chose blue and white.

8/2 cotton

Then I had to figure out where to put my warping board to measure the warp. Over-the-door hooks on the closet door worked really well.

The sampler will be a small one, and I
need two yards, 60 ends of each color.

The first step after measuring the warp is sleying the reed. For that, the book said to secure the beater bar in its upright position. Well, that stumped me because there's no latch to secure the beater in any position. Then I took a closer look at the simple dowel setup for the beater. 

Beater bar set on one of the two dowels lets it move back and forth easily.

I had no idea why the loom had two dowels for the beater; maybe to shift it's position back to allow a little more weaving room(?) Then it dawned on me to try this . . .


Eureka! Placing the legs of the beater between the two dowels holds the beater upright so the reed can be sleyed!

Sleying the reed

I wondered how it would feel to be doing this after so many years. Would it be awkward and slow? I was happy that this wasn't the case. It all seemed so natural and went quickly.

Threading the heddles. I started by resting my arms on the back beam,
but quickly discovered it's more comfortable to work under the beam.

One nice thing about a table loom is that it's very compact. It's easy to turn the loom to thread the heddles from the back. 

Things came back to me as I worked. Things like remembering to secure the loose warp at all times, but especially when I walk away from the loom. That was a lesson taught to me by Catzee!

Every 12 threads in the heddles are tied with an overhand knot.
The loose warp waiting to be threaded is tied with a slip knot.

Better to be safe than sorry.

Potential for disaster seemingly fast asleep.

I found my threading hook to be too long for the short space I was working in, and so switched to my brass combo sleying/threading tool. Threading went more quickly after that. 

Of the methods for tying the warp to the back apron rod, I chose overhand knots. 

Tying the warp to the back apron rod.

Next came winding on the warp. I confess I was nervous about this. From the video, How To Put a Warp on Your Table Loom, Pt. 1, I learned that one advantage to a table loom is that it's easy to tension the warp by pulling it with one hand, while winding it on with the other. No weights or extra person necessary. But could I hold the tension evenly? That's the question. 

To double check, I read the "Tension during beaming" section in Deborah Chandler's book. She says

"The question of how to get even tension has a simple answer: don't apply any."

Wait, what????? I confess I never actually read her book from front to finish. I mostly used it as a reference resource after I took my weaving classes. I wasn't sure if no tension made sense, but I figured what the heck, this is a learning sampler, after all. What have I got to lose?

Winding on the warp with no tension.

She goes on to explain how to wind the warp tension free, when to stop and comb out tangles, and use warp separators. 

Ready to secure to the front of the loom.

Next on the list, attaching the warp to the front apron rod. For that, I decided to use my tried and true method of lashing on. 


I never had much luck tying and tightening knots, but found lashing on to be easier to achieve an even tension.

Lashed on warp

You can read my original post about lashing on here →How To Lash On a Warp.


And there it is. First warp on; it's time to weave!

Tuesday, August 01, 2023

Tablet Weaving: Ladoga

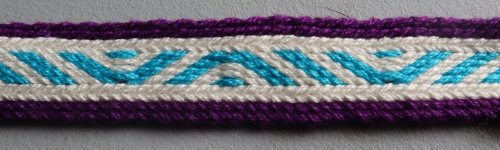
Ladoga was a Norse settlement in Russia. The original band was discovered in 2010 at the Ladoga Burial Mounds about 70 miles east of St. Petersburg. It has been dated at sometime between the 10th and 12th centuries. 

The Pattern

Credit: Lady Elewys of Finchingefeld
The accompanying video is here.

My earlier blog post, Tablet Weaving Notes, explains how to read the pattern and thread the tablets.

Yarn

Artiste #8 Crochet Cotton
I substituted ivory for the yellow and turquoise for the green.

My Band


It turned out much, much better! This is because of what I learned about the border cards (below).

What I Learned
  • Split pack - when some of the cards are turned one way, the others are turned the other way. In this pattern, only the four center tablets of the warp reverse direction. The tablets on the edges are only turned forward.
  • Turning the border cards only the same direction creates a neat, smooth edge to the band.
  • Turning the border cards only the same direction also creates over-twist in the unwoven warp.
You can see the over-twist in the purple warp threads on the left.
  • There are two ways to deal with this:
    • Reverse direction of turning the tablets to untwist the twist. (This is what we did in the first pattern.) But this creates yarn bumps on the edges.
    • Flip the border cards, so S becomes Z, and Z becomes S. Then continue weaving as before. It's shown in this video, Tablet Weaving Tutorial: Untwisting Warp Threads. Creates a smoother selvedge with no bumps.

Observations
  • This was a good second tablet weaving project. 
    • Learning how to make neater selvedges was encouraging.
    • Keeping track of the cards turning in different directions was relatively easy to follow with this pattern.
  • For some reason, I made several mistakes anyway. Perhaps it was mistakes in turning the tablets, or perhaps I didn't always get a clean shed because I wasn't paying close enough attention.
  • Consequently, unweaving mistakes is more difficult with a split pack! 
  • Learning samples are the way to go! No grief if I just simply start over from the mistake.
  • Also, I'm seeing the appeal of an inkle loom for tablet weaving. When measuring with a warping board, there are a lot of tangles to deal with, especially after threading the cards. That problem seems to be eliminated with the inkle loom. However:
    • I don't have an inkle loom.
    • I'm not inclined to get one.


Related posts:

Saturday, July 29, 2023

Studio Progress


I feel like I'm finally in the home stretch of getting my boxes unpacked and my studio organized. It could probably be asked why I've been dabbling in tablet weaving when the studio still isn't done. My only defense is that it's been a slow process to figure out where to put everything. I'm slow to think things through and often find myself testing trial arrangements to see how I like it. If I'm not happy with them, then I try something else. My goal is to have everything organized and accessible.  

Then, getting the table loom meant that I now wanted my weaving yarns sorted and handy instead of in random boxes. But that meant I had to find someplace to put my books, and the original small bookshelf was inadequate. It finally occurred to me to drag out the tall bookshelves still in storage. I painted them and they have become the home for all my books and workshop notebooks. 

The other bookshelf (on the left in the above photo) is becoming a home for my cotton weaving yarns. Sorting these has been a slow go because many of the cones aren't labeled. So I'm having to figure out sizes and fiber content. That's taking time as well.

Slowly, I'm finding homes for everything (I think). Like my warping board. 


I have no wall space to hang it permanently, but it's out of the way on ceiling hooks and easy to get down when I need it. So, progress is slow but steady.

I've set myself a deadline of two more weeks to finish up. That should be plenty of time to shelve the yarn, and I'm thinking I can use the empty totes to organize spinning fibers. With the yarns out of the closet, I can store my fibers there. Hopefully, in mid-August I can do my studio grand reveal.

Studio Progress © July 2023

Related Post: