So here I am, warping my jack loom once again, after months of abandoning it for my new countermarche. Why am I doing this after all my praises for the countermarche system? Well, I am wanting to see if I can get a better warp, better shed, and better weaving, incorporating everything I've learned about looms lately.
Several weeks ago, I discussed the pros and cons of lashing versus tying a new warp onto the front apron rod. With this next warp, I'm going to use the lashing on method. I thought I might show you step by step how I do this. It can be done with either a b2f or f2b warp.

After the warp in wound on and threaded, I go to the front of the loom and trim the warp so that it is fairly even. I know that some weavers can measure their warps so that they are perfectly even, but I'm not one of those weavers.

The warp is knotted in one inch groups. I use a slip knot to do this. I have read that this is not a good idea as the slip knot can slip, but I haven't had any problems with it. I reckon if I ever do, then I'll use a different knot.
 Before I begin lashing, I do two things.
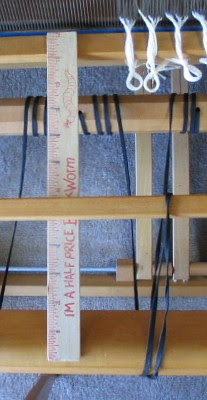
First I support the front apron rod as shown on the left, using two 12 inch rulers. I place one on each side of the warp, resting them between the breast beam and the beater. The front apron rod is laid across those two rulers. This supports it for lashing.
The second thing I do is to make sure that the apron cords are centered in relation to how they wind onto the cloth beam. On the left, you can see the cloth beam with the black apron cord wound around it (near the top of the photo). The cord then travels over the breast beam (at the bottom of the photo) and is looped over the apron rod (resting on top of the ruler in the photo's center.) The apron cord forms V shapes. I try to center each point (where the cord loops over the apron rod), in the middle of the V. The one pictured on the left (to the right of the ruler) isn't centered, so I moved it on the apron rod a bit to the left.
The lashing cord needs to be about 9 to 10 times the width of the warp. It also needs to be very smooth, so that it can slide easily through the warp bundles. Mine is a smooth braided cord. It is tied to the front apron rod with a double half hitch.
 Next, I lace the cord through each warp bundle. I go through the center of each bundle, threading the lace from the top down.
The lashing cord then goes under the apron rod, and then up and over it. (See photo at right.) The effect is that the lashing cord is being spiraled around the apron rod, through each group of warp ends. I aim to keep about three inches between the warp knots and the apron rod.
I continue threading the lashing cord through each group of warp ends. I pause occasionally, to tighten up the cord. Once it's laced through all the warp bundles, I tie it on the other side of the apron rod with another double half hitch.

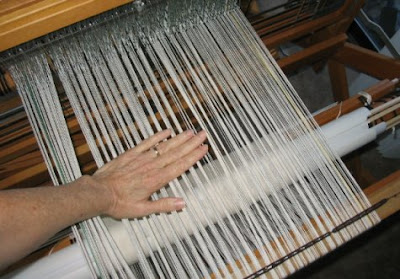
The next step is to begin to even out the tension across the warp. To do this, I go to the back of the loom and push down on the warp......

... focusing especially on the sections that are tautest. Since the warp bundles can slide easily on the lashing cord, the tension begins to even itself out.
To test how even the tension is across the warp, I go to the front of the loom again, and check it behind the reed.....
I repeat this process until there are no obvious taut or loose sections. Then I can fine tune the tension from the front.
 Since the lashing cord slips easily through the warp bundles, fine adjustments of the tension are fairly easy. The tension of indivudual bundles can be adjusted by either pulling on the cord, or by pressing down on the knots. Either way works.
I used to fret over getting the tension perfect. I felt quite inadequate because I wasn't always sure how even the tension was. Then I read "Lacing On" in Peggy Osterkamp's second volume. On page 65 she says,
"Don't agonize. If you can feel a tight or loose bundle, adjust it, but if you can't tell, then the tension must be even."
If I have any further doubts about the tension, then I use a two stick header. This always seems to even the entire thing out. It entails using two smooth sticks or dowel rods.
To make a two stick header, I first throw three shots without beating, then beat them all together. After about one inch of plain weave, I place a stick in each of the next two sheds.

This evens it all out like a dream. Then I weave another inch of plain weave, and I'm ready to begin on my project.
Related Post:
Comparing Looms: Jack & Countermarche
Jack Loom Revisited
28 comments:
Thank you so much for sharing this. I lash on as well, but not quite this same way but will be trying this. I appreciate you showing us how you did it so us "newbies" can work on our skills.
Hmm I don't lash even though I use the word. I tie on, I guess, because I do have an apron. I truly haven't had a problem with tension.
I do love this photo-essay instruction! It is so very clear; I feel if I did lash, I would have absolutely no problem!
Rarely do I see something that makes me say, "Wow I can't wait to give this a try!" I have never lashed on, but will on my next warp, and I have been weaving for 48 years. This is a fabulous post. Thanks!
Reading this makes me want to weave so much that my heart aches, but I'm throwing myself into soap production for the holidays so probably won't have time to weave until after Christmas. I'll be chomping at the bit by then. I wonder if lashing matters as much since I warp F2B. And I'm anxious to hear the outcome of how the jack performs. Yet another great post, and I second your nomination (or third it) for Nice Matters. Thanks!
I always look forward to your latest post because I invariably learn something from it. I lash on, but now and then things don't go quite how they should, in that I don't always get an even warp spread. The idea of using thin sticks/dowels between header wefts sounds like a goer!
I have lashed on before, but I had never heard of your way of adjusting the tension. Brilliant! Thanks so much for sharing.
Great pictures and informations.
Thanks for sharing with the weaving community.
This is a fantastic tutorial. I am definitely going to try it - thanks Leigh.
Thank you so much for this tutorial! Just wonderful info - and really clearly explained. I'm winding warp tonight, I'm going to give this a whirl!
- Kristin
Thank you SO MUCH for this info. I've never tried lashing on before - but will definitely try it on my current warp. Perhaps you should write a book???
It's now 2010 and this blog post is STILL helping weavers. Really good. Thanks
Catherine
And it's appreciated in 2013. Thanks
It's now 2014 and this blog post is STILL helping weavers! I used your method for the first time - once with a heavy string (something like kitchen string), which was so-so - it's a little rough. Then re-did with 3/2 cotton. Amazing! It works!
Thanks in 2015!! Will do this later today.
Great blog post - thank you! New people like me are still learning from it 8 years later!
You all are so very welcome. I'm so glad this post is still a help. Your feedback makes my day!
I have been weaving, and teaching weaving, for about 40 years. Just recently read a comment about lashing on, (a new procedure to me), and looked it up. Found your post and it is so well-done and explicit that I intend to try it with my current student. Thank you so much.
Thank you for sharing!
Very helpful post that I wish I had seen long ago - my thanks. Trying to re-think some of my long-established weaving habits and came across a reference to this page on a reddit weaving thread about using texsolv heddles to tie on to the warp beam to dramatically reduce waste.
Thanks in 2017! Great post!
I just found your blog too. Wow what great info you have provided! I have wanted to try this for a very long time but I could never find a clear explanation for how to do this until now! Thanks!! I'm going to try this on my upcoming project, which is also going to be one of your other posts- the Ms and Os towel.
2018, thats-you! I tried this today and it has worked a treat!
Thanks in 2018..Newcomb WD Nebraska!
Great to find in 2018. I just acquired a Tissart loom and it arrived in one piece with warp still on. I am a total newbie and want to make rugs Had a bit of trouble finding the beater bar but when I did discovered the little bundles of warp underneath. This would be a great way to attach them to the front beam . But what I don't understand about how lashing works is how it winds over the front apron if it is not tied to it. Or is it stationary for a small piece. Can I use the lashing technique and then still get it to attach to the front apron. Thanks Dianne
2019 and still helping weavers to learn new skills. Thanks so much for posting.
Very informative and concise. The pictures are 👌.
I am slowly dressing my new-to-me Glimåkra Standard floor loom. Your blog has given me great ideas, and the strength to just try things out. Thank you!
Anonymous, I'm so glad! So much of learning weaving is being willing to experiment. :)
Post a Comment