Wednesday, August 29, 2007

Space Dyed Twill Afghan

By Leigh

My latest Christmas afghan is just off the loom! I haven't finished the ends or washed it yet, but here it is. This is the side I looked at while weaving .......

One side of my latest twill afghan.
It has solid colored weft faced twill zig zags. You can see the space dyed warp stripes subtly underneath.

Now here is the other side .......

The other side of my latest twill afghan.
... where the zig zags are warp faced, showing off the color changes in the space dyed yarn. Much more interesting to my eye. You can still see where I was unable to perfectly match the space dyed sections, but I am happy with it all the same.

A problem with loose selvedges.After weaving awhile, I did start to have problems with warp looseness at the selvedges, creating an upward turn to the fell. I am guessing this has something to do with the fact that I have tied on so many warps.

And my solution.

My solution was to use an S-hook and a half filled half gallon milk jug to take up the slack. This worked very well and straightened the fell out nicely.

I think this is the end of experimenting with space dyed commercial yarns for awhile. I didn't have much success measuring the warp ends individually, nor was measuring the sections in bouts from separate skeins achieve what I wanted. Using them as weft was okay, but the results weren't exciting enough to want to try this again. So, as Peg said in the comments of my last post, that only leaves dying my own warps.

So, that is on my future "to do" list, when I have more time and a better set-up for dyeing.

To finish this afghan, I'm thinking that instead of fringing it like I did the others, I would like to put a crochet edging around it. I'm thinking that a scalloped or picot-type edge would be nice as this would compliment the zig zags. However, this will have to wait until the weather cools down and I won't mind working with an afghan in my lap. In the meantime, on to the next afghan.


Related Post:
More Space Dyed Twill Weaving
Finishing the Unfinished Afghan

Sunday, August 26, 2007

More Space Dyed Twill Weaving

By Leigh

Although I've mostly been concentrating on the alpaca projects lately, I haven't given up on my Christmas afghans, and am in fact still contemplating how to incorporate the zig zag twill with the commercial space dyed yarns.

My first afghan, used the space dyed yarn as weft. I was semi-pleased with the results. There are possibilities there, but I was more interested in exploring space dyed yarns as warp. My first experiment with this was the summer & winter place mats.

When I warped my Mighty Wolf loom for those place mats, I cut and measured each warp end individually, trying to start at the same place in the yarn's color sequence. That was not only very time consuming, but I ended up wasting a lot of yarn. Not to mention that I wasn't really satisfied with the results. So I decided to try something different for this next afghan.

I actually had two things to consider. First was space dyed effect, but also I wanted to figure out how to center my twill zig zags within the color stripes. From that first afghan, I realized that this wasn't as easy as I thought I'd be.

One option for centered zig zags was to widen the warp color stripes, which I did here. I had to spread the stripes out however, because the very nature of twill lends itself to the overlapped effect that I was trying to avoid. My second option was to treadle narrower zig zags, which is what I planned to do this time.

First though, I had to figure out what I can do with the space dyed stripes. Since cutting the individual warp ends by color was a drag, this time I decided to get eight skeins and see if I could match them all up to start the color sequence at the same place. Then I could start measuring the warp from there. I used eight skeins, because my threading sequence is a straight twill using shafts one through eight.

8 skeins of space dyed yarn, ready to measure.
I don't have a warping paddle, but I figured I could measure the warp from all eight skeins together without one.

Matching the color sequence in all 8 skeins.
Once I matched up the color sequence for all of them, I started to measure the warp on my warping board. However, I discovered that the dyeing is inconsistent amongst the various skeins, so that the colors get out of sync every several yards. I compensated for this by making my bouts very small. Still, there are some odd color threads here and there.

The next thing I had to figure out was which treadles to use in order to keep the zig zags within each color stripe. After a little experimenting I discovered that in order to keep the zig zags within the color stripes (which are eight warp ends wide) I needed to treadle it 4, 5, 6, 7, 8, 1, 8, 7, 6, 5, and repeat. If I were using my jack loom, I would simply change the tie up so that the treadling would start on the first treadle. But since this is a countermarche loom, it is easier to change the treadling sequence(!)

I found, however, that it was easy to keep treadling in the same direction instead of reversing where I needed too. After confusing myself several times and having to unweave a few mistakes, I finally thought to use rubber bands to mark the treadles I am not using.

I marked the treadles I didn't need with rubber bands.
Since I treadle bare footed, this made it easier to keep track of where I was.

So, here's how it is turning out. The weft is a solid blue.

The first inches of my latest afghan.
The zig zags themselves are a tad narrower than the ones on the previous afghans, but that's okay. However, I am still not satisfied with the space dyed effect, because of those maverick threads that didn't follow the color change sequence evenly. So I just won't point this out to the recipient, who will be none the wiser for it. I'm very curious to see how the underside is turning out, but I will have to weave a little more before I can find out.


Related Post:
Space Dyed Twill Afghan
Finishing the Unfinished Afghan

Thursday, August 23, 2007

2 Past Tri-loom Projects

Working with my tri-loom again got me to thinking about projects I used it for in the past. I made quite a few shawls, but most of them were given away. I do have two projects left though. Well, one my daughter has, and the other is mine.

This one is a Kennedy tartan shawl, modeled by my daughter......

Kennedy tartan shawl woven on a tri-loomIt is one of our family tartans and I made it as a gift for her. It was woven with Brown Sheep's Nature Spun wool yarn in worsted weight. We added a velvet edging as she didn't care for the feel of wool against her neck. In looking back through my notes, I am amazed to realize that I wove this in 2003!

A 2 triangle ruana, also tri-loom woven.The other project that I still have is a ruana that I wove for myself (which is a rare thing as I seem to give most of my weaving away.) It was also woven in 2003. For it, I used my handspun; a wool, mohair, and silk blend, purchased as a commercially dyed roving. I did not spin the yarn specifically for this project, but just had a lot left over from a sweater project.

It is actually two triangles, both woven on the tri-loom, one on top of the other. In words the first one was woven and left on the tri-loom, then the second was woven on the tri-loom as well. These triangles became the two halves of the ruana. They were chain stitched together along the top of the loom to form the back (see photo below). The neck and front edges are chain stitched from the opposite side of the loom, around the neck, and down the other front.

Closeup showing how the 2 triangles are finished on the tri-loom.
Back side of finished ruana.I don't know how well you can see all that from the above photo. Actual instructions for making one of these can be found on Carol Leigh's Triangle Frame Loom Weaving Magic.

The fabric was very open, as you can also see from the above photo. After it was taken off the tri-loom, I fulled it until it was thick, warm, and snug. The resulting neckline in back is V shaped as in the photo on the right. If you look carefully, you can also see the seam line down the back from chaining the two halves together. It's barely noticable after fulling.

I prefer to wear it with the neckline from shoulder to shoulder, boatneck style, with one side thrown over my left shoulder.

And before I forget, there is one more free resource I'd like to share with you. It is a yardage chart for various types and sizes of frame looms. You can see it by clicking here.

© 2007 Leigh's Fiber Journal

Related post - Alpaca Tri-loom Teddy Bear Shawl

Monday, August 20, 2007

Alpaca Tri-loom Teddy Bear Shawl

One of my daughter's teddy bears models the shawl.By Leigh

I am pleased to report that my third alpaca project is complete. Cally was curious as to what I had in mind when I said "teddy bear shawl." She had several very good ideas, but her first guess was correct. I wanted a small shawl for a teddy bear!

To actually do this however, I had a couple of challenges facing me. The first was to find my tri-loom, which had been packed away a couple of moves ago. That was fairly easy. The second was to figure out how to adapt it to make a smaller triangle, because, as you see below, it is a rather large size loom, with a six and a half foot weaving width.


My tri-loomFor those of you not familiar with these, a tri-loom is a type of continuous yarn loom. The beauty of it is that the weaver warps and weaves at the same time. In fact, they make an excellent first loom for anyone who is interested in trying their hand at weaving. Mine was handcrafted as a gift from my son when he was in high school. He was never particularly interested in woodworking, so the fact that he wanted to make it for me makes it quite special.

Since my tri-loom is not an adjustable one, but I was hoping that somehow it could be modified without having to make another, smaller tri-loom. Fortunately I have a husband who is quite clever when it comes to this sort of thing. This is what we came up with .....

Tri-loom modified for a smaller project.In this photo, I have already marked the nails along the top with bits of yarn. These are for the color changes in the shawl. Not being mathematically minded, I've had trouble in the past getting my colors changes where I wanted them. I always work it out on paper first, but I have learned to count it out and mark the nails before I begin as well.

Weaving starts with a center pull ball of yarn, in this case my bulky handspun alpaca, and a slip knot. There are excellent instructions with photos for this type of weaving here, so I won't go into detail, but will give you the gist of it.

Weaving on a tri-loom.The loom has the same number of nails along each side of the triangle. On the top (hypotenuse), they are spaced at every half inch, along the legs of the triangle, they are three-eighths of an inch apart. Weaving starts on one side and works back and forth. What is woven on one side of the loom, is automatically woven on the other side as well, so that the weaving works from the sides inward. Above, I am weaving the yarn over one and under one in a plain weave. Twill and leno lace weaves are also possible.

Weaving with a locker hook.Most of the weaving can be done with one's fingers, but I do find that a crochet or locker hook very helpful when I get toward the center and the open space for working the yarn through gets narrower. I like the locker hook because it has a hook like a crochet hook at one end, and a large eye, like the eye of a needle at the other end. This is sometimes convenient for working threads through or correcting mistakes.

Color changes are a simple matter of tying the two colors together on one side and weaving them together on one side. A better explanation with photos can be found here. My light colored yarn is from the same fleece as I used for the knitted alpaca cap.

The nature of tri-loom weaving is that the two halves are identical. Whatever color changes are created on one side, are mirrored on the other. This means that one only has to design half a triangle! Lovely plaids including tartans can be easily designed for this type of loom.

Tying on the fringe.Once all the nails have been used up and the weaving is done, the shawl is fringed. Where ever the color of yarn was changed, these two yarns are knotted securely at the nail with an overhand knot. You can see one of these on the right. Other fringes are added at each nail with a length of yarn and a lark's head knot. Only the two short sides of the loom are fringed.

Once all the fringes have been added, the shawl is ready to remove from the loom. This is done the same way pot holders are taken off of their little square looms, with a chain stitch across the top.

Chaining offAfter that, the shawl can be gently lifted off of the remaining nails.

Off the loom & ready to wash.Now it is ready to wash and then I can trim the fringe. You might be able to tell from the above photo, that the fresh fabric is still quite open, even though I used bulky yarn. Before washing it measured 33 inches across the top, exclusive of fringe. The two shorter sides were each 25 inches. I did full it a bit, so that after washing it was 30 inches across with 21.5 inch sides. I trimmed the fringe to about two and three-quarters inches.

View from the back.The finished fabric is still somewhat open, but I think the teddy bear is happy with it.


Related Posts:
2nd Summer Project - Alpaca
Alpaca Project #2
Last of the Alpaca Projects
2 Past Tri-Loom Projects

Saturday, August 18, 2007

Alpaca Progress

By Leigh

Well, I've still got Shetland on my mind, but I am trying to be diligent to finish up the projects I promised in trade for all those Alpaca fleeces. Of the four chosen specifically for sample projects, I have finished two, the felted Alpaca doll, and the knitted child's cap. I've decided that the next project needs to be a handwoven one, so the preparations have begun.

Rascal approves of this fleece.This fleece is more consistent in color, staple length, and overall texture than the other two I've worked with so far. It is also more Huacaya-like to my mind, though I don't really have enough experience working with raw Alpaca to assume I actually know what I'm talking about here(!)

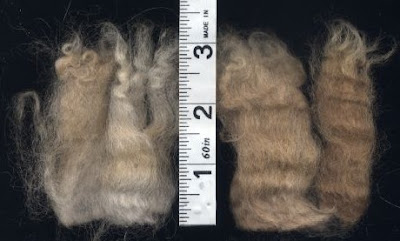
Sample staples measuring 3 inches in length.The fiber is soft, with a vague crimp at about 5 per inch, with no grease or luster. It contains very little VM (vegetable matter), no bugs, mud, or other biological nasties. It is very open and very easy to work with. Being mostly about three inches in length, it would have been a good choice for handcarding. However, I need to press on with this project, so I ran it through my drum carder twice, and then it was ready to spin.

Since I was planning to weave a teddy bear shawl of this on my triloom, I wanted a bulky yarn. The cap is knitted in a medium weight handspun, so I figured this one will be bulky weight, and then the last one will be finer.

It spins like a dream, but after awhile, I was a little dismayed to realize that I had been spinning with a dirty thumb and forefinger ......

What a surprise this was!Had I accidentally gotten oil on them when I oiled my wheel? Hmm. I need to be more careful. I washed my hands and resumed spinning. Much to my surprise, a little while later they were dirty again. That's when I realized that just because the fleece wasn't greasy, didn't mean that it wasn't dirty! Most of my spinning experience has been with sheep's wool (always with at least some grease and the dirt which sticks to it) and Angora rabbit (never greasy and rarely dirty with actual dirt.) The only other raw alpaca I've handled was from Florida so it was sandy. These are from North Carolina however, and while the first two were a little dusty, this one is downright filthy! So I've learned something important here.

Bulky alpaca handspun yarn.Had I realized this before I started spinning, I would have definitely washed the fleece first. However, since I was already in route, I chalked it up to "I'll know better next time" and finished the yarn.

After I finished spinning and had skeined the yarn, I gave it two thorough, very hot soapy soaks and three hot water rinses. I was delighted at how lovely the fiber was under all that dirt: very soft, silky, and with some luster after all.

The singles for the yarn on the left were spun at 14 wraps per inch. The 2 ply measures 7 WPI.

Next will be the weaving of it. More on that and how it turned out here.


Related Posts:
Alpaca Tri-loom Teddy Bear Shawl
2nd Summer Project - Alpaca
Alpaca Project #2
Last of the Alpaca Projects

Thursday, August 16, 2007

What I Took Off My Old Loom

With all of my weaving efforts and energy focused on my new Glimakra 8 shaft countermarche loom, my little Schacht Mighty Wolf 4 shaft loom has stood forgotten and neglected for quite awhile. I had been in the enthusiastic midst of my summer and winter explorations when I found the ad for the Glimakra during the first week of June this year. Every thing else got set aside after that.

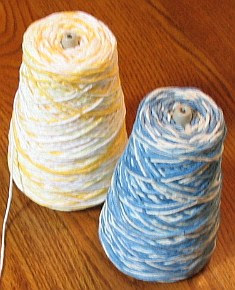
2 cones of Peaches & Creme 4-ply cotton.Eventually I realized that I would have to finish up that project and get it off the loom, so here is what I was working on and what I've done with it since then.

I first started exploring summer and winter last March, because I participated in an Online Guild summer and winter weaving workshop. Between March and June, I wove samplers, dishtowels, and rugs, focusing quite a bit on Fibonacci stripes. One thing I began to wonder is whether I could use variegated, space dyed type yarns with summer and winter. I had two cones of Peaches and Creme 4-ply cotton yarn, so I decided to experiment and see what I could come up with. In the back of my mind I was thinking about place mats.....

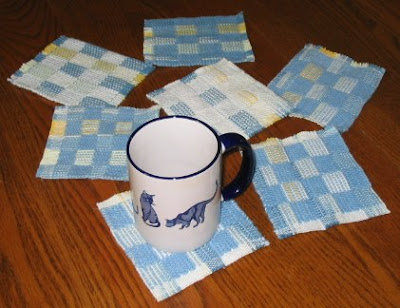
Mug rugs as samples..... but I did some samples as mug rugs first. I experimented with different colors for both pattern weft and tabby weft. I was fairly satisfied with these, so I warped the loom for a series of 6 place mats. However, once I started weaving, I really wasn't happy with them.

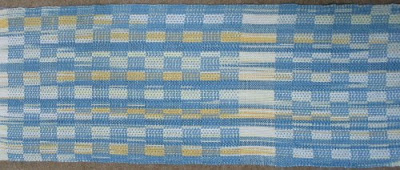
Summer & Winter on top of space dyed yarns.  Yuk.Here is one and a half place mats, and it was at about this point that I decided that the space dyed areas and the summer and winter areas didn't compliment one another the way I had hoped. So I decided to just weave the rest of it off in plain weave with an 8/2 cotton weft, like so ........

Plain weave with the space dyed yarns.  Better.

I have long been intrigued by the space dyed look. Marie does this quite a bit, but she dyes her own yarns. Since my space is very limited at the moment, I've been looking for ways to fake this technique. Hence the use of these yarns. This experiment involved cutting each length of warp separately and tying it on. I did this in an attempt to tie on each warp end at the same spot in the yarn's color sequence. I wasn't particularly careful about it however, so the effect I like got lost. I did discover that they color sequence on the yarns was a little irregular, so that didn't help either.


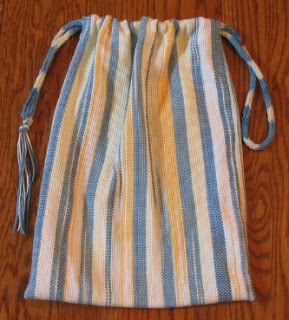
Diddy bag from the above fabric.Oh well. It was an experiment after all. When I gave up on the summer and winter, I also gave up on the place mat idea, as it was weaving up narrower than I'd wanted. However, after staring at the fabric for awhile, I did use some of it to make this diddy bag for my Dad for his birthday. The drawstring is an i-cord knitted from the blue. He was happy with it. I also have an idea to make either a purse or a sock knitting bag for myself as well.

Of course, going back to this project gave me with some new ideas regarding using space dyed yarns. Even with the temporary interruption of learning my new loom, I hope to get back to this. Better yet, I hope to someday be able to do my own dying, which I'm sure will yield better results. Happily, I recently found out that Kaz will be doing an ikat workshop next year for the Online Guild. If you are interested in this type of weaving, then I encourage you to join the OLG! For more information, click on the above link, and then on "Subscription Information."

© 2007 Leigh's Fiber Journal

Related Post:

Tuesday, August 14, 2007

Weekend Sock Knitting

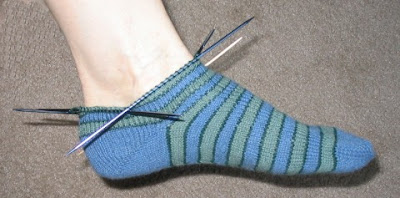
I have a lot of projects going on, but I still find a little time here and there for working on my summer sock knitting. Last night, while Dan read aloud from Five Acres And Independence, I turned the heel on the first sock of the pair.

I just turned the heel on this 1st toe-up sock.
I like this short row heel pretty well. It involves knitting both the stitch and the wrap when working the second half of the heel. I still have trouble with holes at the corners of the heel when I resume knitting in the round, but I have learned to simply pick up and extra stitch or two to fill up this gap.

Speaking of picking up stitches, it does look as though I could have increased a few more stitches for the ankle. I could take it out and do this, or I could just leave it on the "no one will notice on a galloping horse" theory. I haven't decided yet, though I'm not feeling particularly patient at the moment. Fortunately, I like a very snug fit on my socks.

Saturday, August 11, 2007

Tying On A New Warp

By Leigh

I have been busy tying on the next warp in my series of zig zag twill afghans. Cathy (My Little Kitchen) mentioned that she was interested in seeing some photos of how I tie on a new warp. This post will hopefully show how I do that.

The thing I love about tying on a new warp is that it takes advantage of the threadings and tie-up from the previous project. It lets all those painstaking hours of threading the heddles, sleying the reed, tying up the treadles, and correcting mistakes serve double duty (or triple, or quadruple, etc.) Consequently, I tie on alot.

I always begin preparing to tie on when I cut off a completed project. I leave the remaining ends long enough to tie in front of the reed with a half knot like so....

Old warp tied in front of the reed.
This prevents the warp from being accidentally pulled out, like this. I do this with every warp. I can always change my mind later and pull it all out if I want. I can also change just the reed and still leave the heddles threaded if I wish.

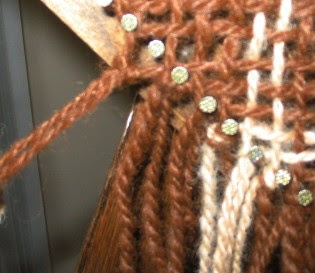
Holding the cross for the new warp in my hand.I like to measure the new warp off in small bouts. Since I hold the threading cross for the new warp in my hand, these small bouts enable me to work in short spurts of time. For one thing, I find that if I am interrupted and have to lay my cross down, I inevitably mess it up when I go to pick it up again. Also, this gives me frequent breaks from sitting for a long period of time.

Another advantage to working with small bouts is that I don't have to worry about the total number of warp ends I need. Though I usually have this number written down in my notes, I seldom remember it off the top of my head. It isn't until I get close to the end of tying on that I actually have to count how many threads are left to measure and tie.

I have learned to leave most of the old warp tied in front of the reed, and only untie whatever short section I want to work with. Currently, my threading is a straight twill, heddles 1 through 8 and repeat, so I untied only 8 old warp ends at a time.

There are probably a variety of knots that can be used, but I use a simple overhand knot to tie on the new warp ends. I hold threads from the old and new warps together, matching the tail ends, make a loop and pull them through. I tighten the knot by pulling on the tails.

Tying on the new warp with overhand knots.
Two things to know about these knots are:

1) They need to be small enough to fit through the eyes of the heddles. So there is a limit as to how bulky the yarns can be.

2) They need to have at least a half to three quarter inch tails. If the tails are too short, there is a danger of the knot pulling out when the new warp is beamed under tension. This can be fixed however, so it is just a nuisance more than anything.

I check each set of knots before moving on to the next section. This way I can easily catch a skipped thread.

After all the new warp ends are tied on, I'm ready to beam the warp .

The new warp is tied on & ready to beam.
I wind the warp on as usual, though care must be taken as the knots travel first through the reed and then though the heddle eyes. The knots sometimes have to be worked through the heddles. I find that by using the flat of my hand to work the warp down .....

Working the knots through the heddle eyes...... and up ......

Working the knots through the heddle eyes.
.... I can work most of the knots through the heddles. Some have to be worked individually, but this is only the case with large knots. As you can see, I have left my lease sticks in. You can also see that this is not the first warp I've tied on here.

I have to say that I think a front to back warp is easier to tie on to than a back to front warp. Why? Because when warping front to back, the warp is actually tied to the back apron rod. This means that the old warp is secure and cannot slip.

An old b2f warp is easy to pull off the lease stick.When warping back to front, the end loop of the warp is slipped through the apron rod or an extra lease stick, like in the photo on the right. This lease stick is then tied to the back apron rod. However, the old warp is not securely fastened, and can be pulled off of the lease stick easily. I have found that when tying on a new warp, it is easy to pull the warp to uneven lengths. Since I want my new warp to start and end at the same place, I have to either take care to not pull it too much, or else adjust the warp ends which have been pulled out of place. Since I am still fairly new to back to front warping, I realize that there may be a better way to do this, I just haven't found it yet!

So this is how I do it and have found it to be a real time saver. Even so, I would welcome your tips, comments, and experiences.

Thursday, August 09, 2007

Alpaca Project #2

By Leigh

My summer alpaca projects are moving right along. The second fleece I had to work with was a lovely fawn fleece with quite a range of color variation. In my research I have learned that alpaca wool comes in 22 natural colors and that these can be blended to create many, many more. I could probably get quite a few from this fleece alone.

Samples from a fawn alpaca fleece.As you can see, there is some crimp to it, especially in the tips. The fiber is fine and silky, and has some luster after it is washed. However it also has some hair-like fibers that I'm assuming are guard hair. Though black, they aren't especially coarse and there weren't a lot of them, so I didn't worry about them. I chose handfuls of the different colors and drum carded them all together.

Four runs through my Strauch Petite blended the color beautifully. I spun this worsted with a lot of twist. My plan was to use the yarn for a small knitted project. My singles measured 24 WPI, and the 2-ply, 14 WPI.

2 yarn colors from one fleece.Actually I ended up spinning two yarns, because once I started knitting with the first yarn (on the right) I felt that the guard hairs were not acceptable! There were not many, but they compromised the softness of the yarn and I wasn't happy about that.

For the second skein I laid the fleece out again and picked out parts that didn't have as much guard hair. I processed and spun it the same way as the first skein, but this time I had a yarn a few shades darker.

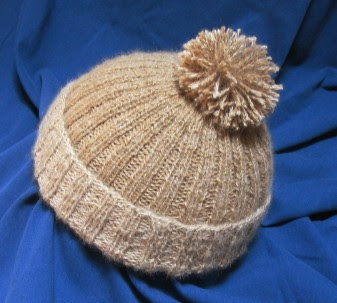
Child's alpaca cap.As it was, I ended up using them both anyway. The two colors were so lovely together that I couldn't resist. I knitted this child's cap from the "Infinitely Adjustable Hat" pattern in Lee Raven's Hands On Spinning. I used the lighter yarn for the brim, and the darker for the body of the cap. The pom pom is made from the two yarns together.

Yes, those guard hairs still bothered me, so I sat there with a tweezers while I knitted and pulled most of them out as I came to them! This improved it tremendously and the cap is silkier and smoother to touch than the yarn. In my research I learned that alpaca rarely has guard hair, but the color and silkiness of the fiber made it worth the extra effort.

Even though alpaca yarn isn't very elastic, this knit 2 purl 2 ribbing was a good choice as the cap has a lot of stretch to it.

For my next alpaca project, I plan to spin a bulky yarn for weaving. I rarely weave with my handspun, so this will be quite an adventure for me.


Related Posts:
2nd Summer Project - Alpaca
Alpaca Tri-loom Teddy Bear Shawl
Last of the Alpaca Projects

Tuesday, August 07, 2007

A Few Answers to A Few Questions

I've had a few questions over the past several posts, so I thought I'd set one post aside to try and answer them. I have to say that your comments are always very encouraging to me, and your questions help me to learn and grow too.

Donna was curious about the cloth protector on my loom, so these photos are for her. I had never heard of a cloth protector (aka cloth cover board) until I got this loom. In fact, if it hadn't been for the Glimakra set-up video I might not have realized what it was. Here is a shot that shows it in use. You can see that it is attached in front of the breast beam.

Front of loom with cloth protector in place.
You can click on the photo to biggify the image. On my loom, there are slots in front of the breast beam on both sides, shown below.

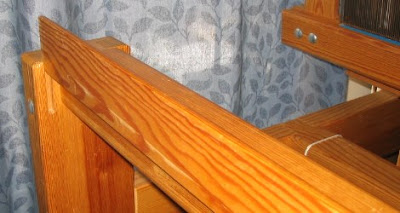
Closeup of slot for cloth protector.
The cloth protector simply slides down into these slots. Obviously this is done after the front apron rod has passed over the breast beam.

Closeup showing the protector being slid into place.
I think it is very beneficial for wide projects. I tend to tuck the bench up under the loom as far as I can when I weave, and this results in leaning on the fresh fabric as I throw and catch the shuttle. The cloth protector protects it from my leaning and possibly rubbing against the cloth.

Speaking of width, Marie asked about the width of my loom and the afghan. The widest I can weave on this loom (a Glimakra Standard) is 59 inches. The warp's width in the reed for my afghans has been 44 inches. After they're off the loom and have been washed, they are 38 inches wide. My digital camera may have something to do with how huge they look on the loom!

Charleen asked how I like weaving those wider fabrics. I have to say, better than I thought I would. I'm not sure that I would have chosen such a wide loom, except that it came up for sale at the right time. Now however, I'm delighted with the possibilities. True, I do have to stretch more to throw and catch the shuttle, but I chalk that up to "exercise." One thing that has taken some getting used to is that the beater has to be pushed back and held open for the shuttle to pass through the shed. This is because the Glimakra has a hanging beater, so I am always working against gravity. I understand that it is possible to get such a rhythm going that one can weave quite fast as the beater swings back and forth. I don't expect to get to this speed anytime soon however :)

Lastly, Cathy was interested in how I tie on new warps. I promised her that I will take photos of the process when I start my next Christmas afghan.

Hopefully I got everything answered. Next up will be another alpaca project!

Sunday, August 05, 2007

2nd Zig-Zag Christmas Afghan
Detail of twill zig zag.My second Christmas afghan is off the loom. Once I solved the mystery of why my twill zig zags weren't centered in the stripes of color, I immediately began planning the next project.

I did a lot of thinking while I wove the first afghan, and actually planned two, one based on my observations about the warp threading in regards to the zig zags, and one based on the comments from Ruby. From the detail on the left, you can see that the first of these two has been successful. To get this effect, I had to expand the color stripes to 10 warp ends, putting the first thread of blue on shaft 6, and the last one on shaft 7. My threading is a straight 1 through 8 and repeat.

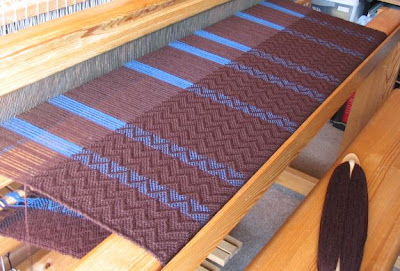
I chose (hopefully) masculine colors for this afghan. The brown is actually darker than the photos. It is interesting to me that the surface of the weaving seems very textured, while the underside was smooth and flat while on the loom. However, the two sides pretty much evened out after the afghan was washed and dried.

Afghan #2 on the loom.The blue stripes are spaced in an approximate Fibonacci sequence. Since I had to start and end the blue yarn on specific shafts, I didn't worry about getting the exact number of brown ends for the Fib count. The yarn is Red Heart knitting worsted, with a sett is 8 ends per inch. I have 354 ends.

Once I got over the excitement of seeing my design success, I have to admit that the weaving got boring pretty quickly. Brown is not one of my favorite colors, and with no color or design changes to entertain my eyes, I lost interest in the project pretty quickly. That in itself motivated me, as I wanted to get it off the loom quickly so I can get on to the next one.

However! I am very pleased to report that I had very good tension, no warp ends were skipped, the fell was straight, and best of all are the selvedges. They are the best I've ever woven, beautifully straight and even. These are things I've struggled with for over seven years, sometimes to the point of feeling defeated enough by them to think about giving up weaving. I am overjoyed that these problems were finally overcome with my third project on this loom. I don't know how well weaving the next afghan will go, but at least I know that I can do it.
The photo of the finished afghan below is closer to its "real" colors.

The finished project.
As you can see, I simply knotted the fringe to finish it off.

I have to say that I am impressed how nicely the Red Heart yarn softens with machine washing and drying. I have used it quite a bit for weaving, which is actually rather odd for me to do, as I am really quite a fiber purist. Most of my own clothing is all natural fibers (except for a few cotton/poly blend tee shirts), as are the things I make for myself or around the house. I would absolutely never knit or crochet a garment with Red Heart. But for weaving, I have found it an inexpensive way to experiment with color, especially since I make a lot of mistakes and have had quite a few design disasters. So if a project is a flop, acrylic yarns seem to cut my losses, especially considering that I have more time than money.
Another thing I find, is that by using an acrylic yarns I feel freer to give my handwovens away. I've often given one of my log cabin scarves as a thank you gift. Perhaps because acrylic is a good choice for recipients who may not understand natural fibers, or who prefer the easy-care of being able to toss it into the washer and dryer.

Well, enough rambling. I'm off to work out the details for Christmas afghan number three.

Friday, August 03, 2007

Shetland Update - Henna

A moorit dual coated Shetland fleece.Henna's is the fifth of the seven Shetland fleece samples Cathy sent me (not counting this.). Working with samples instead of whole fleeces has been wonderful because each sample makes a fairly quick project, easy to accomplish in only a couple of sessions. One day to wash and dry. A couple of hours on another day to drum card it all to blend the colors. Then spinning and plying on the afternoon of another day.

Henna's is a moorit fleece with tips sunbleached to a lovely honey color. In looking back through my Shetland notes, I can tell you that this is the longest fleece of all the samples, measuring up to seven inches in length. There is crimp in part of the sample, about five per inch. The tips were wavy at two per inch. It was a very clean sample, with very little VM. There were very few second cuts and the tips were sound.

Samples of Henna's fleece.What is interesting about this fleece is that it is dual coated. You get a hint of this by the triangular shaped staples. The downy undercoat fills out the base of the triangle, while the long outer coat tapers to its point.

Dual coated fleeces are usually pretty easy to separate by hand. I simply hold the tip firmly in one hand and comb out the undercoat with a dog comb. A flicker works too, but I tend to bust my knuckles every time I use one, so I usually avoid it if possible. Below you can see the two coats separated, with the outer coat on the right, and the inner coat on the left.

Dual coats separated.One thing that really impressed me with this fleece was how soft the outer coat is. I've worked with several dual coated breeds before: Icelandic, Navajo-Churro, Hebridean, and North Ronaldsay. Each of these has a coarse outer coat which is long and can be spun into a nice, hard wearing rug yarn, while the inner coats are much softer and suitable for sweaters and mittens and things. With Henna's fleece however, the outer coat was soft enough that I decided to drumcard the two coats together.

Moorit Shetland yarn.My singles were 30 wraps per inch, about the same size as several of my other Shetland yarns. However, even though there wasn't a lot of crimp in the sample, the 2-ply washed up to be 13 wraps per inch, a little larger than my target size. Crimpier fibers seems to result in more elastic yarns, but that wasn't the case here. I'm guessing that the finer inner coat increased the loft of the yarn more than I anticipated.

I ended up with a little over 78 yards of yarn. It has less luster than my other Shetland yarns, but I love the color.

This very nice close-up, by the way, is courtesy of Xsane, my Linux scanner software. I'm beginning to think that this particular program has a mind of its own, because I am very inconsistent with the size of my scans. Or perhaps I'm just not clever enough to figure it out. Of course, I could always read the online manual and follow the instructions, but who wants to do that. I'd rather spend my time playing with fiber.

© 2007 Leigh's Fiber Journal