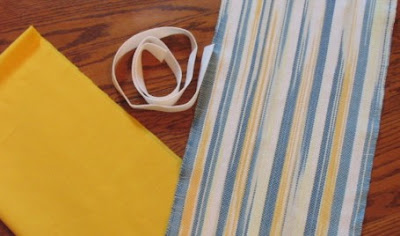
My project over the weekend was to make a new bag to carry my sock knitting.

You might remember this fabric as from an
earlier post. It is leftover from one of my space-dyed warp experiments. The warp was
variegated 4-ply cotton yarn. The weft was an 8/2 white cotton. Part of the
fabric was used to make a
diddy bag
for my dad, but I had enough leftover for a bag for myself.

For my purposes, I wanted a small bag with a squared bottom and handles. Since the handwoven fabric wasn't dense enough to guarantee that I wouldn't loose any double pointed knitting needles, I also decided to line it with a commercial fabric. For the handles, I found a sturdy polyester belting at Hobby Lobby.
Before I could start sewing however, I needed to do something about my sewing machine. The tension knob was not at all responsive, and I was afraid that the machine needed some extensive repair. I did some searching on the Internet first, and found an excellent article on Secrets of Embroidery. From that article, I learned about tension problems and how to fix them. It gave instructions about how to adjust the bobbin tension, though Singer doesn't make this at all easy to do! Fortunately, I achieved an acceptable bobbin tension without too much difficulty. Then I could start sewing on my bag.
 The fabrics were cut into 12 by 24 inch pieces. I sewed the sides up
lengthwise. To make the squared bottom, I opened the side seams and sewed them
across the bottom of the bag, to forming triangle shaped flaps.
When turned right side out, this forms a nice, square bottom on the bag...

For my purposes, I wanted a small bag with a squared bottom and handles. Since the handwoven fabric wasn't dense enough to guarantee that I wouldn't loose any double pointed knitting needles, I also decided to line it with a commercial fabric. For the handles, I found a sturdy polyester belting at Hobby Lobby.
Before I could start sewing however, I needed to do something about my sewing machine. The tension knob was not at all responsive, and I was afraid that the machine needed some extensive repair. I did some searching on the Internet first, and found an excellent article on Secrets of Embroidery. From that article, I learned about tension problems and how to fix them. It gave instructions about how to adjust the bobbin tension, though Singer doesn't make this at all easy to do! Fortunately, I achieved an acceptable bobbin tension without too much difficulty. Then I could start sewing on my bag.
 The fabrics were cut into 12 by 24 inch pieces. I sewed the sides up
lengthwise. To make the squared bottom, I opened the side seams and sewed them
across the bottom of the bag, to forming triangle shaped flaps.
The fabrics were cut into 12 by 24 inch pieces. I sewed the sides up
lengthwise. To make the squared bottom, I opened the side seams and sewed them
across the bottom of the bag, to forming triangle shaped flaps.When turned right side out, this forms a nice, square bottom on the bag...
 I tacked down the handles on the right side of the bag, and then sewed the
outer and inner pieces around the top, right sides together. I left a four
inch opening to pull it outside out.
After turning, I slip stitched the opening closed, gave it a quick press, and
there you have it.
What I Took Off My Old Loom - The fabric & a diddy bag.

10 comments:
Your sock bag looks great! It's a clever thing you did. I love your space dyed weaving.
I need one of those! My sock knitting lives in ziploc bags and the pointy needles find their way out of there more often than I like!
Great Job on the bag. I love making my woven cloth into bags.
what a jolly jolly bag!
the vertical orientation of the stripes is brilliant.
is it just me or is it reminiscient of a stand of aspen trees at sunset in wintertime?
What a neat bag to have for your sock knitting. My sock knitting bag needs a divider in it though - so that I can carry more than one sock project at a time.
Actually your bag looks like it will work for even slightly larger projects, thanks especially to the bottom you created. Very nice!
Way cool! Don't you need a matching one for your lunch as well? ;)
Wow - I love the pseudo-ikat effect of the colors. Heck, I just like the back, period.
What a great little bag!!! Another great idea!!!!!
It's beautiful - I love it!
Post a Comment