Monday, September 16, 2024

Natural Dyeing: Hardy Hibiscus (With Copper Mordant)

I know I said I was done with hibiscus flower dyeing, but they are still blooming profusely and I couldn't resist trying it with a different mordant. The first time I tried it with alum and cream of tartar, the second time with no mordant, and this time with copper as the mordant. Directions for mordanting fiber or yarn with copper can be found here.

Preparing the dyepot

I followed the same procedure as previously, but I scaled down the amounts.

For this experiment, I used 4 ounces of hibiscus flowers
  • Amounts
    • 4 ounces fresh hibiscus flowers
    • 4 ounces clean, mordanted fiber
  • Pour boiling water over the flowers
  • Simmer flowers for about 30 minutes.
  • Strain

Dyeing the fiber
  • Add the wet, mordanted fiber to the dyebath. 
  • Heat to a simmer
  • Simmer 30 to 60 minutes
  • Let steep until cool (I left it overnight)
  • Wash with a bit of mild detergent and rinse until no more color exhausts from the fiber.
Results


And to compare, here are my previous hibiscus dyeing experiments.

Left: hibiscus with alum mordant. Center: undyed. Right: hibiscus without mordant.

So, apparently I can get silver and gold from hardy hibiscus flowers, but not what the natural dye books say, which is purple.

Saturday, September 14, 2024

Natural Dyeing: Copper as Mordant & Modifier

Copper = copper sulfate or blue vitriol

Solutions of copper for mordanting or modifying can be made it two ways: with copper sulfate powder or crystals, or with scraps of copper pipe, wire, etc. The directions here are for animal fibers: wool, silk, angora, cashmere, mohair, llama, alpaca, etc.

Mordant made with copper sulfate powder or crystals

The purpose of a mordant is to fix the dye color to the fiber. Copper sulfate is a common one and can be purchased almost anywhere that sells gardening or pond supplies because it's used as an herbicide, fungicide, to control algae in ponds, and as a soil additive for copper deficient soils. I use it in my Pat Coleby mineral mix for my goats because it's an essential element for goats. Copper in large amounts is a poison, so one has to use their "smarts" when handling it.

As with recipes for an alum mordant, I found a variety of recipes for copper mordant as well. Recommended amounts range from 2 to 8% copper sulfate of the weight of goods (WOG). Jenny Dean uses vinegar in her copper sulfate recipe. I don't have a very good scale, so I decided to rely on Rita Buchanan's quick method measurements:
  • 2 tablespoons copper sulfate 
  • per 1 pound dry goods
copper sulfate diluted and ready to make the mordant bath

Procedure
  • Soak the fiber, yarn, or fabric to be dyed in a large pot of clean water
    • Start with thoroughly scoured goods because oils or processing residues can interfere with the uptake of any mordant.
    • Let soak at least a couple of hours, to ensure thorough wetting for an even uptake of the mordant.
  • Prepare the copper solution
    • Dissolve in a small amount of hot water.
  • Prepare the mordant solution
    • Dilute the dissolved copper solution in a sufficient amount of water, typically 4 gallons for a pound of goods. There needs to be enough water to float the yarn or fiber with plenty of room.
  • Remove the fiber from its soaking pot and add to the mordant pot. Gently heat to a simmer, and hold at a simmer for about an hour. 
  • Let cool.
  • Remove the fiber and rinse thoroughly (gloves recommended). 
  • The fiber can be dyed immediately, or dried for future use.
Wool mordanted with copper has a green tinge

Re-using the mordant bath

I found instructions for this in Rita Buchanan's A Dyer's GardenBecause fiber or yarn doesn't absorb all of the chemical from the mordant bath, it's possible to re-use it by topping it off with additional chemicals.
  • Use 1/3 the amount of copper sulfate called for in the original recipe
  • Follow all the procedure steps above.
After mordanting, the copper solution can also be decanted into a closed bucket or jar and used again later.

Mordant made with copper pipe and such

I've not tried this yet, but I'm including the instructions for future use! Copper pipe, wire, or pennies can be used, as long as they are pure copper, not an alloy. 
  • Place copper scraps in a wide mouth jar
  • Add water and white vinegar (I've seen 1:1 and 2:1 ratios recommended). The vinegar is needed to make the copper soluble. 
  • Lid the jar and let sit for at least a week or two.
  • Decant the liquid off as needed and add to the mordant pot.
  • Add clean, wet wool
  • Heat to simmering and simmer for about an hour. The fiber should turn pale green.
  • Remove the fiber and rinse thoroughly.
  • May be used immediately of dried for later.
An alternative would be to do it the old-fashioned way by doing the dyeing in a copper kettle.

As a modifier

Modifiers are after-dye treatments used to alter the color. They are weaker solutions than mordant baths, and are a great way to extend the color range of any given dyestuff. Copper will make colors greener or browner, and generally improves the fastness of the dye color.

To use immediately:
  • Mix 1/4 amount of copper (as for mordant) in hot water
  • Remove the fiber from the dyebath and set aside.
  • Stir the copper solution into dyebath
  • Return the damp fiber to dyebath
  • Simmer for 15 to 30 minutes or until the color changes
  • Let cool overnight
To make a larger batch ahead of time:
  • Mix 1 tablespoon of crystals in 1 quart boiling water.
  • Store in an airtight jar.
  • This is enough to use for several afterbaths.

Discarding the exhausted mordant or modifier bath

I decanted and saved some of the mordant bath to try as an afterbath in future projects.


Then, because our soil is copper deficient, I was pleased to dilute the remainder and distribute it out on our pasture. Another option is to pour the diluted bath over a gravel driveway. 

 © September 2024 by Leigh at Leigh's Fiber Journal

Wednesday, September 11, 2024

Bathroom Rag Rug: Takeaways

From a utilitarian perspective, my bathroom t-shirt rag rug was a fail. From an information gathering perspective, I'd call it very useful. 

(how it looked before the washing wonkiness)

I think this would have made a good little rug, had it not been for the differential shrinkage of my different colors of t-shirt yarn. Likely, I can find a use for it, but my takeaways need to focus on what I can learn from it.

The structure is crackle, which I've been exploring this year. I like the potential I see in this particular pattern, and am thinking it may be a candidate for dining room curtain fabric. In the meantime, I have t-shirt yarn leftover, and would like to see if I can tweak things a bit and explore some of the questions in my mind. I'm considering what to do next, but for now, it won't be another rug. 

What I liked:
  • I did like the way the wide bands of color worked out. Not what I would have planned, but I liked it. The colors were chosen from our bathroom stained glass window, so I'm happy with them
  • Adding my extra warp ends to the selvedge blocks worked well. These often look narrower due to draw-in, but they appear to be the same width as the rest of the pattern blocks.

Things I'd like to explore further:
  • Motif shape and color
    • Shape. I'd like the motif to be squared up. Even though I decreased the number of weft shots the recipe called for, the motif is still elongated. I could either decrease the weft shots further, but I'd like to try a finer tabby yarn. 
    • Color. Maybe try warping each motif in its own color or warping each block in a different color. Repeat with the pattern weft. With crackle, a different color tabby can add more color interest too.
  • Fabric density. This was satisfactory after shrinkage (except for the orange t-shirt weft), but I'd like to see what a tighter sett would do.
So, my takeaways are exploratory, and I think I have a project for that. As far as a new bathroom rug, that will have to wait for a different inspiration to strike.

Tuesday, September 10, 2024

Bathroom Rag Rug: What Happened After I Washed It


Differential shrinkage at its worst! LOL! I machine washed it in warm water and used medium heat in the dryer. 

What happened? The orange t-shirts were obviously not the same fiber content, I'm guessing a cotton/poly blend while the others are cotton. I thought the rest of it tightened up nicely. Maybe I'll cut it up to make pot holders. 😂

Saturday, September 07, 2024

Bathroom Rag Rug: Off the Loom & Now to Decide

Fresh off the loom.

When I realized that the thickness of my rag weft was going to mean that my length calculations were off, I resigned myself to the idea of not liking the final product and needing to weave another. 

Last night I wove it out as far as my weft would let me go, finished the hemstitching, and laid it out on my studio floor to stare at it for awhile so I can decide what I think. It's definitely not what I planned, so I'm surprised that I kind of like it.

Off-the-loom measurements are 48 inches by 20.25 inches. The fabric is somewhat loose, so the first thing I need to do is give it a good washing and drying. That will shrink it a bit, and give me a better idea of its usefulness as a little bathroom throw rug. It's a small bathroom, so the dimensions will certainly work. 

If that's satisfactory, I need to decide on the beginning and ending brown border stripes. I eeked out as much at the end as I could, but the warp was advanced as far as she was going to go, so I only got two picks in. The beginning brown border stripe is eight. It would be logical to reduce the wider stripe to two, which would mean I'd have to somehow hemstitch it off the loom! 

Weaving another and using this one as a learning sample isn't off the table. I like the pattern and would like to experiment more with block size and color. But I've also got a lot of other ideas floating around in my head, so if my proposed ministrations work, I may just call this project done. 

Wednesday, September 04, 2024

Bathroom Rag Rug: Weaving Thoughts

The rags are made from cotton t-shirts. How I made them here.

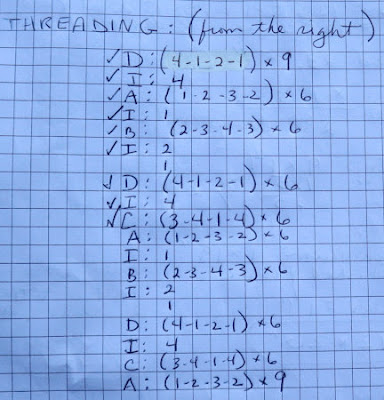
This is my first ever rag rug, so I have a sense of feeling my way. I am uncertain about how it will turn out. No, I didn't sample. I'm actually considering this my sample. I don't know if a mug rug would give me the same information as a larger sample will. The threading and drawdown are here

Table loom liftplan

Border (brown with tabby)
1-2 x 4
1-4 x 4
Body (with tabby)
yellow
1-2 x 12
1-4 x 12
orange
2-3 x 12
3-4 x 12
1-2 x 12
1-4 x 12
red
2-3 x 12
3-4 x 12
1-2 x 12
1-4 x 12
yellow 
2-3 x 12
3-4 x 12
1-2 x 12
1-4 x 12
orange
2-3 x 12
3-4 x 12
1-2 x 12
1-4 x 12
red
2-3 x 12
3-4 x 12
Repeat border

The variations in the orange from selvedge to selvedge is due
to the little clip-on lamp attached to the left side of the loom. 
Weaving observations
  • The t-shirt rag weft takes up a lot more warp length than I was thinking about when I planned it.
  • I did shorten the blocks from 16 pattern picks to 12. This was based on the elongated look of the blocks, which are stretched out under warp tension and will pull in a bit when allowed to relax.
  • On the other hand, I'm doubting I'll be able to weave the entire pattern through.
  • So I'm mentally gearing up to weave a second one with a length based on whatever information I learn from this one.
  • There's a threading error! I discovered it after I'd tied on and tensioned the warp and really didn't feel like undoing all that to fix it. Probably won't be noticeable to anyone but me. 
  • I'm curious as to how my adding extra warp pattern repeats in the selvedge blocks will work out. Okay, I think. 
  • I'm glad I chose brown for both warp and tabby weft; that really makes the pattern colors bright and dominant.
  • So far, I'm happy with the selvedeges. They are a bit bumpy looking, but in keeping with the rustic look of a rag rug. 

After a slow start (feeling my way) I've picked up momentum and it's going fairly quickly. That's one nice thing about a heavy pattern warp. So it should be off the loom soon. I'm curious as to how this first attempt at rag rug weaving will turn out. 

Sunday, September 01, 2024

Natural Dyeing: Hardy Hibiscus (Without Mordant)


Previously, I showed you my results from dyeing with hardy hibiscus flowers using alum and cream of tartar mordant. Jenny Dean's Wild Color says it can be used without mordant, so that was next.  

I followed the same procedure as hibiscus dyeing with mordant, but I kept a closer eye on time and temperature. I also decreased the amount of flowers and fiber to four ounces each. It was easier to collect that amount and keep the flowers fresh in the fridge while I collected. 

Preparing the dyebath
  • Pour boiling water over the flowers
  • Bring to a simmer
  • Simmer flowers for about 30 minutes.
  • Strain

Dyeing the fiber

lovely color in the dyepot
  • Add the wet, unmordanted fiber
  • Heat to a simmer
  • Simmer 30 to 60 minutes
  • Let steep overnight as it cools 

The Results

This is after washing and drying.


Does it even look like there's a color change? It's hard to tell! Below is a comparison of undyed and hibsicus dyed samples from both experiments. The undyed sample is in the middle.

Left: hibiscus with mordant. Center: undyed. Right: hibiscus without mordant.

Interesting, considering how much color was left in the exhausted dyepot. 

exhausted dyepot after dyeing

I'll also mention that I washed the two samples with different soaps because hibiscus is supposed to be pH sensitive. For the mordanted fiber, I used soap berries. For the non-mordanted dye experiment, I used EOS unscented dishwashing liquid. The difference is in pH. Soap berries are slightly acidic, and dishwashing liquids are slightly alkaline. I can't say I see that it made a difference in the final color of the fiber samples compared to the color before washing. 

Analysis

Supposedly, hibiscus flowers dye animal fibers shades of purple. I had no such luck. Of the possible factors I mentioned last time, I can eliminate temperature and time. All other factors remain as possibilities. Gray is a natural fiber color, so I thought it was a lot of work for the color results. 

Different mordants might make a difference in the color results, as might after dips. Bit for now, so much for dyeing with hibiscus flowers.