Tuesday, July 29, 2008

Computer Hex Code Dyeing 5: 1st Success?

By Leigh

I'm not sure whether or not I can actually call this a success or not, but here it is.

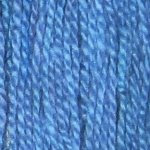
My latest experiment and target color.I will say with confidence that this is the closest I've gotten so far to my target blue. Is it exact? Even making allowances for the difference in media and electronic interpretations, I have to say no. Can I get any closer? I don't know.

Same dye proportions, different DOSThe recipe used the same color proportions as I used for the sample on the right (turquoise MX-G, 76%; red MX-5B, 10%; and black MX-CWA, 14%.) With that series of samples, I experimented with adjusting the amounts of fuchsia and turquoise. This lighter blue sample was the closest match to my cedar waxwing photo.

For this newest sample, I dyed the yarn to a darker depth of shade (DOS), in this case 8%. Previously, my samples were 4% DOS.

So, is 8% DOS dark enough to match the target color? From what I've read, the 8% DOS is considered "very dark" or "very intense." Can a darker DOS be achieved? I haven't found a reference to anything darker. Some of you with more dyeing experience will be able to answer that.

Other possible experiments could include trying a different red (MX-8B), or a different black.

My conclusions from these exercises so far, is that a color's computer hex code can be used as a starting point for dyeing with Procion MX dyes. However, the density of the dye powders effects their relative strength and has to be accounted for. Is there a specific ratio or some sort of formula for this? I don't know. Can one be developed? I don't know that yet either. Will I continue experimenting? Oh yes.

©  29 July 2008 by Leigh 

Related Posts:
Dye Recipes From Computer Color Codes: A Theory
Computer Hex Code Dyeing 1: Palettes From Pictures

Saturday, July 26, 2008

Waffle Weave Sampler

By Leigh

Well, I'm certainly glad that I did a sample for this waffle weave project. For more reasons than one. You can probably spot one reason right off the bat.


The red bled! And this was in a cold water wash. It would have been very disappointing if I had skipped the sampler and just tried to do the towels.

The other thing I decided I didn't like was the the treadling. Usually, waffle weave is treadled the same as the threading, 1 through 4 and reverse. However, I used the treadling from Mary E. Black's The Key to Weaving. The waffle weave treadling from this book called for treadles 1 through 5 and reverse, which makes the waffles a little taller. I think this makes the warp floats too long however. So for my towels, I will use the more common treadling sequence.

The other important bit of information is the shrinkage. Mine was approximately 29%. This is about what several of you have experienced with your own waffle weaving, so I think that 30% is a safe estimate to use in the future. Lengthwise, the shrinkage was 21%.

Using 10/2 cotton and a sett of 30 epi made a fairly thick fabric. I think this would be suitable for a heavy dishtowel or perhaps as fabric for a lightweight vest.

So there you have it. The bother of sampling justified. I'm just not sure what to do with that cone of red however. This is the second cone of red cotton I've had bleed. Does anyone know if it's possible to salvage a yarn like this? Fortunately I got each for only a couple of dollars somewhere, but still, I hate to think that I have to test all my yarns for colorfastness. *Sigh*


Related Posts:
Waffle Weave
Light Bulb Moments with Waffle Weave
List of all my Waffle Weave Posts

Wednesday, July 23, 2008

Spinning Cotton Lint

By Leigh

Do you find that certain fiber activities are seasonal? I feel that way about working with wool. Even though I've been semi-diligent with my Shetland Sampler Cardigan, the hot weather has finally gotten to me and I have no enthusiasm for working with wool. Not only as in yarn and knitting, but even for spinning.

However, the fruit of my cotton lint dyeing experiment is most abundant. I have a rainbow assortment of over 15 different color samples of approximately 100 grams each. What an excellent summer change of pace.

Cotton, ready to spin.Cotton is a very short fiber,

Close-up of ginned cotton fiber (lint).usually 3/4 to 1 and a half inches in length. It is also fine, about 25 microns in diameter. For these reasons it has a reputation for being difficult to spin. But really, it isn't all that hard.

I make my own punis, which are slender cotton rolags. I use my Ashford cotton handcarders.

Charging the cotton carder.I tease the fiber out a bit and then load it on the one edge of the carder. This way it makes a narrow batt. You can load the entire carder; I just find it easier to do a neater job this way.

Rolling the puni off the carder.I use a quarter inch dowel to roll the punis with. Actually, this is my wraps-per-inch counter, the same one used in my Measuring Wraps Per Inch (WPI) post. I smooth the puni by rotating the dowel rod with one hand, using the other to press down the stray fibers.

I continue to roll the dowel and twist the puni off the other end.

Punis are mini-rolags.This had not created an entirely smooth preparation however. I think this is partly because the Ashford cotton carders, which have a finer carding cloth than their regular carders, are still not the finest on the market. Also, the cotton lint has bits of husk and whatnot in it. I pick as much of this out as possible, but some remains behind.

I spin these with my wheel. I'm not a spindle spinner, nor do I have a charka, but a flyer wheel does nicely if adjusted properly.

To spin, I loosen my drive band (for double drive) or break band (for single drive) as much as possible. Cotton requires a lot of twist to hold it together, so I use my highest spinning ratio. A lower ratio is useful to get a feel for spinning it, but it requires a lot more treadling. It also wants to be spun into a fine yarn. I use the long draw, and the punis spin up quickly.

A short bit of handspun cotton, plyed on itself. I haven't decided what to do with it all yet.

This should keep me busy for awhile. It may be psychological, but I certainly feel cooler working with it than with wool. Our southern summers tend to be long, but I have a lot of cotton to spin, and plenty of snoopervision .....

Rascal is always on duty.Posted 7 July 2008 at http://leighsfiberjournal.blogspot.com

Related Post:
Cotton Spinning Update
More On Spinning Cotton

Monday, July 21, 2008

Computer Hex Code Dyeing 4: 2nd Samples - Getting Closer?

Well, Peg was absolutely correct when she said that I was learning a lot. Indeed!

After learning how slow Pro MX turquoise is, I decided that I needed another mini-skein using my original recipe. This time I left it in the dyepot for 2 days, allowing the turquoise to do it's thing. Below is a comparison of those two skeins. They follow exactly the same recipe, with the same proportions of Turquoise MX-G, Red MX-5B (fuchsia), and Black MX-CWA. The only difference is the amount of time the skeins were allowed to soak in the dyebath.

Still too purple. But I had also learned that the Procion fuchsia dyes are strong, so that a little goes a long way. So for my next series of experiments, I began to adjust the amount of fuchsia.

Since I needed 50 milliliters of dye solutions for each skein, I knew that I couldn't simply use less fuchsia. I would have to make up the difference by increasing something else, either the turquoise or the black. Increasing the black didn't seem to be the answer, so I made up the difference with the turquoise.

Here are the results from that (target color is on the left):

Click on above image to enlarge

For each sample, I decreased the fuchsia by half. So the top is 100% of the fuchsia called for, the second is a half, third is a quarter, and bottom is one eighth the amount of fuchsia. Each sample soaked for about 48 hours.

Obviously, none of them are anywhere near the color I was aiming for. Next steps might include finer adjustments of the turquoise and fuchsia. Or experimenting with depth of shade. In fact, Diane has been doing a similar series of hex code dyeing experiments with depth of shade on silk and muslin fabric. Her first set of swatches starts here. They are very interesting so I encourage you to go take a look.

One thing I noticed from my 2nd set of samples, is that the third one looks similar to another color in my original palette, #1470C4 ....

However, part of the problem with these experiments is that there is no way to accurately analyze the results. Why? Because there is no way to establish the "exact" overall hue of the yarn. In order to use my computer to determine the hex code for the yarn, I can use a color picker. However, a color picker will only grab the color from one of millions of pixels which make up a picture. Take a look at a tiny detail from the same yarn photo, enlarged enough to show the pixels.

You can see why it's easy to create an almost infinite palette from just one photo! You can also see why there is no accurate way to choose the exact color which matches the overall appearance of the yarn. This points to another problem, i.e. having to go through multiple layers of color interpretation -- eye > camera > photograph > photo software > computer monitor > eye. In the end, they can only be analyzed visually.

So, to do that, here is the original photo with my 2nd sample skeins.

Technically exact? No. Visually accurate? Close! And you know what? I feel that now at least, I'm somewhere in the ball park instead of wandering around the parking lot.

Conclusions? None yet, but I am still intrigued enough to continue experimenting along this line.

Next ..... Computer Hex Code Dyeing 5: 1st Success?

Related posts:
Dye Recipes From Computer Color Codes: A Theory
Computer Hex Code Dyeing 1: Palettes From Pictures
Computer Hex Code Dyeing 2: Wrestling With Recipes
Computer Hex Code Dyeing 3: 1st Samples - No Joy

Computer Hex Code Dyeing 5: 1st Success?

Originally published July 21, 2008

Friday, July 18, 2008

Jewel Colors From Printers' Primaries

When I first started researching for my hex code dyeing experiments, I found Paula Burch's translation of a Dutch site which gave recipes for jewel like colors created from the dye equivalent of the printers' primaries of cyan, yellow, and magenta. By using a percentage system of Procion Yellow MX-8G, Red MX-5B, and Turquoise MX-G, Dreamline Textiles was able to produce some lovely colors. You can see Paula's page here. I was interested in these, because they use the same primaries I am using in own experiments. In looking at the chart, I focused in on a blue similar to my target blue.

Out of curiosity, I plugged these percentages into the Dye Mixer Applet, and compared it to the target blue on my blog post.

(You can click on the above image to enlarge if you wish.) These looked close enough that I grabbed a screenshot, and then analyzed both colors in The GIMP.

Now, you don't have to be a computer geek to compare those numbers for both colors. As you can see, they're pretty darn close. Close enough in fact, that I couldn't resist giving Dreamline's recipe a try. I made a dyebath using:
  • 9 parts turquoise MX-G
  • 1 part red MX-5B
The immersion time was about 70 minutes or so. You can imagine my dismay then, when my own sample turned out like this .......

Surprise! Purple! (?!?!???) Needless to say, I was exceptionally puzzled. I knew that my proportions were correct, and that I followed the process correctly, so there must be something else at work. Off for another round of research. This exercise also left me questioning the validity of my first hex code samples, also too purple ....

My not-blue purples.... which you can read about in "Computer Hex Code Dyeing 3: 1st Samples - No Joy."
So I started researching Procion MX fuchsia and turquoise dyes, and have learned some helpful and interesting things. I'm putting what I've learned in a separate posts, which you can see by either clicking on the color names above (opens new window) or under "Related Posts" below (uses same window). This is definitely an adventure. Related Posts: Procion MX Fuchsia Procion MX Turquoise

Originally published July 18, 2008

Procion MX Fuchsia

By Leigh

This post is a continuation of Jewel Colors From Printers' Primaries.

Here is what I've learned about Procion MX Fuchsia so far. I'll add to this post as I collect more information. I'd also love to hear your experiences with this dye.

Fuchsia, along with turquoise, yellow, and black, is one of the recommended basic starter colors for color mixing. It substitutes for magenta in the printers' primaries. In fact it is preferred to red dye as it makes brighter colors in mixtures.

There are two Procion MX fuchsias to choose from: Red MX-5B (also known as "light, mixing, or clear red") and Red MX-8B (also referred to as "fuchsia.") Which one is preferred is an individual choice among dyers. According to Paula Burch's "What do MX codes really mean?", the "B" in the code signifies blau (German for blue.) The numbers indicate the strength of that color. So Red MX-8B has more blue in in than Red MX-5B. However, she goes on to say that these two fuchsias have completely different chemical compositions, with very different properties. Consequently, they won't yield the same results in a dye recipe.

Fuchsia is very dense as a dye powder. Consequently a little goes a long way and amounts used in mixtures are usually decreased (some recommend by as much as half).

It is also the fastest reacting of all the PMX dyes, especially MX-8B. The problem with this is that it can "grab" the fiber before it has a chance to migrate evenly across the fiber surface. This can result in a spotty appearance of the dyed goods.

Another problem with MX-8B, is that not all batches of the dye powder are equal; some batches do not dissolve as well as others. This can also contribute to a spotty effect in the dyed goods. In fact, if MX-8B is used in premixed dye colors, it can still cause spots. For these reasons, Paula Burch at least, recommends the Red MX-5B. It is a little slower reacting and more consistent in quality. She also recommends avoiding mixtures that contain MX-8B. Dharma Trading Co., on the other hand, recommends filtering dye solutions with a coffee filter or old pantyhose.

Fuchsia as a color reflects both red as well as blue light rays. For this reason it creates the brightest purples.

Mixing Basics:
Fuchsia + a little Yellow = Red
Turquoise + Fuchsia = Purple
Turquoise + a little Fuchsia = Blue

Bibliography:
All About Hand Dyeing
Creating Color: A Dyers Handbook by Judy Anne Walter
The Dye Forum Archives
The DyersLIST Archives

Posted 18 July 2008 at http://leighsfiberjournal.blogspot.com

Related Posts:
Jewel Colors From Printers' Primaries
Procion MX Turquoise


Procion MX Turquoise

This post is a continuation of Jewel Colors From Printers' Primaries.

Here is what I've learned about Procion MX Turquoise so far. I'll add to this post as I collect more information. I'd also love to hear your experiences with PMX Turquoise.

Procion Turquoise MX-G, along with fuchsia, yellow, and black, is one of the recommended basic starter colors for color mixing. It substitutes for cyan in the printers' primaries. In fact it is often preferred to blue dyes, as it makes brighter colors in mixtures.


Evidently, it is considered to be one of the more difficult colors to work. Due to it's large molecular size, it is the slowest reacting of the Procion MX dyes. Consequently, results are either a pale turquoise, or a tendency toward purple when mixed with fuchsias or reds.

Dyers compensate for this one of several ways:
1 - Double the amount of turquoise called for
2. Let dyebath sit 24 to 48 hours
3. Heat the dyebath to 140° F for the last 30 minutes of dyeing time to speed up the chemical reaction.

Dharma Trading Co. recommends the use of Glauber's salt (sodium sulfate) instead of table salt (sodium chloride) with Procion Turquoise MX-G for brighter color.

Turquoise MX-G dye stock tends to change color with age, becoming bluer. I am still unclear of how and if this effects the results.

Mixing Basics:
Turquoise (doubled) + Yellow = Green
Turquoise (a lot) + Fuchsia (a little) = blue
Turquoise + Fuchsia = Purple

Related Posts:
Jewel Colors From Printers' Primaries
Procion MX Fuchsia

Bibliography:
All About Hand Dyeing
Creating Color: A Dyers Handbook by Judy Anne Walter
The Dye Forum Archives
The DyersLIST Archives

Tuesday, July 15, 2008

Waffle Weave

By Leigh

Here is an update on the other fibrey things I'm doing besides dyeing. I have to admit that my enthusiasm for working with wool (knitting my SSC and spinning that Polwarth) is quite diminished in our heat. This is typical for the southeast this time of year, and it doesn't help that our second floor apartment overlooks a blacktop parking lot which intensifies the heat coming from our already hot afternoon sun.

What's on the loom now, is a sample for some waffle weave dishtowels.

Waffle weave sampler in Christmas colors.
It's funny, because when I signed up for a towel exchange with the Western North Carolina Fibers/Handweavers Guild, I immediately thought Susan's waffle weave projects. So that's what I decided to do. Then I visited her blog, only to discover that she had signed up for a different towel exchange, but was planning to do huck weave after reading my posts about that!

I've done waffle weave before, but it's been quite a few years, and that was before I was in my dishtowel phase. Waffle weave isn't a separate structure in it's own right, rather it's all in the treadling. Here is the draft I am using:

Waffle weave draft
The threading here is the traditional point twill, although Helene Bress's The Weaving Book: Patterns & Ideas, (which I understand is to be republished soon), shows waffle weave not only on point twill threadings, but also on Rosepath and broken twill threadings, as well as Huck, Monk's Belt, and Overshot.

The tie-up involves tying two treadles for plain weave, and tying the rest to lift (or sink) three shafts or one. This creates the floats, which you will see in the close up below. The treadling is tromp as writ, which simply means treadling in the same pattern as the threading draft. For my sample, that means treadling one through four and reverse.

If you look closely, you can see that a combination of warp and weft floats create the "waffles."

Detail showing warp & weft floats.
My sample is utilizing 10/2 cottons in a sett of 30 epi. This sett was from a chart, so I hoped it would be correct, as evidently it is easy to create a weft faced fabric if the sett isn't close enough or if one's beating is too hard. The key is to make it a balanced weave, so that the picks per inch equal the ends per inch. So far so good; the little waffles are turning out nicely.

The exchange is in November, hence the red and green stripes. There is a story behind those stripes, which I won't go into here, but will get on to when I weave the actual towels.

One thing I'm curious about will be the total amount of shrinkage. The warp is 10.5 inches in the reed, but draw-in takes the actual woven fabric to 8.75 inches. Being cotton, I know it will shrink a bit more with washing and drying.

I have several yards on for this sampler, and as I weave I'm amusing myself by thinking about what I can do with it. Potholders perhaps? A scarf? Little bags for little goodies? Any other suggestions?


Related Posts:
Twills - The Basics - explains the basic twill threadings

Saturday, July 12, 2008

Computer Hex Code Dyeing 3: 1st Samples - No Joy

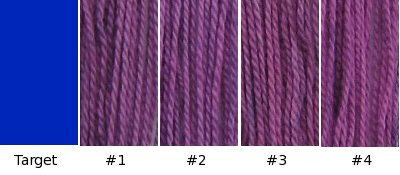
Since my last post, I've dyed my first samples. I have to report that while I got some gorgeous colors, they are nowhere near my target samples. They're not even close enough for me to plead computer discrepancies! ;)

Here they are:

My not-blue purples.Target (see "Palettes From Pictures"):
#0025B9
cyan - 1.0
magenta - 0.8
black - 0.2

Using those numbers to calculate percentages, these are the recipes I used based on a 1% stock solution. As you can see, I experimented a little with different fuchsias and blacks.

Sample #1:
Turquoise MX-G - 24 mls
Fuchsia MX-5B - 19 mls
Black CWA - 7 mls

Sample #2:
Turquoise MX-G - 24 mls
Fuchsia MX-8B - 19 mls
Black CWA - 7 mls

Sample #3:
Turquoise MX-G - 24 mls
Fuchsia MX-5B - 19 mls
Black 602A - 7 mls

Sample #4:
Turquoise MX-G - 24 mls
Fuchsia MX-8B - 19 mls
Black 602A - 7 mls

Nowhere near the target color. In fact, these samples are actually closer to the prediction I got from the Dye Mixer Applet.

Click on image to enlarge.

In comparing my four samples, the color differences are subtle, in fact barely discernible on my computer monitor. Most notably, the fuchsia 5B samples (1 & 3) appear a little cooler than the fuchsia 8Bs (2 & 4). Not much difference between the blacks however. I also note that I didn't stir well enough, as the color is spotty. About the only thing I am satisfied with is the depth of strength (DOS).

Comparing them to the target color, they are obviously purple. Too purple, which means the fuchsia was too strong.

The second color I tried to duplicate was the gold: 

My not-gold oranges.Target:
#EE9628
magenta - 0.37
yellow - 0.83
black - 0.07

Sample #1
fuchsia 8B - 19.5 mls
yellow 8G - 32.5 mls
black CWA - 3 mls

Sample #2
fuchsia 8B - 19.5 mls
yellow 3RA - 32.5 mls
black CWA - 3 mls

For these, the only color I experimented with was the yellow. #1 is the cool yellow sample, and #2 used a warm yellow. But! Neither one is anywhere near my target color. And again, the fuchsia dominated, creating orange. (I did do a better job stirring during the leveling phase though.)

These experiments affirm what I wondered about, and what many of you confirmed in the comments; that equal weights of various Procion MX colors are not equal in dyeing strength.

So it would seem that the next logical step would be to experiment with the proportions. It would be wonderful if I could come up with some concrete numbers for these differences, but that remains to be seen.

Next ....... Computer Hex Code Dyeing 4: 2nd Samples - Getting Closer

Related Posts:
Dye Recipes From Computer Color Codes: A Theory
Computer Hex Code Dyeing 1: Palettes From Pictures
Computer Hex Code Dyeing 2: Wrestling With Recipes
Computer Hex Code Dyeing 4: 2nd Samples - Getting Closer
Computer Hex Code Dyeing 5: 1st Success?

Originally published July 12, 2008

Wednesday, July 09, 2008

Computer Hex Code Dyeing 2: Wrestling With Recipes

Questions! (And my proposed answers.)

The first question is what to do with those numbers:

#0025B9
cyan - 1.0
magenta - 0.8
black - 0.28


Do they need to be percentages? Proportions? Weights?

To test the numbers on my various colors, I have been plugging them into the Dye Mixer Applet. Sometimes the applet results matched the html sample, sometimes they didn't. After a little research, I have learned some interesting things about the applet in this comment on Paula Burch's Dye Forum. Namely, that the "mix amount" numbers only give approximate results. Considering the samples that didn't match, that's a relief. I also learned that those numbers don't indicate any specific unit of measurement. That's not a relief, that's a "now what."

The CMYK (cyan, magenta, yellow, & key black) color model that I'm trying to use, is for printing inks on paper. The numbers stand for percentages of each color. So for computer color #0025B9 (above), the printer would reproduce it on paper by using 100% cyan, 80% magenta, and 28% black inks. Obviously this cannot be translated directly into proportions for a dye recipe, because then I would have to be working with 208%.

For my first experiment I've decided to calculate these as percentages of their total 208. This gives me:

Cyan (for which I will substitute turquoise) - 48%
Magenta (for which I'll substitute fuchsia) - 38%
Black - 14%

Which lead me to another question, what unit of measurement? 48 teaspoons (or even 48 eighth teaspoons), is out of the question here in terms of dye amounts. And from what I have learned from the DyersLIST archives, Procion MX dyes do not all weigh the same anyway. This means that a teaspoon of one color doesn't necessarily weigh the same as a teaspoon of another color. So, kitchen measurements are definitely out and metric measurements are definitely in.

The next question is on mixing. Do I mix the individual powders to make one dye stock, or do I make up individual dye stocks and then mix them? Considering that I will likely need to do quite a bit of sampling, mixing individual dye stocks makes more sense. Plus, it is safer to work with the dyes in solution rather than in powdered form. True, solutions won't keep all that long, but without the activator (soda ash), I should be able to use them up quickly enough.

And then there's the question of how well fuchsia will substitute for magenta and and turquoise for cyan. Also, which yellow is best? And what about black? There is no true Procion MX black as all the various blacks are mixtures of other colors. I think only experimentation can answer this for me.

Here's my plan:
  1. Measure mini-skeins of 12.5 grams each as samples. Based on the yards per pound, I have calculated that my yarn has 5.55 yards per gram, so I will need to measure out 69 and 1/3 yards per mini-skein.
  2. Mix up 1% stock solutions for the individual colors and mix the colors based on the percentages I calculated. I'm doing 1% instead of the usual 2% as it will be easier to work with the hex code numbers this way.
  3. Start with a dark depth of shade (dos), since the color #0025B9 (above) is a fairly deep blue. I will make adjustments from there.
Here are my calculations (from this pdf help sheet from the University of Hertfordshire):
% shade ÷ % dye stock x WOF (dry weight of fabric) = total mls of dye stock 4% ÷ 1% x 12.5 gms = 50 mls total dye stock to add to dye bath
So for each color I need:
  • Turquoise: 48% of 25 ml = 24 ml
  • Fuchsia: 38% of 25 ml = 19 ml
  • Black: 14% of 25 ml - 7 ml
One last question I have is based on some of the research I've been doing. That the depth of hue can vary amongst the various Procion MX colors, even if the same weight /amount of dye is being used. I hope I'm saying that right. I found this as a question in the DyersLIST archives, but with no clear answer. I've seen this somewhat with my own experiments: I got a bright yellow but a softer red, even though I used the same amount of dye powder for each color. I got a red more equal in intensity to the yellow by doubling the amount of dye powder. Am I making sense? I'm probably not using all these terms accurately, but I hope you get my drift.

Anyway, I don't have any concrete facts to work with here, so I'm not going to worry about for now. I figure that I can't correct my course if I don't begin the journey.

I have absolutely no idea where I will end up colorwise, but at least I'm making a start.

Next .... Computer Hex Code Dyeing 3: 1st Samples - No Joy

Related Posts:
Dye Recipes From Computer Color Codes: A Theory
Computer Hex Code Dyeing 1: Palettes From Pictures
Computer Hex Code Dyeing 3: 1st Samples - No Joy
Computer Hex Code Dyeing 4: 2nd Samples - Getting Closer
Computer Hex Code Dyeing 5: 1st Success?

Originally published July 9, 2008

Monday, July 07, 2008

Computer Hex Code Dyeing 1: Palettes From Pictures

The first step in testing my theory, was to choose some colors to work with. Rather than use a computer image, I decided to start with hard copy picture. There are a couple of reasons for this. One is what Jane mentioned in the comments to that post; that computer monitors do not display colors accurately. Even though computer technology has advanced beyond the traditional "web safe" colors, computer color vision just isn't that accurate. (For an interesting article on this, "Is Your Computer Color Blind?," click here for )

The other reason is that it will be easier to compare and share my results.

The photo I chose was from an old Audubon Society calendar. My first problem was getting it into the computer without a whole lot of color distortion. I quickly discovered that my scanner couldn't do it. [Note: I have an HP OfficeJet 5600 series All-in-One. The scanner stinks. The best scanner I ever had was an Epson Perfection.]

I discovered that photographing the picture in natural light rendered the best color reproduction after inputting to the computer.

There are a number of ways to create a color palette from a photo. I could have done it one color at a time at a site like LunaPic, or with my photo editing software's color picker tool. However, I wanted to show you two websites which automatically create palettes for free.

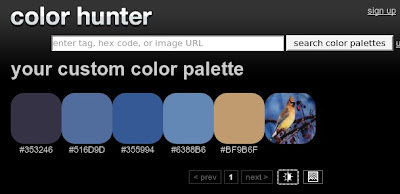
First at Color Hunter. All I had to do was upload the photo and click on "upload image."

Click on image to enlarge.You can click on these screenshots to enlarge them. Color Hunter offers two options for their color palettes, vibrant (above), and dull (below.)

Click on image to enlarge.Both seem to coordinate with the photo quite well.

Another option is Big Huge Labs Palette Generator:

Click on image to enlarge.The Big Huge Labs palette is closer to Color Hunter's dull palette, though the hex code numbers are not the same. And considering the number of colored pixels there are to choose from in any photo, this isn't surprising.

I arbitrarily chose the Color Hunter vibrant palette to work with first. I picked three colors and wrote down their hex codes. Then I went to the Color Converter and plugged in those codes to get the CMYK proportions. (Like I did in this photo from my previous post.)

I rounded the proportions to hundredths, because that's what my own photo editing software does.

So, here are the colors I've chosen to start experimenting with:

#0025B9
cyan - 1.0
magenta - 0.8
black - 0.28


#1470C4 cyan - 0.91
magenta - 0.5
black - 0.11


#EE9628 magenta - 0.37
yellow - 0.83
black - 0.07


The next step will be to try to figure out how to translate these numbers into recipes. Since the test run with the Dye Mixer Applet wasn't all that accurate .....

Click on image to enlarge....... I have several doubts and a lot of questions.

Next ..... Computer Hex Code Dyeing 2: Wrestling With Recipes

Related post: Dye Recipes From Computer Color Codes: A Theory
Computer Hex Code Dyeing 2: Wrestling With Recipes
Computer Hex Code Dyeing 3: 1st Samples - No Joy
Computer Hex Code Dyeing 4: 2nd Samples - Getting Closer
Computer Hex Code Dyeing 5: 1st Success?

Originally published July 7, 2008

Friday, July 04, 2008

Expanded Multiple Tabby Weave Samples

By Leigh

Since I am in the middle of concocting and sampling dye recipes, I thought I'd show you the extended multiple tabby weave samples I've recently taken off the loom.

I really like these! I think they would be especially lovely with two closely related colors. I only wish I had started experimenting with them sooner. As it was, I was trying to see if I could use MTW like a one shuttle Summer & Winter.

The particulars for these samples:

The threading draft

Yarns: 16/3 white unmercerized cotton warp and tabby weft
..........5/2 navy mercerized cotton pattern weft
Sett: 36 EPI
Width in reed: 17.75 inches
Width off loom: 16.5 inches
Width after washing and drying: 15 inches

With this warp, I tried both one shuttle and two shuttle weaves.

One shuttle, using only the pattern weft:


Two shuttle, in overshot fashion:


I have to admit that I like the one shuttle samples better. Not because they were faster to weave, but just because.

And remember the sett I calculated? Two different ways? I can honestly say that it worked very well and that the result is a nice firm fabric. I had hoped for something not so thick, but I'm thinking that the heavier pattern weft is what made the difference.

Next on the loom will be something different. More on that soon.


Related Posts:
Multiple Tabby Weaves - the basics
Expanding Multiple Tabby Weave Blocks - expanded to 5 warp ends
Calculating Sett - Peggy Osterkamp's method
Another Way to Calculate Sett - Another formula
Summer & Winter: Structure and Theory - the basics

Tuesday, July 01, 2008

Dye Recipes From Computer Color Codes: A Theory

Creating color schemes from photos is one way in which fiber and textile artists find inspiration for their work. Kris's Color Stripes blog is a wonderful example of color palettes that can be obtained from photos.

What I've been wondering however, is how to duplicate the colors from my own palettes onto fibers, fabrics, and yarns. I've been thinking that there must be a way to create dye formulae to match colors from a photo. After a lot of poking around on the internet, I've come up with an idea which I plan to try soon. Here it is in a nutshell.

Computers use what is known as hexadecimal codes to interpret color. These are based on the RGB (red, green, blue) color model which is the same model used to mix colored lights. Why RGB instead of the traditional artists' RYB (red, yellow, blue)? Because devices like digital cameras, scanners, and computers interpret colors like lights rather than paints.

Hexidecimal (or hex) codes use values from 0 to 9 or A to F and look like this: #40E0D0 or #EE82EE. The first two places refer to red, the middle two to green, and the last two to blue values. A hash mark always precedes them. By changing the codes, a web designer can determine the colors for background, text, links, etc on a web page. Several websites have charts of these codes, such as this one at december.com, or this one at web.forret.com.

Obviously dyes don't work like lights, so potential recipes would have to be interpreted in a different model. For my experiments, I'm going to try the CMYK (cyan, magenta, yellow, key or black) model. Why? Well for one thing, according to my experiments, dyes don't mix like paints do. For another, it's easier to convert hex codes to CMYK codes rather than RYB codes.

Most photo editing software can pick out individual colors and give you the hex code. Many of them (like The GIMP) can give you the CMYK code too. But you don't need your own editing software to pick colors from your own photos. There are many online editors that can do it for you.

I found the one below at LunaPic.

[NOTE: You can click on any of these photos to enlarge.]

I had the choice of either using their free photo, or uploading my own. Wherever I click on the photo, the color picker isolates that color and displays it at the top, along with it's hex code.

Next, I need to convert the hex code to a CMYK code. This can be done Peter Forret's online Color Converter.

I type in the hex code at the bottom and click the RGB -> CM.... button. At the top, the color displays as several swatches. Under that, the CMYK and RGB codes are given.

My theory is that by substituting fuchsia for magenta, and turquoise for cyan, those CMYK values should give me proportions for my dye recipe. But how to test? With Olli Niemitalo's free, online Dye Mixer Applet (which is also available for downloading).

There is a column on the left side of the dye mixer applet entitled "Dye." If I click on any "blank," I get a drop down menu with a number of different types of dyes and colors to choose from, including several Procion MX dyes. The choices are somewhat limited, but hopefully I can get an idea of whether or not I am on track. A color swatch for each individual color is displayed at the right.

The "Mix Amount" column in the center lets me adjust dye amounts with either a slider, or by plugging in actual values. I input the CMYK values from the Color Converter. At the bottom of the applet, I can see the mixed swatch.

How well does the mixed swatch match the original chip from LunaPic? It's not exact. There might be several reasons for this.

One thing I notice is that the color swatches on the right for the individual dyes display lighter hues than the CMYK key on the color converter. I can note too, that my mixed swatch on the applet, appears to be a lighter hue than the original color I'm trying to match.

Another problem is the dye color choices available in the dye mixer applet. There are two reds and four yellows to choose from, and none of them matches the CYMK key. However! The mixed swatch is enough in the ball park that I am encouraged to take this a step further and try some dye experiments. Looks like I've got my work cut out for me, doesn't it?

Next ..... Computer Hex Code Dyeing 1: Palettes From Pictures

Related Posts: Summary of Procion MX Dye Experiments - Learning how dye colors work together Computer Hex Code Dyeing 1: Palettes From Pictures - using free online tools
Computer Hex Code Dyeing 2: Wrestling With Recipes
Computer Hex Code Dyeing 3: 1st Samples - No Joy - but a starting point
Computer Hex Code Dyeing 4: 2nd Samples - Getting Closer
Computer Hex Code Dyeing 5: 1st Success? - achieving the closest match so far

Originally published July 1, 2008