Friday, June 29, 2007

Warping the Glimakra: Winding It On

By Leigh

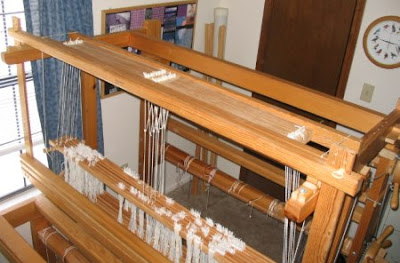
For my first warp on the Glimakra, I decided to follow the steps on the set-up video. It used a back to front one cross method, which is what I've been using on my Schacht. However, it did a few things differently and I wanted to try these. For my first project, I wanted to weave a blanket for the WNCF/H Guild's service project, Project Linus. Until now, I hadn't had a loom able to weave the minimum 35 inch blanket width.

Of course on the set-up video, the loom is being warped for the first time, so the shafts are placed up on top of the countermarche, getting them out of the way for warping. Since my loom had already been woven on, the shafts were still tied to the lamms. After a little internal debate, I untied the lamms and put the shafts on top of the countermarche. I wasn't sure if this needed to be done for every new warp, but it let me follow along with the video more easily.
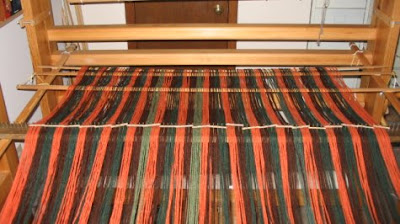
My warp is spread out on the loom.
As you can see in the above photo, two long support sticks are placed on either side of the loom, resting on the front and back beams. The lease sticks and raddle rest nicely on these, making it easy to work with the warp and wind it on.

The raddle Dan made me for my Schacht isn't wide enough for this loom, but happily, I discovered that the top piece of my triangle loom worked very well, having enough length plus 1/2 inch spaces between the nails. After securing the warp with the lease sticks, I spread it out in the raddle.

Closeup showing the arrangement of the sticks and raddle.The one cross b2f method I had been using was from Deb Chandler's Learning to Weave. It uses a threading cross only. In the Glimakra video, the cross is a raddle cross. No threading cross is used. The heddles are later threaded directly from the lease sticks.

In Chandler's method, an extra (lease) stick is placed in the the back loop of the warp (the end without the threading cross). This stick is then tied to the back apron rod. In the Glimakra video, the warp is actually transferred to the apron rod. On the left you can see that an extra (warp) stick has been placed in the cross with the lease sticks. This stick enables transfer of the warp to the apron rod.

The first step was to lay out the back apron cord and the warp, making sure both were centered. The warp was positioned so that it was divided into equal parts, each part to be placed between the corresponding apron cords.

Getting the warp ready to transfer to the apron rod.
One thing that was different with the way my loom is set up, is that the apron cords are not continuous lengths of cord looped over the apron sticks. The previous owner had cut the apron cords into equal lengths, and tied these onto the apron sticks from the warp and cloth beam. You can get an idea of this in the above photo.

Had these been looped over the apron stick as one long cord, I would have been able to transfer the loops of the cord onto my arm. However, since I was dealing with individual lengths of cord, I had to remove them from the stick in order to transfer the warp.
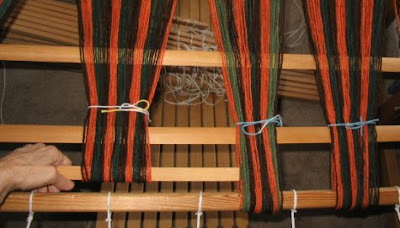
Transferring the warp to the apron rod, one section at a time.
I took my own photos, so you can't see that this is really a 2-hand task. I found that after deciding where the groups of warp needed to be placed on the apron rod, it was easiest to tie them onto bundles. Starting in the middle, I removed the apron cords from the apron rod until I got to the place for warp bundle I wanted to transfer. After I put the bundle onto the apron rod, I pulled the temporary stick out, replaced the apron cord and then moved on to the next bundle. I did this in two halves, working from center outward, since my warp is so wide.

Spreading out the transferred warp.
After all the bundles of warp were transferred from the temporary stick to the apron rod and the cords replaced, I spread the warp out between the apron cords. The lease sticks remain in the warp to hold the cross.

Since my warp is so wide, and I don't have enough 1/2 gallon milk jugs / weights, I tensioned the warp myself as I wound it on. I did have help . . .
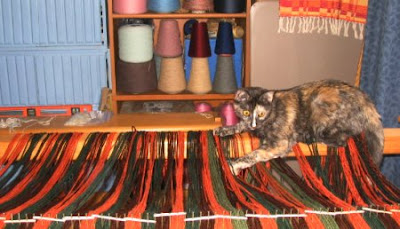
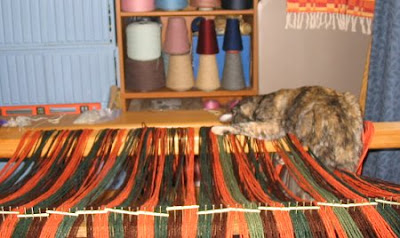
Catzee couldn't resist all that yarn!
She responded to 'NO' in typical cat fashion - by ignoring me.
. . . but as you can see, it wasn't the useful kind.

I found that by using Peggy Osterkamp's "firewood method" (picture here), I could put my full body weight into it. Hopefully I have it tensioned evenly!

The loom also came with warp separator sticks. The previous owner's husband made this very handy storage container for them . . .

Nifty warp stick holder.
The sticks are flexible enough to remove easily from the container through the long oblong opening.

After I finished winding on, the breast beam and knee beam were removed. The bench fits nicely inside the loom and I'm ready to take the shafts down from on top of the countermarche and start threading the heddles.

The warp is ready for the next step.

Tuesday, June 26, 2007

Shetland Update - Nikki

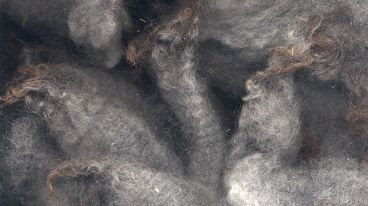
Raw Shetland lamb staple.I reckon I'd better get a quick Shetland spinning update in here before I get too far behind. I'm spinning faster than I'm posting.

Nikki's is a grey lamb fleece . I'm a little partial to greys and exceptionally partial to lamb fleece, so this one was attractive to me from the git-go.

The color is lovely. The raw staple on the left shows the white base and grey mid-section. The tips were sunbleached brown, though that is difficult to see in the scan.

Fiber length in my sample ranged from about 2 and 3/4 to 4 inches. The crimp was pretty consistent throughout, measuring 6 to 7 crimps per inch. The tips were wispy and wavy, and measured about 4 per inch.

The staples were open with no cotting, and sound with no breaks of tenderness. Very inviting to spin.

It washed up beautifully. I used two very, very hot soaks in Dawn dish liquid, followed by three rinses. I put a glug of white vinegar into the second rinse.

Washed staples.I drum carded the entire sample to blend the colors well. I used my dog comb to open up the staples before putting them through the carder. Some of the brown tips combed off, so they didn't effect the final color as much as I'd hoped.

Finished yarn from Nikki, grey Shetland lamb.My goal is to spin all of my Shetland samples about the same size for a knitting project next winter. You might remember that Korny, my first Shetland sample was spun to about 16 WPI. My singles averaged 28 WPI. Nikki however, is crimpier (6 to 7 per inch as compared with Korny's 4 to 6) and gives me a much loftier and more elastic yarn. To try and compensate, I spun my grey singles at 30 WPI. This looked pretty good on the bobbin when twisted back on itself, but after being washed, my Nikki yarn measures 12 WPI! It is a much loftier (and softer) yarn!

Comparing handspun skeins from 3 different fleece samples.You can see the effect of elasticity when comparing the three Shetland skeins on the left. After plying, all were wound off the bobbin onto the same niddy-noddy, but after washing, you can see the difference in elasticity.

The moral of this story can be summed up in one word, "Sample!" What is interesting is that there is so much variation within the Shetland breed, not only in color, but in fiber characteristics. While this makes it more interesting for a handspinner, it also makes it more challenging. So I'm not sure how all these will knit up into one project. Perhaps they won't. Figuring all that out will probably be a challenge in itself.

© 2007 Leigh's Fiber Journal

Sunday, June 24, 2007

Adjusting the Loom With Texsolv

By Leigh

Before I could warp the loom, I wanted to make sure that everything was properly adjusted and that all parts were true and square. The loom had disassembled easily for moving, but I knew I'd need to do some fine tuning for my weaving to go smoothly. All adjustments are done with the Texsolv System. I had heard of Texsolv heddles before, but didn't know that there was more to it than that.

On the left is a scan comparing one of the Texsolv heddles to one of the flat steel heddles from my Schacht loom. I've read several discussions about these heddles on various email lists, though I confess that I didn't pay much attention as I didn't have them.

What I didn't realize is that Texsolv is an entire system of knotless, heat treated polyester cords that attach everything on the loom: the shafts to the jacks and lamms, apron sticks to the warp and cloth beams, and treadle tie-up.

The cords are actually more like a chain rather than a smooth cord; something like a series of linked button holes. These serve two functions. The first is that a loop can be make by pulling the cord through one of it's own chain holes. Very convenient for tying shaft sticks to the overhead jacks, for example.


To attach the cords to other parts of the loom, such as the treadles, anchor pegs are used. The knob on the peg is pushed through one of the chain holes, and the legs on the peg are pushed into the appropriate hole as below.


Many adjustments are made simply by trying the anchor peg in another chain hole. As long as I don't have to fumble around too much or drop too many anchor pegs, I should be able to handle this. Next I can actually start warping the loom.

For a little more information on the Texolv System, there is an excellent article here.

Next, winding on the warp.


Related Posts:
Warping the Glimakra:
.....Winding on the warp
.....Threading
.....Tying Up the Treadles
.....The 3 Duhs
.....Adjusting the Shed
Color Coding Texsolv Heddles

Thursday, June 21, 2007

Why A Countermarche?

By Leigh

Cathy mentioned in the comments of my last post that she was curious as to why I chose a countermarche loom. I guess the short answer would be,

"It was there, I was there, and the price was right."

Of course there's a little more to it because I probably wouldn't have pursued the ad if it had been a jack loom, and definitely wouldn't have pursued it if it had been a counterbalance loom.

When I first started weaving I didn't know that there were different kinds of looms. My introduction to weaving was at a one day workshop, where we were able to try variety of floor and table looms; all jack. That workshop not only confirmed that I loved weaving, but also gave me an idea of the make and model of loom I wanted, especially since I had back aches at the time. The Schacht Wolf loom was the most comfortable for me to work at, so it was what I looked for.

I eventually found a used Mighty Wolf, which came with two reeds, a bench, and lots of yarn. It had belonged to the seller's deceased aunt, and I was told that it was thought to be a '4 Now - 4 Later'. That was deciding factor for me, as I knew I would someday want more than four shafts. Needless to say I was very disappointed when I later figured out that this was not a '4 Now - 4 Later' model, just a basic four shaft loom. Ah well. I put it to good use nonetheless.

I first read about loom types in a Woodland Woolworks catalogue. I immediately dismissed counterbalanced looms, since the shafts work best in pairs and therefore seem limited in regards to unbalanced weaves. I already had a jack loom and could verify that they take a lot of leg work to weave, and yes they are noisy to operate. But I lingered over the description of the countermarche looms. Phrases like "wide even shed," and good for "using delicate materials and when weaving narrow on a wide loom" really got my attention.

A little more research and I found new phrases I liked; "quiet, smooth treadling" and "better tension" were added to my list of things to admire. My only mental set-back came when I discovered that CM looms are much trickier to tie-up (for nonweavers, this basically means connecting the shafts to the treadles, which determines the pattern on the cloth). Several weavers had told me that it was just too much work to get down on the floor and struggle with tying up a countermarche loom.

Of course, everyone has their personal preferences. It is human nature to prefer what we have good success with, whether warping back to front versus front to back, or Scotch tension versus double drive spinning wheels. Since I thought a new loom was a long time down the road, I pretty much set the whole thing on the back burner and pressed on with weaving on what I had. It was when I read the ad that I knew I was ready and willing to own a countermarche loom.

Now that I have it, I've been doing more research because I want to understand how it works and how it is different from my jack loom. Interestingly, in my reading I am discovering that some of the weaving problems I have been having are probably due to the design of the jack loom itself.

When creating a shed (the opening that the shuttle passes through), the jack loom uses what is referred to as rising shed action. This means that as the treadles are depressed, their attached shafts are lifted to make the shed. The result is that the lifted warp threads are stretched tighter than those that remain unlifted. This creates an unevenness of the warp tension that can result in skipped warp threads, poor shed, and poor selvedges. These are things I've been battling for as long as I've been weaving! I used to try and fix skipped threads by increasing the warp tension, but as I would crank the tension tighter, my shed would get narrower.

Another problem this uneven tension creates is difficulties weaving weft dominant fabrics (which is why jack looms are not usually recommended for rug weaving). I always thought that I was not beating hard enough because I could never get the weft well packed in when certain shafts were lifted. Now I understand that it probably wasn't just me.

Even so I would not have traded my jack loom for all the world. And if I had started with a countermarche loom, I'm sure I would have thrown in the towel a long time ago.

I cannot honestly tell you if and how well the countermarche loom will correct the weaving problems I've had. I'll just have to wait, weave, and see. In the mean time, if you are interested, there is an excellent article on the different types of looms at Fiberarts.org, read it here.


Related posts:
Comparing Looms: Jack & Countermarche


Tuesday, June 19, 2007

Comparing Looms: Jack & Countermarche

By Leigh

To help myself get over the feeling of being overwhelmed with my new loom, I first took some time to explore the differences between it and my old one. Both the Glimakra Standard countermarche and the Schacht Mighty Wolf jack loom weave cloth, but it amazes me that there can be so many differences between the two.

The most obvious difference is size. While the Schacht fits comfortably into a corner in my living room, the Glimakra takes up an entire room.

Another obvious difference is the way the beater is attached:

Beaters on the jack loom (left) & the countermarche (right).
The beater holds the reed and serves to pack the newly placed weft into place.

On my Schacht loom on the left, the beater is hinged at the bottom. The advantage of this is that it stays put during weaving, whether forward or back.

On the Glimakra on the right, you can see that the beater hangs from the top (reed has been removed). It rests in the beater cradle and can easily be lifted off and removed from the loom for warping. The cradle has three notches, so that the beater can be advanced as the weaving progresses. The advantage to this is not having to advance the warp quite as often. The bar itself is quite solid and heavy, but the frame is still easy to move.

One thing I did with the help of the video, was to check to make sure the that beater bar is parallel to the breast beam. It was off by about half an inch after being moved. It was very easy to adjust by loosening the nut and bolt on top of the cradle, sliding the cradle until I was satisfied with the measurement, then tightening them again.

One thing I noticed from the video, is that since the beater swings, it has to be held back to throw and catch the shuttle. That will take some getting used to. Evidentially, it is possible to gain such a rhythm as to let the beater do all the work; the weaver simply throws the shuttle between swings and keeps the beater moving. Of course, that's them and this is me.

The other obvious difference is the system by which the treadles move the shafts. On my jack loom, it is a beautifully simple thing:

Jacks, lamms, & treadles on the jack loom.
In this photo you can see the jacks, the lamms, and the treadles.

The jacks are the diagonal bars which are partially hidden by that bar under the cloth on the cloth beam. The jacks are attached to pivots which enable them to push the shafts up when the treadles are pushed down.

The lamms are the horizontal sticks below the jacks with the strings hanging from them. On this loom, I have four shafts, each having it's own lamm and it's own set of jacks. By choosing which lamm strings to attach to the treadles, I can determine which shafts raise which treadle. It's possible for a weaver to tie-up all sorts of combinations, anywhere from 1 to 3 shafts at a time. By depressing the treadles in a prescribed order, the jacks push up the attached shafts, and my weaving pattern appears almost magically on my cloth (assuming I haven't made any mistakes.)

Now, here are the lamms on the countermarche loom:

Countermarche lamms & treadles.
A countermarche loom has two sets of lamms, an upper and a lower. This loom has 8 shafts, so there are 8 upper lamms and 8 lower lamms. Both sets have strings (cords actually) hanging from them. One set raises its attached shafts, while the other set lowers its attached shafts. The tail in the lower right hand corner of the photo is optional and nonfunctional in regards to weaving, except that what it's attached to likes to attack strings and yarn.

Obviously the tie-up system is a bit more complicated than on a jack loom. I'll be learning about the tie-up when I put my first warp on this loom. (Have I mentioned yet that I feel a bit overwhelmed???)

The jacks on a countermarche loom are overhead, right behind the beater:

Countermarche jacks.
You can scroll back up to the first photo to get a view from the under side. The shafts are attached to the jacks on either end, while the cord running down the middle attaches the jacks to the lower lamms.

Close up of the lamm tie up on the countermarche.
The upper lamms are attached indirectly to the jacks by being attached to the lower lamms with a separate cord. But who can see that from the forest of strings hangning there. Well, I'm at the point where the more I try to explain this, the more confusing it sounds. I reckon I'd better quit while I'm ahead.


Related posts:
Why A Countermarche?
Jack Loom Revisited
Jack Loom Diagnostics
Skeleton Tie-Ups for Countermarche Looms
Skeleton Tie-Ups for Jack Looms

Sunday, June 17, 2007

Measuring Wraps Per Inch (WPI)

By Leigh

Tina and Sharon were interested in my comment in my last post about how I use wraps per inch (WPI) in spinning. Of course this got the wheels turning and before I knew it I had another topic to post about!

Measuring WPI is actually quite easy and extremely useful. One thing it does is help ensure your yarn is a consistent size throughout the entire bobbin. By periodically checking your WPI, you can adjust your spinning to keep it consistent. Knowing your WPI is also invaluable when planning for some projects, such as an item knitted from a commercial knitting pattern. The pattern will require a specific size of yarn, so you have two options. You can either spin as you will and then change the pattern to accommodate your yarn, or you can spin the size yarn called for in the pattern.

The only tool that is required is something that can measure an inch. It can be a boughten tool like this one .......

Purchased WPI counter.
... but actually a simple ruler will do. The one I like the best (when I can keep track of it) is the one I made from the instructions on Patsy Zawistoski's wonderful video, Spinning Wool - Basics and Beyond. I learned how to spin from this video, so I can't recommend it highly enough!

Homemade WPI counter.
My favorite counter is simply an 8 inch length of quarter inch dowel, marked in inches, and with a notch cut into one end.

The secret to an accurate count is to neither add nor subtract twist from whatever you are measuring. It is probably easiest to understand this with a little experiment:

Take about a yard of 1/4 inch ribbon and wind it around a stick, ruler, or whatever. Notice that the ribbon takes on twist as you wrap it. OK. Unwind that and now try putting the ribbon onto the stick by rolling the stick. You will find that you can roll it onto the stick smoothly.

Measuring WPI of Shetland singles
I secure the end of my yarn in the notch and begin to roll the stick toward me. I either loosen the brake band (on Scotch tension) or remove the drive band from the bobbin (on double drive) so that the yarn is easier to pull off the bobbin.

My marks are only on one side of my stick, so I keep track of my count by watching for that mark each time it comes around. I use my right hand to roll the stick toward me, and my left thumbnail to guide the yarn into place. The stick should be solidly covered with yarn. When I get to the next mark, I write that number down, usually on a note card to which I also attach a sample of my single and a sample of the yarn plyed back on itself. My card can also contain other information I want to remember such as fiber type and source, spinning ratio, etc.

When I'm finished counting, I secure my brake or drive band again and unroll the yarn back onto the bobbin as I treadle.

I already gave you a link to a chart which gives WPI for standard commercial yarn sizes, but then there is the question, what size do the singles need to be spun? Here is a rough guide to use as a starting point, using the same yarns as are mentioned in that chart:

For a 2-ply measuring 18 WPI, spin your singles to about 34 WPI
For a 2-ply measuring 16 WPI, spin your singles to about 27
For a 2-ply measuring 14 WPI, spin your singles to about 25 I
For a 2-ply measuring 12 WPI, spin your singles to about 22
For a 2-ply measuring 10 WPI, spin your singles to about 17
For a 2-ply measuring 8 WPI, spin your s ingl es to about 13

Even so, remember the famous adage to "Sample, sample, sample." It's especially important to wash a length of the sample, as washing will bring out a yarn's loft and effect the resulting size. And it would probably be a good idea to attach this to the sample card as well.

I keep my sample card close by and use it to monitor my spinning by comparing it to the sample on the card. By trying to match the two, I can keep pretty close to my desired size. I only use the counter occasionally, usually when I sit down to spin and perhaps one or two other times during that session. This method has really helped me gain consistency with my yarns and I would recommend it to anyone.

Friday, June 15, 2007

Shetland Update - Korny

By Leigh

Before I get too involved with my new loom posts, I thought I'd better pop a Shetland update in here.
Washed sample staplesOnce all my samples were washed I started to spin. For no particular reason, I chose the fawn to spin first.

This single coated fleece came from a three year old fawn ewe named Korny. It is the coarsest of the samples that Cathy sent me, but even so it was lovely to spin.

Korny's crimp wasn't exceptionally well defined, but where it could be counted, it averaged about 4 to 6 per inch. Fiber length ranged from 3 to 5 inches.

The sample displayed a lovely range of colors; from cream to light brown to an almost pewter color. And this leads to a question for all you Shetland shepherds. How is an individuals official color determined? There seem to be so many variations that I think it would be a difficult task to decide.

I decided that I would drum card it to blend it. I put it all through my Strauch Petite four times, which blended it to my satisfaction.

Deciding what size yarn to spin took a little research and contemplation. I knew that I wasn't up to trying my hand at spinning for and knitting a Shetland ring shawl, so I pulled out Alice Starmore's The Celtic Collection to see what size yarn she used for her Fair Isle type designs.

Now, this leads to a short aside where I air out a pet peeve of mine regarding knitting books which only designate a particular brand of yarn rather than a standard size of yarn. This information is of no use to handspinners, not to mention that the book becomes obsolete as soon as the yarn is no longer available. However, one day it occurred to me that I could approximate what size yarn I needed from the gauge listed with the pattern. I just need to spin a yarn to match that. In this case, most of the patterns I'm interested in in this book are about 30 to 33 stitches and 32 to 35 rows per four inches on US 2 - 3 knitting needles. A quick look at the nearest yarn catalog (Knit Picks in this case) informs me that this is a fingering weight yarn, which according to this chart, measures about 16 WPI. So how do I figure out what size to spin my singles? I reach for this book......

Mabel Ross is absolutely one of my favorites and I love her books and video. The handy little chart on page 32 tells me that to create a 2 ply yarn of 16 wraps per inch, my singles need to be 27 WPI. I find however, that this is only a ball park estimate and that I still need to sample. Crimp, loft, and elasticity all play a part in the final yarn size, so experimenting is important. In my case, I settled on 28 WPI for a finished 2 ply size of 17 WPI.

My Fawn Shetland handspun yarn. I started out with 2.4 ounces of raw fleece, and after washing out the lanolin and dirt, and picking out anything undesirable (a few short bits and VM), I ended up with 1.3 ounces of lovely yarn. I have almost 73 yards and I really like the color.

For more photos of this lovely fleece and to see how Cathy's been spinning it, click here!


Related Posts:
Measuring Wraps Per Inch (WPI)

Wednesday, June 13, 2007

Setting Up the New Loom

Thank you all, for your encouraging comments about my new loom. I think I'm finally getting over the shock of owning it. I am delighted to know that several of you already have this loom, so don't be surprised if I bombard you with questions!

Set up was pretty easy. Between the video and the booklet, we just took it step by step. Plus we had plenty of help.

Rascal the HelperRascal was in charge of hardware and small parts.

First one side is put together...
Pardon the rather crookedy photos. Due to the size of the room, I couldn't get back far enough to photograph the entire thing. So I used the hold-the-camera-up-and-back- behind-your-right-shoulder-and-hope-you've-aimed-good-enough method. I had cleared out our spare room, which until now had been a storage room, junk room, and general catch all for things we wanted out of sight. Actually, it was good to do some spring cleaning in order to make room for the loom.

...then the other is added.
No nails or screws are used for the frame. It is held together with wooden wedges. Catzee was in charge of inspection and snoopervision.

With beater and countermarche in place.
Fortunately we didn't disassemble it completely when I bought it. The countermarche with the shafts and the beater remained assembled. All we had to do was set them in place.

Catzee likes it.
As you can see, there is plenty of room to get in there and work with anything that needs adjustment. Cat included for size comparison. Unlike my jack loom, the treadles are attached at the back rather than the front.

View from the front of the loom.Here's what it looks like from the front.

View from the back, showing the double back beam.
And here's what it looks like from the back. Both warp beams are in place. The long tube on the floor is the reed holder. Very clever I think. It was made by the previous owner's husband. She warped front to back so there is no raddle however. One other thing I'm delighted with is the top part of the frame which will be very useful for winding on the warp. I can hang the warp over the top and weight it with my milk jug weights. I'll be able to wind on quite a bit before having to move them!

Next, adjusting the loom with the Texsolv system.


Related posts:
New Loom = New Books. Right?
Comparing Looms: Jack & Countermarche
Why A Countermarche?
Warping the Glimakra:
.....Adjusting the Loom With Texsolv
.....Winding on the warp
.....Threading
.....Tying Up the Treadles
.....The 3 Duhs
.....Adjusting the Shed

Sunday, June 10, 2007

New Loom

It all started harmlessly enough when I saw the ad for a used 8 shaft loom.

Seeing the ad led to a comment about it to my husband.

Which led to an encouragement to call the number.

Which led to a "can we just come and see?"

Which led to a trip to the bank "just in case."

From which there was a trip up the mountain.

And then we walked into her studio.

I knew that the loom was going to be big. The ad had described a Glimakra Standard 60 inch, 8 shaft countermarche loom with a double back beam. Of course, I did my homework by looking it up on the Glimakra website, so I knew it was going to be big. But face to face it was so much bigger!

I looked at Dan and asked, "But do we have room for it?"

To which he firmly replied "Yes."

We circled it and stared at it. I didn't know what to think.

"But can we fit it into the truck?" I asked.

"Oh it comes apart!" said the Weaver, "we'll help you."

Dan looked at me once again and without hesitation said "Yes."

Nobody said anything. I asked a few questions, but actually I was stalling. Dan and I had both known that eventually I would get a bigger loom, but that was still years down the road in my mind. At least until after the kids graduated from college. I just couldn't switch mental gears fast enough.

"Well, are you ready?" the Weaver asked.

My mind was saying "I don't know" but I heard my voice saying "Yes."

So apart it came and into the back of our little Chevy S-10 pick-up it went.

After we'd climbed into the truck and started to head back down the mountain, I turned to Dan and said. "I almost couldn't do it. I started thinking, 'What in the world am I getting myself into,' and I almost jumped up and screamed 'I've changed my mind!' "

"You didn't think I'd actually let you leave there without it, did you?" he asked. But by that time my brain was in full gear, trying to figure out where in the world we would find the room to set it up.

Here it is at the moment.......

We took the loom apart to transport it.
..... with a few other odds and ends scattered about elsewhere.

Fortunately it came with a video which will show us how to fit it all together again. In the meantime, I've embarked upon a spring cleaning project to make room for it. I'm still wondering what in the world I've gotten myself into, but at least now I'm looking forward to finding out.

Next, Setting Up the New Loom


Related post:
New Loom = New Books. Right?

Thursday, June 07, 2007

Fibonacci Overlay 2

My second summer & winter Fibonacci overlay experiment is off the loom. Like the first, I didn't match the colors of my warp stripes to the threading pattern.

My threading pattern was the same Fibonacci threading sequence I've been using:
1 unit for block A (threaded 1, 3, 2, 3 making 4 ends for 1 unit),
2 units for block B (threaded 1, 4, 2, 4 making 8 ends),
3 units for A (12 ends),
5 units for B (20) ends),
8 units for A (32 ends),
repeat.

For the colored stripes in the warp, I used a different Fibonacci sequence so that it overlaid the threading sequence. I made it easy on myself and used a sequence of three: 8 warp ends of white, 12 warp ends of dark green, and 20 warp ends of dark purple. My warp is 8/2 unmercerized cotton.

I put on enough warp for three dishtowels, and then used what was left to experiment a little. For each dishtowel, I used different colors in the tabby and pattern wefts, and different treadlings as well.

For the first on I used purple tabby weft (same as warp, an 8/2) and white pattern weft in 6/2 unmercerized cotton. I treadled with the same pattern as the warp color stripes: 8, 12, and 20. You can see these changes in the horizontal bands of the weaving above.

For the second dishtowel, I continued to use the 6/2 white cotton pattern weft, but switched the tabby weft to the 8/2 green cotton. I changed the treadling to be the same sequence as the threading blocks, using 4 pattern picks (each of first tabby and then pattern wefts), 8 pattern picks, 12 picks, 20 picks, and 32.

For the third one I used a white 8/2 cotton for the tabby and navy 6/2 cotton for the pattern wefts. I repeated the 8, 12, and 20 treadling pattern.

After that I had a little warp left and so tried another traditional summer & winter treadling. I used the 6/2 white for the pattern weft again, but this time used an 8/2 navy unmercerized cotton for the tabby weft.

In some ways I think the navy was a better choice for the tabby weft as both the green and purple I used in the warp have blue as a common color element. It had a better visual influence on both the green and the purple, which tended to muddy one another a bit when used on top of each other.

One thing bugged me while I wove was the white warp stripes. I figured that I should have learned my lesson with that last batch of towels as white tends to be very pronounced against darker colors. As I wove, the white kept grabbing my attention and was a distraction. I kept mentally kicking myself for using it in the warp. But now that it's all off the loom and I'm looking at photos of the result, I realize it isn't so bad. Hmmm. Live and learn.

In reading all this over, I realize that one problem with reading about weaving is that it requires a lot of concentration to mentally visualize what's being described. It does for me anyway and I don't know about you, but I'm not always up to it! So if my descriptions are are confusing, just enjoy the pictures. :)

Tuesday, June 05, 2007

Shetland 2 - A Closer Look

A moorit dual coated Shetland fleece.Monday was a play day. I spent it sorting and examining my Shetland fleece samples. With seven samples of fleece, I have excellent variety in terms of fleece type and color. They came from Nussbaums River Bend Farm in Farmington, NJ.

I had washed them over the weekend, in separate batches so as not to lose track of which was which. I used mesh bags and hot, hot, hot water in my kitchen sink. Each batch had two 20 minute soaks with Dawn dish liquid and then three long hot rinses. The 2nd rinse had a good glug of white vinegar. Wool and silk favor slightly acidic conditions. Soap and detergents are basic, and can damage protein fibers. The vinegar returns the fiber to a happier pH. I used the spin cycle on my washer to remove as much water as possible and allowed them to air dry on a towel in a cat proof room.

A gorgeous grey lamb fleece.Shetland is an ancient Northern European short tailed breed, thought to have been brought to the Shetland Islands by the Vikings. Considered a primitive breed, Shetlands were originally dual coated. "Improvements" over the years developed a single coated variety. Both types can still be found, and each has it's own characteristics. I was fortunate that Cathy sent me some of each type!

A sample of a fawn fleece.In the US, Shetland is considered a "recovering" breed according to the American Livestock Breeds Conservancy, which is good news. The breed is evidently a very popular choice for a spinners flock, as they are a small, hardy, sweet tempered sheep. I know they would be my choice if sheep were allowed to live in apartment buildings!

Shetlands come in eleven main colors and have 30 types of pattern markings. In trying to evaluate the fleece samples, I discovered that much depended upon the type of fleece it was. The North American Shetland Sheepbreeders Association (NASSA) recognizes three types of Shetland fleece.

The 3 types of Shetland fleece.
Left - the beaver or double coated fleece. These have the longest staples, with a length of 5 to 7 inches. The staples are distinctly shaped and it is easy to separate the two coats by grasping the tip firmly in one hand and gently combing out the undercoat at the butt of the staple. The undercoats are softest, but I didn't find the outer coats to be especially harsh, like the Navajo-Churro and Icelandic fleeces I've worked with. Crimp in these samples was the least well defined at about 6 per inch on average. The outer coats also showed the highest amount of luster.

Middle - is the long and wavy type. Mine measured 4 to 5 inches in length and are triangular in shape. These could not be separated into two coats. I'm not exactly sure where crimp becomes wave or vice versa, but in these samples it was about 6 to 7 per inch with wavy to curly tips. Staples are very open.

Right - Kindly, single coated fleece. The shortest at 3 to 4 inches. The crimpiest; I measured 12 per inch on the sample I had. The softest and densest.

My plan at the moment is to drum card each of them. There is an interesting color variety withing some of the samples, but I think I will ultimately want them well blended. I plan to spin them the same size as the yarn for my Rare Breed Sweater, from which I have quite a bit of leftover Shetland yarn and roving! I would like to use all the colors together in a Fair Isle vest or cardigan eventually. I'll report more on the individual processing as I go along.

In the meantime, comments, corrections, and suggestions are most welcome, especially from you Shetland folk!

Sunday, June 03, 2007

Shetland 1 - Fleece!

Shetland fleece! Or more accurately, fleece samples. Cathy sent me seven glorious Shetland fleece samples. If you have been reading her blog, then you know that she has acquired some gorgeous fleeces lately. I was so honored that she wanted to share some of it with me.

Shetland really came to my attention while I was working with my Bowmont fleece challenge sample. When I compared a small bit to it's two parent breeds, Merino and Shetland, I really had a hankering to work with Shetland next. Plus, through the blogosphere, I know several Shetland people: Tina T-P, Kathy L, and Sharon (did I miss anyone???) It is such a perfect next step for me.

This is not a totally new fiber for me as I have spun Shetland before, but it was roving. It was for my Rare Breed Sweater (which remains front and neck bandless.) In fact, here is the Shetland row right after I knitted it. All three sheep were spun from roving.

Rare Breed Sweater row of Shetland sheep.However, working with roving isn't the same thing as working with fleece. I enjoy spinning from roving, but it tends to feel impersonal. To its credit, it saves one the time and fuss of having to sort, wash, and prepare the fiber. But it only gives a spinner partial information. With roving I can discover the fiber length, which tells me how far apart to hold my hands as I spin. But other information is lost in processing. Was the fleece crimpy? Wavy? How many per inch? How did the color vary across the fleece? What were the tips like? Tender or sound? Discolored? How greasy was it? How much weight was lost during washing? Plus I lose the option of separating the finer portions from the coarser. With roving, it's all processed together.

Then there are the the qualities of smell and touch. Not all sheep smell the same! It is through smell and touch that I begin to bond with my future yarn. It is at this point, as I touch, examine, sort, and separate my fleece that it begins to speak to me. It begins to hint at what it might want to be.

So, I have been busy getting to know my samples. I have been saving some raw for my staple collection and have been washing the rest. Interspersed with weaving and whatever posts, I will be sharing my Shetland adventure with you over the days and weeks to come.

© 2007 Leigh's Fiber Journal