Sunday, September 28, 2008

Space Dyed Yarns & Plain Weave

By Leigh

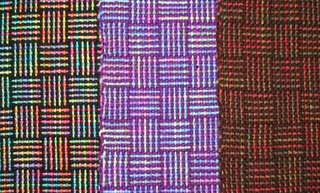
Weaving on my plain weave shawl got me to thinking about weaving with space dyed yarns again. The shawl's slubby yarn created a lovely visual pattern that I thought would be even lovelier in color.

In the past, I've experimented with space dyed yarns as either warp or weft. As warp, I tried to create an ikat-like effect by grouping sections of like colors together (click here for how I did that) . As weft, space dyed yarns seem to end up being more random looking. (Example here). This time, I'm using the space dyed yarn in both warp and weft, alternating it with sections of fuchsia and brown.


I liked the striped effect, but the most fun is the interaction of the space dyed yarns. I'm getting

plaid-like

check-like

and other interesting patterns.

like this

and this

I'm using commercial worsted weight acrylic knitting yarns sett at 8 epi. They are inexpensive, fun to experiment with, and make good gifts for folks who want something they can toss into the washer and dryer.

This is fairly good size, 45 inches wide on the loom. I plan to make it a little longer than square, and will probably finish it off with a crochet edging.


Related Posts:
Plain Weave Shawl
Space Dyed Blankie Done

Thursday, September 25, 2008

Natural Dyeing?

By Leigh

Jewel asked if I have ever used plants to dye my yarns. The answer to that is yes, I have used plants. And bugs. ;p

I've dyed some yarns, but usually I like to dye unspun fiber, whether it's with natural or chemical dyes. The reason for this is because home dyeing often results in somewhat irregular (splotchy) coloring across the fiber or fabric. Sometimes this is the look one is going for. Other times, an even distribution of color is wanted. By dying the fiber instead of the yarn, I can blend the color as much or as little as I wish (an advantage of spinning my own yarns).

Anyway, her question prompted me to pull out my box of natural dye experiments and share them with you. All of them are on raw wool, and all except one are from the same fleece. All were done as part of one of the Online Guild's natural dyeing workshops: "Medieval Dyeing" in May 2003, "Indigo Dyeing" in March 2004, and "Dyeing for Purple" in May 2005.

Sadly, all my notes for these experiments were lost when my old computer crashed. I did label the bags, so what I can tell you is taken from that. The information below each photo describes them from left to right.


Yarrow plant tops, copper mordant - this is actually a very pale yellow/green
Onion skins, alum mordant
Onion skins, chrome mordant


Daffodil flowers, no mordant
Dahlia flowers, alum mordant, ammonia afterbath
Osage Orange inner bark, no mordant


Indigo (powdered leaves), no mordant
Madder roots, alum mordant


Brazilwood (heartwood chips), no mordant
Brazilwood, ammonia dip
Brazilwood exhaust over madder (it's hard to tell there are 3 samples there)


Cochineal bugs, alum & cream of tartar mordant
Cochineal bugs, chrome mordant
Cochineal bugs, alum & cream of tartar mordant, ammonia dip
Cochineal bugs, exhaust over madder


Logwood (heartwood chips), alum mordant
Logwood exhaust over madder (I had a lot of madder dyed fiber)


Alkanet roots, with acetone on alum & cream of tartar mordant
Alkanet exhaust, with acetone on alum & cream of tartar mordant


Not labeled! I couldn't believe that I didn't label this. And it frustrates me all over again that I lost so much information in my computer disaster. I really like the color however.

So far I've just been a dabbler in the world of natural dyeing. If you want to know more about it, do visit Helen's blog. She is a fellow Online Guild member, and helped tutor some of the workshops.

Eventually, after the entire fleece is dyed, I will spin all of these and make something out of them. I'm not sure about the what or when of that project obviously, considering that some of these have been keeping since 2003! Be assured that I will definitely blog about it when the time comes, assuming that you're all still around by then! :)

Monday, September 22, 2008

Procion MX Exhaust Experiments

By Leigh

I haven't done a dyeing post in awhile. Why not? Because discovering that my hex code dyeing posts had been stolen, really knocked the wind out of my sails. I had worked hard for my first success, but having to deal with the stolen content distracted my concentration for converting hex codes into Procion MX dye recipes. This doesn't mean that I've completely given up on the project. It just means that I will have to collect my notes and my motivation for a fresh experiment.

What I want to blog about today, is the results from an experiment I started two months ago, using the exhaust from my Procion MX dyeing. By "exhaust," I am referring to the color left in the dyebath after the primary object has been dyed. "Exhaustion," is technically the process in which dye molecules move from the dyebath and attach onto the fiber. When as much dye as possible has attached itself to the fiber, the dyebath is said to be "exhausted."

Until the Online Guild Vegetable Dyeing Challenge, all of my dyeing experience had been with acid dyes on wool, mohair, and angora. With acid dyes, the dyepot is rarely completely exhausted. It's often possible to continue to dye with a used dyebath, getting progressively lighter shades of the original color.

Now theoretically, there is no exhaust from Procion MX dyes. This is because in an alkaline environment (created by the addition of washing soda, aka soda ash or sodium carbonate), the Procion MX molecules in the dyebath will bond not only to the fiber, but also to the water molecules. That means that even though the leftover dyebath may retain a lot of color, the dye molecules left in the dyebath are unavailable to dye more fiber.

Even knowing this, I deplored the apparent waste of dye when I poured out the used Procion MX dyebath. So I started experimenting. As I worked on the challenge, I would pop more scoured cotton lint into the exhausted bath and leave it sit for a couple of days. For some colors, the fiber would look as though it had taken the color, all of which would wash out. However, I did have some interesting results with anything that had turquoise MX-G or fuchsia MX-8B in it.

The results of these experiments are in the next two photos below. At the top of each is the cotton lint from the original dyebath. The recipes for each of these can be found on this post. At the bottom of each photo, are the samples I got from the exhaust of each of the above.

Experiments with green PMX dye exhaustsExperiments with fuchsia PMX dye exhausts
In each case, the fiber sat in the exhaust for at least 48 hours. It is interesting to note that the exhaust experiments which came out palest (green #3 and purple #3), had neither turquoise (Turquoise MX-G) nor fuchsia (Red MX-8B) in the recipes.

This wasn't in keeping with everything I'd read about Procion MX dyes, so when I reported the results to the Online Guild, I was curious whether anyone knew what was going on. It was suggested to me that the exhaust samples probably wouldn't have the lightfastness typical to PMX dyes. Ever the "see for myself" soul that I am, I set up a second experiment.

I put three samples onto a piece of paper, folded the paper to cover half the sample, labeled them, stapled the paper, and taped it to my bedroom window with the fiber samples facing into the sun. This window gets the long, baking, hot afternoon sun. I figured if there would be any color deterioration, this would be the place for it to happen.

Lightfast test sample before
That was two months ago. Yesterday, I took the paper down to see what had happened. In the above photo, you can see that the ink faded, but what about the color in the fiber? See the results below.

Lightfast test sample after
Yes, there was fading, but not very much!

Conclusions? None on my part. I'll leave the explanations and speculations to the experts. This is all highly unofficial anyway. However, any time I dye with either of these colors, I'll be sure to have something else around to throw into the exhaust. :)

Friday, September 19, 2008

Plain Weave Shawl

By Leigh

Is finished!

Leigh's handwoven slubby, plain weave shawl.
The particulars:
Structure: plain weave
Yarn: Cotton flake of unknown size
On loom size: 24 by 85 inches
Finished size: 20 by 74 inches, not including 6 inch fringes
Wet finishing: Warm water soak about one hour followed by several minutes of machine agitation. Machine dry on medium for about 30 minutes. Laid flat to complete drying.

Close-up of shawl texture
Here is a close up of the visual textural I got from the slubs in the yarn. The thick and thin of the yarn also gave me a slubby looking, uneven selvedge, which is in character with the shawl overall.

I pondered quite awhile over the fringe. I liked the appearance of the yarn, so I had hopes of a loose fringe. The problem with a loose fringe of course, is unraveling. In the photo below, you can see how I prepared to give loose fringe a try.

Preparing for a loose fringe
On the left, you can see my hemstitching. I used a 10/2 natural cotton, which gave a neater appearance than using the slub yarn. I left about 8 inches of warp unwoven before weaving in another inch of plain weave. After I took the shawl off the loom, I used my sewing machine to run a row of zig zag across that inch of plain weave. This let me wet finish the shawl without messing up the fringe.

After the shawl dried, I cut off that zig-zagged part and knotted the ends of the fringes. Usually knots don't look well on fringes, especially fine yarns. However the yarn was so slubby anyway, I didn't think the knots would be too noticeable, but would still help keep the yarn from unraveling. Here's how it turned out.

Close up of the fringe
I don't know yet how well this will wear, but I think with gentle hand washing and lying flat to dry it should be okay. I also want to mention that it's thicker and heavier than I expected, but it is wonderfully warm and soft.


Related Posts:
Good Ol' Plain Weave
Undulating Shadow Weave 3 - Finishing - one way to cut fringe

Tuesday, September 16, 2008

Good Ol' Plain Weave

By Leigh

There's been an interesting discussion on the Weaving list about plain weave. This most basic weave structure is the one almost every beginning weaver starts with it. It's simple over 1 - under 1 - over 1 - under 1 structure is the easiest to understand, and probably because of that, seems boring pretty quickly.

Actually however, the possibilities with plain weave are almost endless. Besides plain old plain weave, color effects are fascinating, such as checks and plaids. Log cabin is plain weave,

3 of my log cabin scarves
Then there are others that I haven't explored much, such as warp or weft faced weaves.

Another fun thing is plain weave with space dyed yarns.

Plain weave with the space dyed yarns.
Something similar, is plain weave with a textured yearn such as cotton flake. According to the Celanese Acetate Textile Glossary, flake yarn is by definition, "Yarn in which roving or short, soft staple fibers are inserted at intervals between long filament binder yarns." I can't say that this definition heralds the dawn of my understanding, but here's what it looks like -


While waiting for my tied weave study group, I decided to see what this yarn would look like in plain weave.

Plain weave with textured yarn.Close up.

Stepping back.


I can't say that it looks like much at the moment, but it is interesting to watch as it weaves up. It will be either a scarf or a shawl, depending on how much it shrinks after washing! At any rate, it's weaving quickly. Hopefully it will be off the loom by tomorrow.

Oh! And if you like kitty pictures, be sure to check out my "helper."


Related Posts:
Plain Weave Shawl
Space Dyed Yarns & Plain Weave
Weaving At Last - warp-faced plain weave

Saturday, September 13, 2008

Waffle Weave Dishtowels Done

By Leigh

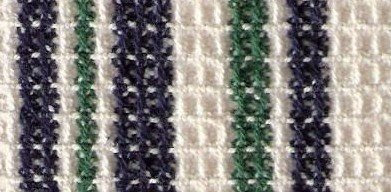
My 2 barcode striped WW dishtowelsThese are the towels for the Towel Exchange.

Close-up to show waffle effectWaffley close-up for Peg (see comments)

The particulars:
4 shaft waffle weave
yarn - 10/2 unmercerized cotton
sett - 30 epi
stripe pattern - upc barcode
shrinkage - about 24%
finished size - 18 by 24 inches

My sett is a little tighter than the 24 epi that many handweavers use for waffle weave in 10/2 cotton. My sample was done at 30 epi however, and when I asked my DH if he thought the fabric was too thick for dishtowels, he responded with a definite no. He liked their thick, thirsty feel, so I left the sett as it was.

I finished hemming them yesterday afternoon. After looking all the suggestions you all shared last March (see Hemming Handwoven Fabrics), I decided to serge the fabric and then hand hem. I like my serger for this, as it cuts and binds the edges at the same time. It was easy to fold under and hem.

My only concern about the hems is that they are a little thick. However, no one seems to have any luck using plain weave weave for the hems, as the plain weave doesn't draw in enough. My other option would have been to use a finer cotton or sewing thread as weft, in waffle weave. But I have neither; not in cotton anyway and I didn't want shrinkage (or non-shrinkage) issues! If these were for myself, I would have been willing to experiment, but not for a towel exchange.

I still have to make up 20 project sheets, but they aren't due until November, so I have time for that. We will exchange two towels each, and then receive project sheets (with fabric samples) from all participants. Hopefully I won't procrastinate on those either!


Related Posts:
Waffle Weave
Light Bulb Moments with Waffle Weave
List of all my Waffle Weave posts

Thursday, September 04, 2008

Weaving: What's Next?

By Leigh

When I first started this blog, I had a couple of goals in mind: to keep a record of my fiber and textile activities, and to begin a serious exploration of weaving. This coincided with having my youngest child leave home to join his sister at university, giving me more free time than I had enjoyed before.

My record keeping has been fairly consistent though my projects are somewhat sporadic: weaving, spinning, knitting, dyeing, plus a few other fiber activities, as well as occasional miscellaneous content. The biggest problem I've had has been finding posts again, once they've become buried under the ever-increasing pile of more recent entries. Blogger's addition of labels has been helpful here, but if you've clicked on any of the links in the above list, you have discovered that I use Delicious.com to try to organize my posts. This is also what I used to create a blog index in my sidebar.

In regards to weaving, I had previously worked my way through some plain weave, twills, and overshot, and had taken a class on double weave. In starting this blog, my plan was to work my way through Deb Chandler's Learning to Weave, and experiment with structures and effects I hadn't yet tried. I had a lot of fun exploring Log Cabin, but after that I diverged from Chandler. Why? Because Log Cabin seemed to lead naturally to Shadow Weave.

Next I participated in several Online Guild weaving workshops, including lace weaves, Huck, and Summer & Winter.

When I got my Glimakra 8-shaft countermarche loom, I started my 8-shaft adventure by returning to something I understood, twill. With that I did a series of afghans, enjoying with wider width of my new loom. I finished these in time to take another Online Guild workshop, Advancing Twills.

I started experimenting with M's & O's thanks to the WNCF/HG's Winter Project. This led to a self study on Multiple Tabby Weaves. Most recently, I've revisited waffle weave for a towel exchange within the same group. All that's left with that is to cut and hem the towels.

So what's next? I could continue exploring weave structures I haven't tried yet, but at this point in time I feel a need to dig deeper. Being a member of Complex Weavers offers that, through one of it's many study groups. Since Summer & Winter interested me the most so far, I have recently signed up for the Tied Weaves Study Group. Summer & Winter is a 2-tie unit weave, so this study group will allow me the opportunity to continue exploring not only S&W, but related weaves as well.

So that's the plan. The study group officially starts in October. Not sure what I'll do on the loom in the meantime, but I doubt it will sit idle until then.

Monday, September 01, 2008

More on Spinning Cotton

By Leigh

There were some good questions and interesting comments on my Cotton Spinning Update post, so I thought I would expand a little on the subject.

Tina asked

Do you card it into rolags before you spin it?

Yes. Actually, I've been carding them into mini-rolags called punis (also spelled poonis). A "how to" along with a little more information about cotton lint can be found here.

Is it really soft?

It's wonderfully soft! Not silky, though it does have a little bit of luster (at least it seems to when I try to take a flash shot!) The yarn has a lovely next-to-the-skin wearable softness to it.

What are you going to make with it?

That's a good question. Since cotton is not in the least bit elastic, I am tending to not want to use it for a knitted project. I am, however, thinking about weaving a scarf. This is a bit daring for me as I rarely weave with my handspun. I will have a whole rainbow of colors when I finish spinning it all (pix of all those here). Now that the Olympics is over, I amuse myself as I spin by thinking of how to use the colors to advantage. More on that later.

Barbara asked

Along with Tina's questions I'd like to know how strong the yarn is.

The 2-ply is wonderfully strong. It will be good as both warp and weft. I did however, have some too thin spots in the singles of the first skein, which led to some breakage when I plyed it. I've pretty much corrected that, though this is one of the problems I seem to have spinning long draw.

Which leads to Patrick's question

How are you finding spinning long draw? For me, it was a pretty fast method...

I love spinning long draw for the exact reason that it is so much quicker than short draw (inch worm method). For me however, it does make a somewhat inconsistent yarn, as you can see in the close-up below.

This is partly due to preparation. The cotton lint tends to be clumpy, especially after being dyed. It also still has some bits of husk in it. Between that and the fact that my long draw spinning is somewhat slubby anyway, well, you can see the result. Many of the slubs can be individually pulled out during spinning, others I roll down. According to my Judith MacKenzie Mc Cuin video (Spinning Exotic Fibers & Novelty Yarns), these slubs even out during plying. I find though, that often they ply together which intensifies them. The same goes for the thin areas.

Even so I'm not unhappy with it. The singles average 42 WPI and the 2-ply, 22 WPI. I'm using my smallest spinning ratio (16:1), as cotton requires a lot of twist. For cotton, I keep the tension tight enough to draw in, but loose enough so that if I stop spinning, I can pull the single from bobbin without breaking it.

So to Dorothy and Jewel, I say jump on in, the water's fine. :) It takes a little practice to get it started, but cotton is lovely to spin.

And as to the last two comments.....

Kathy

I'm just speechless!

Sharon

I've never seen anything like your cotton yarns.

I'm going to take these as compliments! I'm pretty sure they are, but they are delightfully ambiguous enough to go either way. ;)

© 1 Sept. 2008 by Leigh at http://leighsfiberjournal.blogspot.com

Related Posts:
Spinning Cotton Lint
Cotton Spinning Update