First of all, please excuse my photos of the shed. When I took them, my usual helpers were quite useless ........

So I simply held out the camera, pointed it at the shed, and clicked the shutter while standing at the front of the loom as I depressed the treadles. I managed to get a couple of photos to illustrate what I'm talking about.
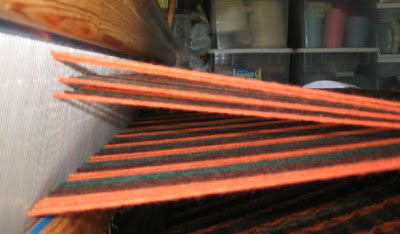
To begin the evaluation, I first wove a few inches of plain weave. Then I checked the shed. Here is what it looked like at first:

To begin the evaluation, I first wove a few inches of plain weave. Then I checked the shed. Here is what it looked like at first:

If you examine the bottom of the shed at the reed on the left, you can see that the warp ends pass through the reed at various heights. Looking down the length of the shed they all appear the same height, but in fact they are are all at different heights for the full 352 ends. No good. The shuttle will catch on some of these and pass under them when it is supposed to go over. That messes up the pattern on the cloth, which would obviously be frustrating. So the threads in the shed need to be adjusted.
I wouldn't have had a clue how to adjust the shed if it hadn't been for Joanne Hall's Tying Up the Countermarch Loom (more on that book in another post.) Here is what I learned about adjusting the shed.
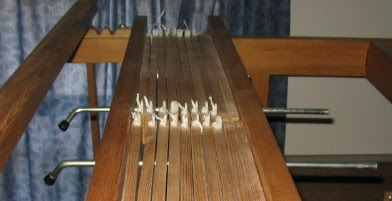 All adjustments on a countermarche loom start at the top. The loom comes equipped with removable locking pins, pictured in the locking position on the left. These lock the jacks in place so that the shafts stay put during adjustments.
Starting at the top, I checked to make sure that the shafts were centered to the loom. On a countemarche loom, the warp should run through the center of the heddle eye. If it doesn't, then the shafts need to be raised or lowered accordingly. The shafts are attacked to the overhead jacks with Texsolv cord and anchor pins. By adjusting the cord on the anchor pins (at the far ends of the jacks), the shafts can be raised or lowered.
I also checked the beater height, to make sure that the shed formed in the middle of the reed. You can see from the above shed photo that it does.
Next I checked to make sure that the lamms were level with one another.
Once I was satisfied that all was well so far, I removed the locking pins and started checking the treadles. To make sure the treadles are tied correctly, I pressed each treadle in turn and examined the shed. I noted which warp ends ran above the rest of the shed and made a list of which shafts these were connected to. I also made a list for the warp ends which ran below the rest of the shed.
It was from these lists that the treadle tie-up is adjusted. I took the treadles one at a time and started with the upper lamms (which lower the shed):
* For shafts with warp threads which were too high and ran above the shed, the treadle ties were shortened.
* For shafts with warp ends which were below the shed, the treadle ties were lengthened.
I repeated this for each treadle in turn. Then I checked the shed again and made further adjustments as needed.
This is what it looked like when I got done:
I wouldn't have had a clue how to adjust the shed if it hadn't been for Joanne Hall's Tying Up the Countermarch Loom (more on that book in another post.) Here is what I learned about adjusting the shed.
 All adjustments on a countermarche loom start at the top. The loom comes equipped with removable locking pins, pictured in the locking position on the left. These lock the jacks in place so that the shafts stay put during adjustments.
Starting at the top, I checked to make sure that the shafts were centered to the loom. On a countemarche loom, the warp should run through the center of the heddle eye. If it doesn't, then the shafts need to be raised or lowered accordingly. The shafts are attacked to the overhead jacks with Texsolv cord and anchor pins. By adjusting the cord on the anchor pins (at the far ends of the jacks), the shafts can be raised or lowered.
I also checked the beater height, to make sure that the shed formed in the middle of the reed. You can see from the above shed photo that it does.
Next I checked to make sure that the lamms were level with one another.
Once I was satisfied that all was well so far, I removed the locking pins and started checking the treadles. To make sure the treadles are tied correctly, I pressed each treadle in turn and examined the shed. I noted which warp ends ran above the rest of the shed and made a list of which shafts these were connected to. I also made a list for the warp ends which ran below the rest of the shed.
It was from these lists that the treadle tie-up is adjusted. I took the treadles one at a time and started with the upper lamms (which lower the shed):
* For shafts with warp threads which were too high and ran above the shed, the treadle ties were shortened.
* For shafts with warp ends which were below the shed, the treadle ties were lengthened.
I repeated this for each treadle in turn. Then I checked the shed again and made further adjustments as needed.
This is what it looked like when I got done:

The top of the shed still needs some adjustment, but the bottom is exactly the way it should be. To adjust the top of the shed, the treadle ties to the lower, lifting lamms are adjusted:
* For shafts with warp threads which were too high and ran above the shed, the treadle ties were lengthened.
* For shafts with warp ends which were below the shed, the treadle ties were shortened.
Note that this is the opposite of what was done with the upper lamms.
What a difference this made with my weaving! I used to have frequent skipped or caught warp threads with my other loom, but there have been very few so far this time. I cannot say that my shed was absolutely perfect for each treadle, but my goal is to improve my shed with each project.
To be honest, this was simply a "monkey see, monkey do" activity. I just followed the directions without understanding why they worked and got the results I needed. At this point I cannot look at the shed and automatically know what needs to be done to fix it and why. That is one of those things that will come with experience. Still, it feels good to be on the right track.
Now on to the weaving .........and at last Blanket Done!
Related posts:
* For shafts with warp threads which were too high and ran above the shed, the treadle ties were lengthened.
* For shafts with warp ends which were below the shed, the treadle ties were shortened.
Note that this is the opposite of what was done with the upper lamms.
What a difference this made with my weaving! I used to have frequent skipped or caught warp threads with my other loom, but there have been very few so far this time. I cannot say that my shed was absolutely perfect for each treadle, but my goal is to improve my shed with each project.
To be honest, this was simply a "monkey see, monkey do" activity. I just followed the directions without understanding why they worked and got the results I needed. At this point I cannot look at the shed and automatically know what needs to be done to fix it and why. That is one of those things that will come with experience. Still, it feels good to be on the right track.
Now on to the weaving .........and at last Blanket Done!
© 11 July 2007 at http://leighsfiberjournal.blogspot.com
Related posts:
Warping the Glimakra:


