Sunday, March 29, 2009

Poll Results & Test Press

By Leigh

As of this afternoon, here are the results for the Catzee's Cloth poll:

  • I love it! Leave it as is - 43 votes (57%)
  • Yuk! Iron it quick! - 33 votes (43%)
I've always assumed that beauty is in the eye of the beholder, but most of us will agree that an unexpected outcome can throw any of us for a loop. Because of this, I was also interested in your comments on this.

One consideration is planned usage. Though it looks like a scarf, I wove it for cutting up into exchange samples. Consequently all the weft ends are hanging out of the selvedges rather than being woven in (I changed weft color with every treadling block.) I need a total of twenty samples for the exchange, but it won't take all of it. While I was weaving away, I thought about using leftovers for a vest.

I like this pattern.....
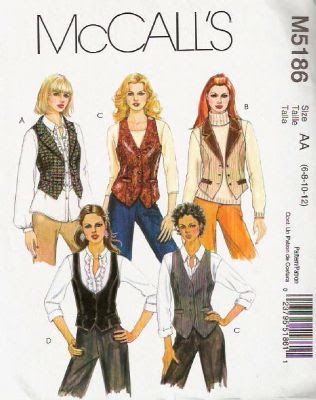
A possible use for Catzee's ClothMaybe version B with a black velvet collar?

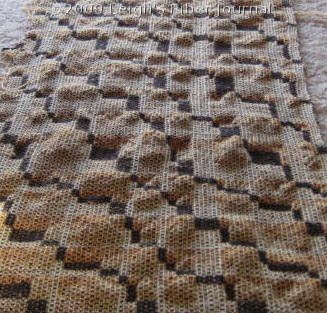
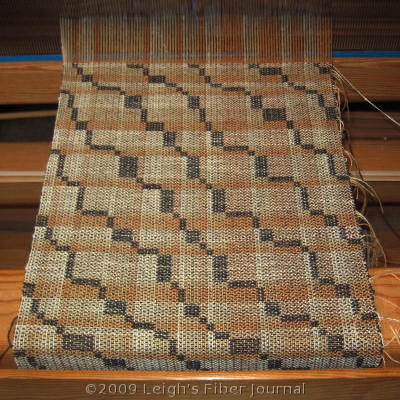
With that end in mind, I decided to go ahead and press a section of the bumpy cloth to see what could be done with it. Here's how that turned out .....

Close-up after wet finishing & pressing
It smoothed out nicely. Bettina did make a good point in the comments however, that it will likely want to bubble up again after washing. I don't figure that samples will be washed, and my vests are more likely to get dry cleaned, so that may not be a problem.

Lynette brought up another good point, that of visual competition between the shrinkage texture and the color pattern. For this sample, the focal point is the tabby-like stripes against a tortoiseshell-like background. (See Inspired By Catzee.) The bubbles and dimples from the differential shrinkage should probably be a design feature on its own.

So I've come up with a plan. I'm going to press out Catzee's Cloth, and then experiment with differential shrinkage on a scarf. I will still weave it in summer and winter, just in simpler colors.

The interesting thing about all this is that I never expected to take this direction in my weaving. But thanks to this happy accident and all your encouraging comments, it's a step I'm going to take nonetheless.


Related Posts:
Inspired By Catzee
An Unexpected Wrinkle
One Thing Leads To Another

Thursday, March 26, 2009

An Unexpected Wrinkle

By Leigh

My Catzee inspired fabric is off the loom.

Both sides of Catzee's ClothI think it looks pretty neat and am happy with it. I'm going to call it "Tortie Trails."

However, after machine washing and drying, it did this.....

How it shrunk after washing & drying.This is the result of mixing the type and fiber content of my yarns. I used both mercerized and unmercerized cottons, and rayon. As a design element, this is referred to as "differential shrinkage," where the different yarns shrink at different rates as a result of wet finishing.

My problem is that differential shrinkage is not really my "thing." I find traditional methods and effects personally more appealing.

What to do. What to do. This is supposed to be for my Complex Weavers Tied Weaves study group. So tell me ....


view results
Free vote poll

I've not tried a poll like this before so I'm not sure how this will work. I am interested in your opinion, so this may be a fun way to see what you all think.

[For poll results and what I decided to do, click here.]

Posted 26 March 2009 at http://leighsfiberjournal.blogspot.com

Related Posts:
Poll Results & Test Press
Inspired By Catzee
Catzee's Cloth
One Thing Leads To Another
"Catzee's Cloth" Made the Complex Weavers Journal

Tuesday, March 24, 2009

Spring Cleaning: Find #4

By Leigh

I was cleaning out my spice cabinet the other day and look what I found...

I don't even know how old this tumeric tin is.
A can of turmeric! It is commonly used as a culinary spice in Far East cuisine. According to this article in Wikipedia, it is also used as a food additive for coloring foods and protecting them from sunlight, as a dietary supplement for digestion, as an antiseptic in Ayurvedic medicine, as an experimental cancer treatment in clinical studies in Western medicine, in cosmetics, as an ingredient in radiator stop-leak sealant mixtures, in gardening to deter ants, and as a dye.

It's been eons since I shopped at a Kroger. The last I remember was when I lived in Houston, some 18 to 20 years ago. The fact that this tin is still full after all those years, gives you some idea of the kind of cooking I do (or don't do.) But that's okay, because since that time I've become a fiberist and am going to use this for some natural dyeing. Hopefully time has not effected it's potential as that regard, but that is something I intend to find out. More on that soon.


Related Posts:
Spring Cleaning: Find #1 - madder roots
Spring Cleaning: Find #2 - my heirloom coverlet
Spring Cleaning: Find #3 - prints for my wall

Saturday, March 21, 2009

Tuesday, March 17, 2009

Shetland Sampler Cardigan Complete!

By Leigh

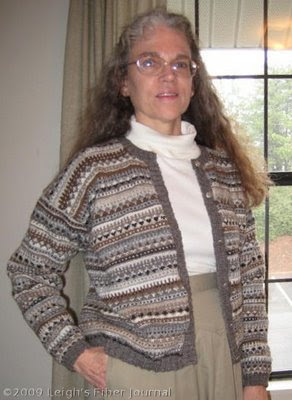
I'm delighted to announce that at long last it's done! 

I'm pleased with how it turned out.It's the best fitting sweater I've ever made for myself.

Project Particulars:

Fiber - Shetland, both American and British, from both fleece and roving. I had a total of 20 samples to work with and I have several people to thank for this:
  • Cathy, who donated a lot of fleece, both locally obtained and from Riverbend Farm.
  • Tina, who donated some of her own.
  • Sharon, who did the same.
  • Mim, from whom I got a sample via Sharon!
Yarn - 2-ply handspun measuring 16- 18 WPI. Photos of all 20 can be seen at this page of my Fiber Gallery. If you click the links under the photos, they will take you to blog posts with photos of the raw fleece and spinning details for most.

Sweater Pattern - Measurements were copied from my Rare Breed Sweater, with an adjustment made for the neckline. Though technically not true Fair Isle knitting, I did use a Fair Isle Stitch Pattern.

Stitch Design - From Anne Field's "Dyepot Fairisle Sweater," The Ashford Book of Spinning, pages 98 - 99. This required calculating yarn amounts for the color rows, details on how I did that here.

Knitting Details -
  • Gauge - 6 stitches/inch and 8 rows/inch
  • Technique - stranded knitting in the round
  • Needle size - US 2 circular for sweater body and sleeves, US 0 for K2P2 ribbing
Techniques Used -
I started the spinning for this project in June 2007. Swatching started in January 2008. I took my time and did not do any knitting during the heat of summer. I also set it aside at times to ponder various things I needed to figure out or calculate. Does it seem like it took that long? I can't tell. I lose track of time with a project like this. But I've learned a lot and I'm very happy with the outcome.

Friday, March 13, 2009

Catzee's Cloth

By Leigh

OK. I admit it. This is a rush job of a post, but if I don't do one now it will be days before I can get to it!

I just wanted to share that my Catzee barcode weaving is underway.

8-shaft S&W sampleIt is a 6-block summer & winter draft and overall I am happy with it. As inspired by my tortie Catzee, it has a somewhat tortoiseshell plaid look with random tabby-like stripes. Here's a close up ......

Close-up shot showing the color variations in the cloth.I used half of the draft for the threading, and the other half for the treadling. I have three colors in the warp, which rotate through the threading blocks. I am using the same three for the tabby weft, changing colors with each block. The lightest color is a slightly slubby rayon and I'm not sure if I like the effect, but oh well. What I do like is the subtle color blending that can be achieved by changing tabby colors. The black pattern weft is only slightly different in size (a 7/2 as opposed to the rest being 8/2s).

Now, off I go! I hope you all have a wonderful weekend.

Posted 13 March 2009 at http://leighsfiberjournal.blogspot.com

Related Posts:
Inspired By Catzee
An Unexpected Wrinkle
"Catzee's Cloth" Made the Complex Weavers Journal

Sunday, March 08, 2009

SSC: Finishing Touches

By Leigh

Two things remain to be done before I can wear my Shetland Sampler Cardigan:

1. Sewing on the buttons.

Celtic knot style buttons need to be sewn on.
2. Finishing the raw edges left after sewing and cutting the steeks.

Raw edges.  What to do???
You can see all the cut yarn ends on the left when I fold back the front band. Apparently there are several ways to deal with these cut edges. In her Essential Techniques for Serious Knitters Peg Arnoldussen described knit-in facings to cover them. When I read that part of her booklet however, I didn't really comprehend what she was saying until now (sort of an "Oh! So that's what she meant" moment.)

Another option would be to handsew a ribbon facing over the raw edges, but I was concerned that these wouldn't have the give that the knitting does. The edges can be covered with crochet, but I wasn't certain how to do this. Finally I opted for the method Alice Starmore describes in The Celtic Collection. This involves a cross-stitching over the raw edges.

Tacking down the raw edge with cross-stitch.
The raw edges have been trimmed and I'm tacking them down with cross-stitch. It's not easy to get a self-explanatory photo of, but hopefully you get the gist of what I'm doing.

OK. I'll finish these little things up and then get a photo of the finished garment!


Related Posts:
Sewing & Cutting The Steeks
SSC: Bands Done at Last!
Shetland Sampler Cardigan Complete!

Thursday, March 05, 2009

Inspired By Catzee

By Leigh

Way back when I first started playing with barcodes as stripe patterns, my first barcode was "Catzee", the name of one of my cats.

Catzee's very own barcode.At first it was simply a word for an experimental barcode. But when I considered her lovely tortoiseshell coloring .....

Little Cat Zee...... the wheels started to turn.

Considering my recent self-revelation about designing and weaving summer & winter, I decided to use that barcode for my next S&W project. I also considered that even though the draft I had in mind (similar to my Fibonacci S&W) was easy to do out of my head, this would be a good way to begin learning DB-Weave weaving software.

Using the entire barcode resulted in a pretty wide draft, of which the screenshot below shows only shows part. You can click on the drafts to enlarge them (they're pretty big).

Catzee barcode in an 8-shaft S&W draft.With the Fibonacci drafts, I only had four shafts to work with (and no weaving software). Now I have eight, so the patterns can be much more complex. Interestingly, the draft hints at Catzee's vague ginger tabby stripes.

Adding color to the draft made it much more interesting.....

Experimenting with Catzee-like colorsOf course, I don't have these colors to work with, but it gave me the gist of what it might look like.

These are my actual yarn choices .....

A variety of 8-2 mercerized cotton & rayon yarnsThey are the closest Catzee-like colors I could find in my stash. The golds and cream will be the warp and tabby weft. The black will be the pattern weft. I would love to be able to use the black chenille for this, but will sample first. The second black cone of cotton is on stand-by.

And of course, since this piece is inspired by Catzee, she reserves full rights to snoopervise the entire project.

Catzee loves helping with "string".
Posted 5 March 2009 at http://leighsfiberjournal.blogspot.com

Related Posts:
"Catzee's Cloth" Made the Complex Weavers Journal
Catzee's Cloth - progress
An Unexpected Wrinkle - what happened after washing
More Weaving Software That Can Run on Linux
Stripes! - creating with barcodes
Summer & Winter: A Basic Definition

Monday, March 02, 2009

SSC Sleeves & Cuffs

By Leigh

Now that the front and neck bands are done, progress on my Shetland Sampler Cardigan has picked up.

The Siamese sleeves have been completed for awhile now. I sewed and cut them the same way I did the other checkerboard steeks.

Siamese Sleeves cut apart
I really liked the Siamese sleeve technique and will definitely do it again. I sewed the sleeve seams by hand with some extra Shetland yarn.

I was delighted (and relieved) that they fit the armholes perfectly.

Perfect fit in the armhole.
Overall, I am very happy with the fit. The only problem was that the sleeves were a little too long. And this is before the cuffs are added.

The solution was simple however. Since I used the COWYAK technique for casting on, I simply adjusted where I picked up the stitches to start knitting the cuff. I used a circular needle to do this....

Picking up stitches.
Then I pulled out the stitches in the row above the needle. If you look closely at the photo below, you can see the plastic part of the circular needle, with my stitches safely on it.

Cutting off unneeded knitting.
I used it much like a safety line.

To knit the cuff, I had to transfer the stitches to double pointed needles. It is in the same K2P2 as the rest of the ribbing.

Finished cuff