Thursday, December 28, 2006

Getting Back on Track

By Leigh

Whew. The holiday weekend has been long and continues to be exceptionally busy. We've had a full house, full tummies, and full hearts. My focus has been on family and friends; consequently, I haven't been on the computer much, nor made progress on the fiber front.

Knitting has progressed no more than a few rows beyond this. Not because I haven't been working on it, but because the spacing between the rightmost sheep and the lamb bugged me so much that I frogged it and have been reknitting, one stitch closer together. Bibliotecaria's comment verbalized something I was musing over, so I took the plunge to reknit.

My decision to do things like this usually boils down to this: which is worse; the thought of having to re-do an entire section of a project, or having to live with the regret that I didn't do something about it while I had the chance. I haven't caught up yet to where I was when I decided to do this, but hope to make good progress over the next several days.

For spinning, I am getting anxious to start on this, which was dark to photograph and therefore difficult to see.......

........10 ounces of luscious raw black Rambouillet, received in a trade with Dianna. It is a new breed for me, and I am looking forward to making my wheel sing with it.

Weaving. Well, I wish I had more to report, but the loom only looks like this:

Since completing the Lace Weaving Workshop last November, it has been on my mind to go back over the workshop notes and explore what I learned in greater depth. My plan is to start back at the beginning, with huck. But this time, instead of weaving samplers, I plan to weave a series of dish towels.

A long time ago I took up a good suggestion to weave scarves as samples, and I have done a lot of these. However, I'm not exactly a scarf person, and now that I've exhausted my giving list from my scarf stash, I still have more than I know what to do with.

A some point along the way, it occurred to me that I could weave something else as I explored various weave structures, color effects, and yarns. Huck is a traditional weave for towels, so that seemed to be a good project to switch to.

Actually I love kitchen things. I love kitchen stores and the kitchen department in any store. I love looking at dishes, pottery, containers, kitchen towels, and table linens. So the dish towels seem like a more logical project for me than scarves.

Having queried several of my towel weaving friends, I have measured 5 yards of white, 8/2 cotton. As you have seen I've gotten it beamed, threaded, and sleyed. I'm planning to use a royal blue for the weft.

I also hope to start visiting and reading blogs again, though the blogosphere is not surprisingly quite these days. In addition to the December holidays, we also have a late December birthday to celebrate in our family. Even so, a calendar imposed break isn't too bad. I'm finding it is renewing my motivation and enthusiasm, which will be a good way to start the new year.


Related Posts:
Huck Towels 1
Rambouillet - From Fleece to Yarn

Saturday, December 23, 2006

Warp Separators

In my quest for the perfect warp, I've made some big adjustments (switching from front-to-back, to back-to-front) and some little ones. Some things I've changed, not because they were actually problems but, because they were awkward for me or less efficient. A means of separating the warp on the back beam has been one of the little non-problems for me.

My weaving teacher used rolls of corrugated cardboard, the kind elementary school teachers use for bulletin boards. I got used to using these in class and looked for some for myself. I even visited an area teacher supply store, but when they didn't carry it I didn't know where else to look.

Next I tried cutting up paper bags, but in trying to achieve a solidly wound warp I eventaully abandoned these. With paper bags I still had some mushy spots along the warp beam, and more than once I've wound them on crookedly (which does create a problem).

Peggy Osterkamp says that if one's warp is very tight and smooth across the beam with no gaps in the warp groups, then separators aren't necessary. I'm still working on this one.

Sticks were the next option. These work okay too, unless the warp is very long. In this case I run out of sticks, plus the warp beam ends up very fat, which I don't reckon is actually a problem.

So when I was getting to toss an odd mini-blinds into the give-away pile......

Getting ready to cut up a mini blinds for the slats............ it occured to me that I could use the slats as separators.

Using the mini blinds slats as warp seperators.I still use sticks to separate the warp until the apron cords are wound on, and then switch to the slats. They are firm, lightweight, add very little bulk to the back beam, and nest (somewhat) for storage. Plus they end up being cheaper (think thrift store or el-cheapo discount store) to purchase than sticks from the hobby store.

You can also see from the photo that I am doing a better job of winding on without warp gaps. It was especially bad up until last May, when I started consciously trying to improve on this. I can't exactly tell you why it's better, but if I ever get it figured out I'll let you know.

© 2006 Leigh's Fiber Journal

Thursday, December 21, 2006

Rare Breed Sweater Progress

In my last Rare Breed Sweater post (right here), I mentioned being in the problem solving mode. I had two issues I had to deal with before I could start knitting my rows of sheep on the front.

My first problem involved gauge. After I knitted that first tension swatch over 4 years ago, I calculated 4 sheep per row across the back, and 2 for each row in the front. I planned for a row of dark colored breeds and a row for white and light colored breeds. That meant I needed a total of 8 dark yarn samples and 8 light for the body of the sweater. So over the years that's what I collected. 8 dark fleece samples and 8 light ones.

However, when I did a gauge swatch before actually starting the sweater, I discovered that my tension is much tighter now than it was back then. That meant I had to adjust the motif, ending up with 5 sheep for each row across the back. No problem, it worked fine.

But it also meant I had to recalculate the sheep for the fronts. If each front is approximately half of the back, and if I had 5 sheep across the back, then that meant 2½ sheep per front. I can't knit half a sheep -- dilemma! At this point I lamented not starting the whole thing on a circular needle in order to omit the side seams, but the idea of having to juggle twice as many yarn butterflies quickly brought me to my senses.

To think through the problem, I laid out the sweater back to study it.

Sheep motif on my Rare Breed Sweater back.I realized that each sheep was separated by 4 background stitches, and that I had knitted these background stitches at both edges of the sweater back. That meant that the sheep on the front side seam could start almost on the seam. That saved me some stitches!

I redid my calculations and figured that by starting the sheep at the edges of the front, I could fit three sheep on each front. What a relief!

My second problem involved the number of yarn samples I had spun. My original plan (based on that first guage swatch) was to knit each sheep in a different rare breed yarn. According to my original calculations, that meant I needed a total of 16 different rare breeds to work with (8 dark and 8 light.)

My new calcualtions, however, require 11 samples of each color category, for a total of 16 rare breeds. I had picked up a few extra rare breed fleece samples, and have also worked out a fleece trade for after the first of the year, but that still left me short a few samples.

On the one hand, I could start ordering more samples. Hmm, not sure I actually want to do that. Also in my mind were the three boxes of different breeds (Navajo-Churro, North Ronaldsay, and Shetland), each with a lovely variety of breed colors. Trying to choose just one color of each had been hard when I first started planning my rows of sheep. Why not incorporate more colors of at least one of those breeds, maybe as a little family(????)

So here's what I came up with:

My design-as-you-go idea for the 1st Rare Breed Sweater front.
A family of Navajo-Churros, each in a different NC color. This did mean I had to spend some time figuring how to best fit them all on the front, and I hope I've come up with the best solution.

At the moment I've stopped knitting just to look at it for awhile. I'm trying to envision this on the completed sweater. Alternatively, I could frog these and knit three adult NCs, each in a different color. I still haven't decided yet. What do you all think? If I leave the little family will it give the whole thing an off-balanced look in the end? Or will it add some asymmetrical interest? Now that I've met the challenge of actually fitting the adults and lambs on the sweater front, I'm not emotionally attached to either idea and so could go either way.

Opinions welcome.

Monday, December 18, 2006

A Weaving Setback

By Leigh

I assigned myself a simple task for the weekend; finish beaming the warp for my next weaving project.

First things first. Number 1 is check on Catzee to make sure she's asleep. I don't need any “help” with this.

Great! She's sound asleep.

Now quick, get to the loom and get that warp wound on.

Wait a minute. What's this? The warp is wet!

And the floor is wet?

And what's this?? Teeth holes in my water jug weight???
Remember this incident?

Hmmm. Not so innocent looking after all.


Related Post:
Undulating Shadow Weave 1 - Weaving (Scroll down. You'll know when to stop)
What's Not on the Loom

Wednesday, December 13, 2006

Finished Object Non-Gallery

Not much progress to report on the Rare Breed Sweater knitting front. Hmm, an unintentional pun.....

Rare Breed Sweater front, ready to start on the sheep feet.
I'm at a problem solving junction regarding my sheep motif for the fronts of my cardigan. More on that after I get it figured out.

Instead of that, I thought I might post photos of my other stranded finished knitting work. I love Fair Isle and stranded knitting. However, being an all thumbs knitter, I doubt I'll ever feel like I've mastered the technique. I worry over proper tensioning and am always amazed when it finally comes out right.

Many bloggers have a Finished Object Gallery of their work, which I don't have, so this post will be my

Non-Gallery of Finished Objects

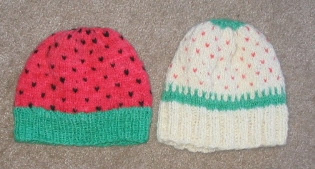
2 hand spun hand knitted caps dyed with Easter egg dyes.Wool Caps

These are leftovers from my first stranded/Fair Isle knitting experiments. The wool is an unknown breed, dyed with Easter egg dyes, and handspun . The watermelon cap on the left is my favorite.

Pullover hand knit in black and royal blue handspun yarns.Sweater for Dan

After successfully knitting those caps, I bravely struck out on this more ambitious project. Knitted of handspun commercially dyed black Wensleydale top and hand dyed blue Border Leicester. The Fair Isle patterns comes from Elizabeth Zimmermann's Knitting Without Tears, one of my all time favorite knitting reads. The sweater pattern was just copied from the measurements of one of DH's favorite sweaters.


Navajo-Churro Vest designed from Navajo rugs.Navajo-Churro Vest

Next came my project for the Online Guild's Navajo Churro Challenge several years ago. The vest pattern comes from Cheryl Oberle's Folk Vests. I developed the knitted Navajo patterns from Navajo rugs. The yarns are all handspun and the colors are natural NC colors except for the hand dyed madder.

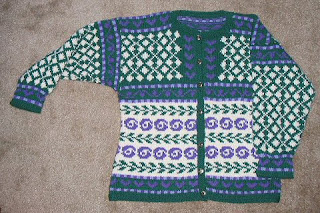
Norwegian Roses jacket from commercial merinos yarns.Norwegian Roses Cardigan

I finished this one last winter. It's more of a jacket actually. The pattern is from The Green Mountain Spinnery Knitting Book, and the yarn is KnitPicks Merino Style. It's wonderful to wear.

I've also enjoyed experimenting a little with Aran style knitting. But that's another story.

© 2006 Leigh's Fiber Journal

Sunday, December 10, 2006

Felted Soaps

Besides the greeting cards, my other Christmas project was felted soaps. I first saw these a couple of years ago when one of the gals in my spinning group brought some she had made. I thought they were very cool. So I was delighted awhile back when, while reading Holly's blog, I found her excellent tutorial, "Making Felted Soap."

Besides, the brightly dyed wool roving, the other supplies were items one usually keeps around the house (though I confess I had to borrow the knee highs from my daughter.)

Supplies needed to make felted soaps.
The method is a super easy no-muss, no-fuss method. It would be a great project with kids.

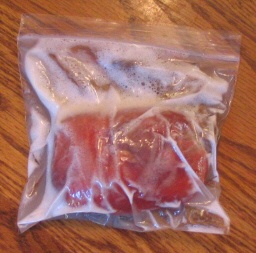
Felting in a sandwich baggie.
Even so, I managed to make a mess when the zip lock burst open. Fortunately I thought to do this in the kitchen sink, "just in case."

The soaps came out pretty good. There are a few thin spots in the felt, though one wouldn't notice from a galloping horse. From these, I can see how to do a better job next time.

3 felted soaps in bright colors.
Holly also has instructions on making multiple felt soaps at one time, but I'll let you go check that one out for yourself. Three will do me fine for now.

Thursday, December 07, 2006

Making Christmas Cards

Earlier this week I was reading Sharon's "Make Your Own Christmas Cards" post, and figured that I'd better get started on mine. I've shared some of these from time to time here, but the wannabe teacher in me thought it might be fun to show you the process step by step.

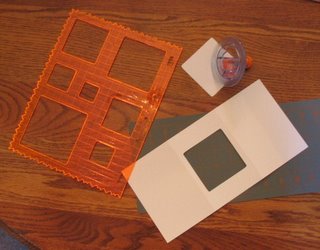
My supplies laid out and ready to use.My supplies:
A. 110 pound card stock. This comes in white or colors
B. Shape templates - I found these in scrapbooking supplies
C. Shape cutter - ditto
D. Stickers, the acid free kind
E. Pre-cut trifold aperture greeting cards - available at craft stores
F. Plastic sleeves for the insets
G. Handwoven fabric scraps
H. Envelopes

Cutting card stock so that the finished card will fit the envelope.The ready made trifold cards are nice, but if they can't be found, it's easy to make one's own. I used purchased invitation envelopes and so measured my card stock so that it would fit after being folded in thirds. I have to use a paper cutter as my scissors work is usually pretty crookedy.

Marking the card to fold in thirds.If I'm in a hurry I eyeball folding it into thirds. Here I'm being good and doing the job properly. (Note: I'm not a lefty, but have a right-handed camera.)

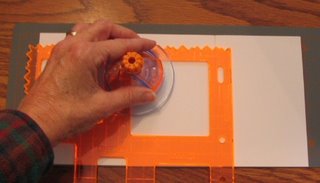
Creating an aperture with a shape cutter.Cutting the aperture is easy with the template and shape cutter. The hardest part was centering it.

All done with that.Being a saver, I usually save the cut-outs. Some of the fancier shapes can be used for making cards as well.

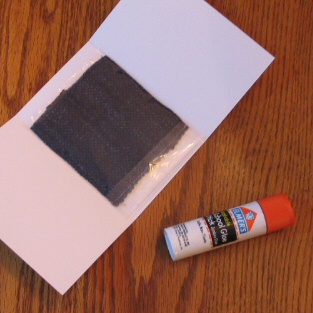
Placing a handwoven fabric sample in a plastic sleeve. I have mixed feelings about these clear plastic sleeves. I don't like them because one can't get a good look and feel of the handwoven sample. On the other hand, they are handy when I want to use stickers as part of my card design.

I've also used hand knitted swatches and handcrafted paper as insets.

Gluing in the inset.The inset (with or without the sleeve) is glued over the aperture first. I like to use a glue stick
1) because I have it and
2) I don't make as big a mess as when I use some sort of crafters' liquid glue.

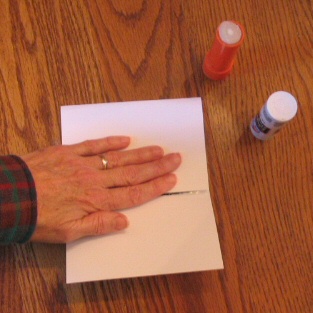
Gluing down one end over the inset.Then one end is glued on top of that. At this point I usually weight the card with a heavy book overnight, or until the glue dries.

Adding stickers is the fun part.With the plastic sleeves, I can put stickers right on top of the fabric; something I wanted to do for what I had in mind here.

White card with handspun, handwoven navy blue inset & snowflake stickers.On the back of the card I add a few details about the inset and then sign it. Finished!

And a few more:

Small pink card with handwoven inset of pink & navy with teacup sticker.
Marbled card with handwoven Monk's belt inset of cotton & cotton chenille.
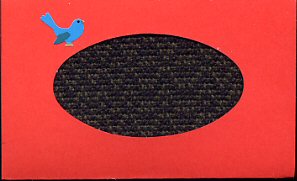
Red card with handwoven black & green shadow weave inset & bluebird sticker.No, they're not all very Christmasy, but oh well. I only give these to folks whom I know appreciate them and probably won't throw them away. A set of them makes a nice gift as well.

Related Posts:
Gallery Photos: Greeting Cards
Q & A: Trifold Aperture Card Blanks

Tuesday, December 05, 2006

Lace Sampler – Bronson Lace

By Leigh

I have one sample to show for Bronson Lace. I actually wove two, one with warp treadling, and one with weft treadling. However, I beat the warp version in too firmly and squished the pattern all together. Neither a scan nor photo showed the pattern, so I didn't post it here. That will be a project for future experimentation.

The weft version, on the other hand, is lovely, I think. Even with the threading error! This is in the same 12/2 cotton, sett 24 epi.

Lace Bronson in white 12/2 cotton.I think this structure would be lovely for a table cloth, though I can't imagine having a loom wide enough for such a project. Nor can I imagine doing Bronson Lace as a double weave. But.... a table runner would be nice too.


Related Posts:
Lace Sampler - Beaming the Warp
Lace Sampler - Huck
Lace Sampler - Huck Lace 1
Lace Sampler - Huck Lace 2
Lace Sampler - Spot Bronson

Saturday, December 02, 2006

Rare Breed - North Ronaldsay

North Ronaldsay wethers & rams scavenging for seaweed on the rocky shore.Jackie and Judy made some interesting comments about the North Ronaldsay sheep on my Rare Breed Sweater update. So I have spend several days pulling together a few things to share. I have long been interested in collecting samples and information about as many different breeds of sheep as possible, but I find the rare breeds especially intriguing.

I was introduced to the North Ronaldsay breed through an Online Guild Rare Breed Challenge. It was led by Elizabeth Lovick, who lives in Orkney. She sells and works extensively with North Ronaldsay yarns, and kindly provided these photos.

North Rons are an ancient, primitive, and once feral breed of sheep, named for North Ronaldsay, the island on which they once resided exclusively. They are intelligent, agile, sure-footed, and difficult to catch! Being a primitive breed, they have short tails and actually shed if not shorn. They roam the island in loose herds, eating seaweed washed up on shore.

In late April, the pregnant ewes are caught and taken into care by their owners, as lambing is in early May. Ear clips identify which sheep belong to whom. A second round up occurs in August, when the sheep are inspected, clipped, injected, and dipped. Each shepherd receives a percentage of the total clip, depending on how many ewes are owned.

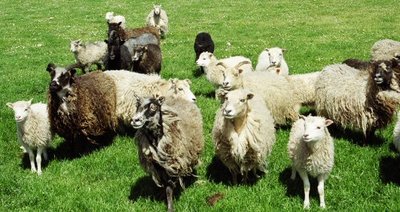
North Ronaldsay ewes & lambs at pasture.
With a world population around 4500, North Rons are classified as 'vulnerable' by the Rare Breeds Survival Trust (UK). The majority of these remain on the island of North Ronaldsay.

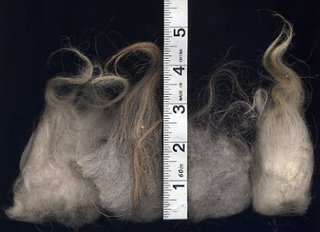
Measuring a sampling of North Ronaldsay fleece.
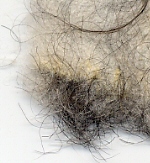
The only problem processing the fleece was the kemp!The fleece is dual coated (another primitive breed characteristic) and comes in every color imaginable, from chocolate to white. Fleeces are processed at a local mini-mill, where the guard hairs are removed by centrifugal force. While the two coats are easy to separate by hand, the real bugaboo are these little black kempy hairs (pictured at right) which I ended up pulling out semi-successfully by hand. The amount of guard hair in a fleece varies according to color; chocolate having the least.

Below are some samples from the fruit of my labors for the challenge. The range of colors is lovely, and getting them out of their storage box once again reminds me that they are still awaiting a project.

My handspun North Ronaldsay yarns in a range of colors.
I reckon thinking about that will be one more pleasant way to spend my time as I continue knitting on my sweater.