Friday, October 10, 2008

Summer & Winter: A Basic Definition

By Leigh

I decided that the best place to begin my study of tied weaves is with a review of summer & winter. This isn't the first time I've woven S&W, and hopefully thanks to that experience, I am better able to understand it now.

Before I get started however, I'd better warn ya'll that I'm fixin' to get a bit weave geeky here. I'm doing this to try to wrap my head around the technical definition of S&W, which isn't necessary to weave it, but which is helpful in understanding it and designing for it. My plan is to write a basic definition in this post, followed by a series of posts dedicated to summer & winter threading, tie-up, and treadling. My hope is that by trying to explain it to someone else, I'll gain a better understanding of it myself.

So here goes. A basic definition might be:

Summer & winter is a two shuttle weave which weaves a pattern tied to a plain weave ground cloth. This is achieved by assigning two shafts (commonly 1 and 2) to serve as "tie down shafts" which hold the pattern in place. The remaining shafts are "pattern shafts," and are used to create the desired pattern. The shafts are threaded so that the tie down and pattern warp ends alternate (td-P-td-P). One shuttle is used for the tabby weft, which is usually similar to the warp. The second shuttle is used for a heavier, pattern weft.

Recently I've learned that a more accurate name for summer & winter is Single 2-Tie Unit Weave.

Single - because each threading unit uses only one pattern shaft

2-Tie - because each unit uses two tie down shafts

Unit Weave - because it uses units to produce the pattern. For S&W, it is a four thread unit.

OK. So what's a unit? I first attempted to define this when I was weaving M's & O's.

A unit is the smallest number of warp and weft threads needed make the weave unique. For a 4-shaft S&W, two warp units are required.

4-shaft S&W units.In going back to the definition of S&W above, we see that each unit uses two tie-down shafts, both 1 and 2. Each unit also features only one pattern shaft, either 3 or 4. We also see that the tie-down and pattern shafts alternate (1-3-1-2 or 1-4-1-2).

The weft must be woven similarly: tabby-pattern-tabby-pattern. It is the interaction (interlacement) of the warp and weft threads which make S&W uniquely itself.

If we had more shafts, then we could have more threading units, but the above two are all that are needed to weave summer & winter. The units can be repeated as many times as one wishes to create "blocks", which in turn create the overall pattern of the piece. Treadling can vary too, as long as it follows a tabby-pattern-tabby-pattern sequence.

OK. So that's it for a basic definition. Next I'll try to elaborate on S&W threading.

Bibliography
A Weaver's Book of 8-Shaft Patterns, edited by Carol Strickler
Complete Book of Drafting for Handweavers, Madelyn v.d. Hoogt
Eight Shafts: A Place to Begin, Shelp and Wostenberg
CWTW Fall 2008 Newsletter, Su Butler
CWTW S&W Lesson 1, Su Butler

Posted 10 Oct. 2008 at http://leighsfiberjournal.blogspot.com

Related Posts:
Summer & Winter: Threading
Summer & Winter: Tie-Up
Summer & Winter: Treadling
Summer & Winter: Structure and Theory

Tuesday, October 07, 2008

A 2nd Little Space Dyed Yarn Blanket

By Leigh

The trouble with enjoying my weaving is that I start to get ideas. I wonder, "what if I did this," or "what if I changed that." So too with the spaced dyed yarn weaving. As I worked on the 1st space dyed yarn blanket, the wheels were already turning with ideas for another.

Here's what the turning wheels produced over the weekend:

Space Dyed Yarn Blanket #2Click pic for a slightly larger view.

This one definitely has a more plaid-like look than the first one.

Catzee helps me photograph the new afghan.Cat included for size
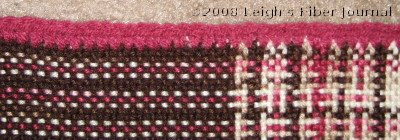
A few close ups:


I did nothing special to line up the color sequences of the space dyed yarn. I measured and wove as it came off the skein.

The Particulars:
  • Yarn: Red Heart TLC, worsted weight acrylic knitting yarn
  • Structure: plain weave
  • Warp ends: 360
  • Sett: 8 epi
  • Picks Per Inch: 8
  • Width on loom: 45 inches
  • Length on loom: didn't measure
  • Finished size: 39 x 44 inches woven, with crochet edging 41 x 46 inches
  • Wet finishing: soak in warm water for about an hour, then machine wash and dry with a dryer sheet to soften the hand.
  • Edge finishing: machine zig zagged cut edges, then crochet shells
    • Row 1 - single crochet
    • Row 2 - shells - *5 DC in one stitch, skip 2 stitches, one SC, skip 2 more*, repeat
The difference in the effects of the space dyed yarns is from two things:
  1. Color value - the first blanket's yarns had more light and dark contrast
  2. Color transition - the change of colors in the first blanket's yarns are more obvious. In this blanket, the color changes are subtle.
These last two exercises in weaving with space dyed yarns have inspired me to want to try doing my own warp painting and space dyeing. In fact next month, Karen Madigan is going to give an Online Guild workshop I plan to participate in, "Easy Warp Painting and Ikat."

However, what I'm supposed to be doing at the moment, is getting ready for the Complex Weavers Tied Weaves Study Group which commenced this month. And I am, I promise. In fact I've begun a review of summer & winter weave. I'll see how well I can write that out next time.


Related Posts:
Space Dyed Yarns & Plain Weave
Space Dyed Blankie Done

Saturday, October 04, 2008

Space Dyed Blankie Done

By Leigh

My experiment using (commercial) space dyed yarns in both warp and weft is off the loom and finished.

Leigh's space dyed blankie
The Particulars:
  • Yarn: Red Heart TLC, worsted weight acrylic knitting yarn
  • Structure: plain weave
  • Warp ends: 360
  • Sett: 8 epi
  • Picks Per Inch: 8
  • Width on loom: 45 inches
  • Length on loom: didn't measure
  • Width after finishing: 39 inches
  • Wet finishing: soak in warm water for about an hour, then machine wash and dry with a load of towels. A dryer sheet helped soften the hand nicely.
  • Edge finishing: machine zig zagged cut edges, then single crochet around entire blanket.
  • Finished size: 39 by 43 inches
Close-up
Yarn changes in the weft resulted from guesstimations for the various amounts I had of each yarn.


It was what I call fun weaving: fast and entertaining. It's also been a reminder of how much I love working with color, and this is something I don't intend to forget as I move on to the next project.


Related Posts:
Space Dyed Yarns & Plain Weave
Good Ol' Plain Weave

A Note About Watermarks

By Leigh

Thank you to everyone who responded to my question in this post about the watermark on my photo. Personally, I don't like them. I find them annoyingly distracting, so it was interesting to me that some of you never really noticed it.

I had an interesting chat with Dorothy about that photo, and she showed me how easy it is to obliterate a watermark from a photo. Mine was fairly small, but with some skill and a clone tool, even a large one could be removed. As she said in the comments, "(The) best way to protect pictures is keep them off the internet." However, that would defeat the purpose of a fiber and textile blog!

If I had my own website I might be concerned about another type of photo theft called "hotlinking" or "inline linking." This is when someone steals a photo by linking directly to it's original location from their website. The image shows up on their site, but it uses the bandwidth of the original website (bandwidth theft), which is paid for by the owner of the photo! You can read more about this here. Any sort of watermark would be helpful in this case, as the photo is never tampered with by the thief.

My personal experience however has been having entire posts (including photos) taken by a scraping website (post about my experience here.) Posts and photos from dozens of other blogs had been stolen and reposted there too, some with copyright notices and watermarks still intact. Unfortunately scraping is very common. It is also somewhat indiscriminate, as it is based on keywords rather than actual content.

Because scrapers essentially just copy and paste entire posts and articles, these are rarely edited to disguise the actual author. For that reason I've taken measures to not only let readers know that my posts are copyrighted, but to always include links back to myself so they know where the posts came from. For this same reason I plan to leave a small, unobtrusive watermark on my pix. If the post is scraped, then the watermarks will be another clue back to me. If someone really wants to steal individual photos they will crop out, or clone over the watermark regardless of its size or prominence.

There are no real answers to this type of problem. I want to take measures, but one thing I don't want to do is to have so many security checks as to take the joy out of blogging!

So there you have it. I appreciate everyone's honest feedback. You all are the best!

Posted 4 Oct. 2008 at http://leighsfiberjournal.blogspot.com

Related Posts:
Stolen Content
Update on Stolen Content (& a little more info)

Wednesday, October 01, 2008

Cotton Lint Spinning Progress

By Leigh

I wanted to give you all a quick update on my cotton lint spinning.

Handspun Procion MX dyed cotton lintClick photo to biggify

Eight 100 gram skeins are spun, with at least two purples to go. The differences in the oranges and greens are subtle, but this seemed to be the best photo to catch them.

I also have several other colors, which used the printers' primaries including the pastels from my exhaust experiments. At the moment I'm mostly interested in a rainbow set of colors, though I don't have a specific project in mind for them.

On another note, I learned how to do a sort of watermark with The GIMP. Now I need your opinions. Does it distract too much from the photo????????

Posted 1 Oct. 2008 at http://leighsfiberjournal.blogspot.com

Related Posts:
Summary of Procion MX Dye Experiments
Spinning Cotton Lint