By Leigh
Done.
Posted 26 December 2009 at http://leighsfiberjournal.blogspot.com
Related posts:
Fireside Sock Knitting
Fireside Sock Progress
Saturday, December 26, 2009
Saturday, December 19, 2009
Small Bags For Small Gifts
By Leigh
I've always given handcrafted gifts to family members for their birthdays and Christmas. This year, thanks to the homestead, I haven't been able to make the knitted, woven, embroidered, or sewn gifts I usually do. Instead, I decided to give some of fig jam, muscadine jelly, and canned figs I made this summer from our harvest bounty.
Even so, it didn't seem like enough. I wanted a personal, finishing touch that would make it even more special. The answer? Some little bags made from handwoven samples.
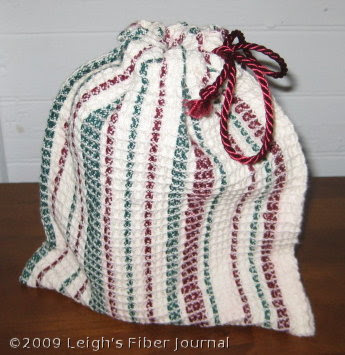
These were made from the waffle weave sampler I wove in July 2008 (all those samples come in good for something :) Not only was it the right size, but it's also in Christmas colors!
The sampler was 7.5 inches wide and quite long. I cut 20 inch lengths for the bags. I purchased cording for the bag ties.
I folded them over one inch at each end. Then I seamed the sides, with the selvedges on the outside of the bag. The selvedges made a nice finished side to the bag with no turning and no bottom corners to neaten.
I only sewed the side seams up to where I sewed the fold. Unfortunately the photo showing this didn't turn out.
I think they made a perfect wrapping for my gifts. Plus, once the goodies are gone, recipients will have the bag forever.
Related Posts:
Sock Knitting Bag
I've always given handcrafted gifts to family members for their birthdays and Christmas. This year, thanks to the homestead, I haven't been able to make the knitted, woven, embroidered, or sewn gifts I usually do. Instead, I decided to give some of fig jam, muscadine jelly, and canned figs I made this summer from our harvest bounty.
Even so, it didn't seem like enough. I wanted a personal, finishing touch that would make it even more special. The answer? Some little bags made from handwoven samples.
These were made from the waffle weave sampler I wove in July 2008 (all those samples come in good for something :) Not only was it the right size, but it's also in Christmas colors!
The sampler was 7.5 inches wide and quite long. I cut 20 inch lengths for the bags. I purchased cording for the bag ties.
I folded them over one inch at each end. Then I seamed the sides, with the selvedges on the outside of the bag. The selvedges made a nice finished side to the bag with no turning and no bottom corners to neaten.
I only sewed the side seams up to where I sewed the fold. Unfortunately the photo showing this didn't turn out.
I think they made a perfect wrapping for my gifts. Plus, once the goodies are gone, recipients will have the bag forever.
© 19 December 2009 at http://leighsfiberjournal.blogspot.com
Related Posts:
Sock Knitting Bag
Sunday, December 13, 2009
Fireside Sock Progress
By Leigh
First Fireside Sock heel flap done.
Posted 13 December 2009 at http://leighsfiberjournal.blogspot.com
Related posts:
Fireside Sock Knitting
1st Fireside Sock Heel
Related posts:
Fireside Sock Knitting
1st Fireside Sock Heel
Tuesday, December 08, 2009
I Have Pirns!
By Leigh
These are for my bargain shuttle. They were passed on to me by Barb, after they were passed on to her. I feel equipped!
Now, I freely confess that it will be awhile before I get to try my new shuttle. I'm still cutting rags for the rag rug I'm planning for the bedroom, and that will be the first project on my loom once I can get back to weaving. But I will definitely be learning to use it in the not so distant future.
So, a heartfelt thanks to Barb, and also to everyone who left me helpful and encouraging comments about my new shuttle. All are very much appreciated.
Related Posts:
My $6.93 Shuttle
Now, I freely confess that it will be awhile before I get to try my new shuttle. I'm still cutting rags for the rag rug I'm planning for the bedroom, and that will be the first project on my loom once I can get back to weaving. But I will definitely be learning to use it in the not so distant future.
So, a heartfelt thanks to Barb, and also to everyone who left me helpful and encouraging comments about my new shuttle. All are very much appreciated.
© Dec 8, 2009 at http://leighsfiberjournal.blogspot.com
Related Posts:
My $6.93 Shuttle
Sunday, November 29, 2009
Fireside Sock Knitting
By Leigh
Theresa recently cleaned out her library and I was the happy recipient of Knit Socks! 15 Cool Patterns For Toasty Feet by Betsy Lee McCarthy. I love wearing handknit socks, I love knitting them, and I love collecting sock pattern books.
Obviously I am happy to add this to my own library and of course I set about trying to decide which pattern to knit first. My initial idea was to use one of the patterns with these yarns ...
... from this post, I'm A Sucker For Sock Yarn.
I found a pattern I liked and knitted a swatch. Unfortunately my gauge was too large but I don't have any sock needles smaller than US2's. Well, I do, but they are bamboo which I've broken because, well, I'm not sure why except that I knit with a lot of tension in my hands as well as my gauge! Ordinarily I would just recalculate the pattern but I don't feel like going through the mental gymnastics for that at this point. I decided to save that pattern and those yarns until I can get some double pointed 1's. Instead, I looked for a pattern with the gauge I'd knitted and this is the one I ended up with....
Fortunately this pattern was also on my "must knit" list. The stitch pattern was easy to memorize and it is very pleasant and relaxing to knit by the fire at the end of the day.
If feels good to be knitting again.
Posted 29 November 2009 at http://leighsfiberjournal.blogspot.com
Related Posts:
I'm A Sucker For Sock Yarn
Theresa recently cleaned out her library and I was the happy recipient of Knit Socks! 15 Cool Patterns For Toasty Feet by Betsy Lee McCarthy. I love wearing handknit socks, I love knitting them, and I love collecting sock pattern books.
Obviously I am happy to add this to my own library and of course I set about trying to decide which pattern to knit first. My initial idea was to use one of the patterns with these yarns ...
... from this post, I'm A Sucker For Sock Yarn.
I found a pattern I liked and knitted a swatch. Unfortunately my gauge was too large but I don't have any sock needles smaller than US2's. Well, I do, but they are bamboo which I've broken because, well, I'm not sure why except that I knit with a lot of tension in my hands as well as my gauge! Ordinarily I would just recalculate the pattern but I don't feel like going through the mental gymnastics for that at this point. I decided to save that pattern and those yarns until I can get some double pointed 1's. Instead, I looked for a pattern with the gauge I'd knitted and this is the one I ended up with....
Fortunately this pattern was also on my "must knit" list. The stitch pattern was easy to memorize and it is very pleasant and relaxing to knit by the fire at the end of the day.
If feels good to be knitting again.
Posted 29 November 2009 at http://leighsfiberjournal.blogspot.com
Related Posts:
I'm A Sucker For Sock Yarn
Monday, November 23, 2009
My $6.93 Shuttle
By Leigh
I was browsing a thrift shop this morning and found this...
Of course I bought it! (Click pic for a little bigger). It cost me a total of $6.93 including tax and is in excellent shape. I know absolutely zilch about end-feed shuttles, so I need your help! Did I just buy a pretty ornament for my studio? Or can I actually weave with it? It has no identifying markings, but stamped on the bottom are these: SH (or 5H) 852 on one side, and M 3394-37 on the other. It's 16.5 inches long. I'm assuming it's an industrial shuttle (???)
Help?
Help?
© 23 November 2009 at http://leighsfiberjournal.blogspot.com
Thursday, November 12, 2009
Shams And Rags
By Leigh
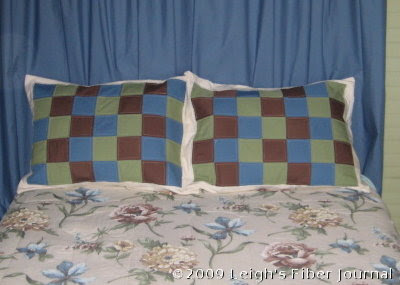
I finished my quilted pillow shams!
They aren't perfect, but I think they look well enough with the comforter.
I've also been cutting rag strips for the matching rag rug.
I finished my quilted pillow shams!
They aren't perfect, but I think they look well enough with the comforter.
I've also been cutting rag strips for the matching rag rug.
If you recall, this is going to be a summer & winter polychrome rag rug. This means that I will use a S & W threading, but will throw two different colored pattern shots between tabby shots. The whole thing is straightforward enough that I don't need to make a full drawdown for it. The threading will be a 2-block (4-shaft) summer and winter.
My sett will be 16 epi, and I want the squares to be the same size as those in the shams, 4 inches. That means each square will have 64 ends. With a threading unit of 4 ends, each block will be 16 units. I haven't calculated the width yet, probably four feet, for which I would need about 12 blocks and 768 ends. Length needs to be about 6 feet, which will probably require miles of rags!
Treadling will alternate two colors per block, following the same sequence as my pillow shams:
Pattern shot - blue
Pattern shot - green
Tabby a
Pattern shot - blue
Pattern shot - green
Tabby b
Repeat for four inches
Pattern shot - green
Pattern shot - brown
Tabby a
Pattern shot - green
Pattern shot - brown
Tabby b
Repeat for four inches
Pattern shot - brown
Pattern shot - blue
Tabby a
Pattern shot - brown
Pattern shot - blue
Tabby b
Repeat for four inches
Repeat
Rag cutting is rather slow going, I admit, but I can't get to my loom anyway, until we get the dining room floor down (which is next on the indoor project list). I started out measuring the width of the rags, but quickly abandoned that in preference to the eyeball method. It's faster and it will be close enough!
To be continued ........ one of these days.
Related Posts:
A Little Quilting
Summer & Winter: Polychrome Rug 1
Summer & Winter: Polychrome Rug 2
My sett will be 16 epi, and I want the squares to be the same size as those in the shams, 4 inches. That means each square will have 64 ends. With a threading unit of 4 ends, each block will be 16 units. I haven't calculated the width yet, probably four feet, for which I would need about 12 blocks and 768 ends. Length needs to be about 6 feet, which will probably require miles of rags!
Treadling will alternate two colors per block, following the same sequence as my pillow shams:
Pattern shot - blue
Pattern shot - green
Tabby a
Pattern shot - blue
Pattern shot - green
Tabby b
Repeat for four inches
Pattern shot - green
Pattern shot - brown
Tabby a
Pattern shot - green
Pattern shot - brown
Tabby b
Repeat for four inches
Pattern shot - brown
Pattern shot - blue
Tabby a
Pattern shot - brown
Pattern shot - blue
Tabby b
Repeat for four inches
Repeat
Rag cutting is rather slow going, I admit, but I can't get to my loom anyway, until we get the dining room floor down (which is next on the indoor project list). I started out measuring the width of the rags, but quickly abandoned that in preference to the eyeball method. It's faster and it will be close enough!
To be continued ........ one of these days.
© 12 November 2009 at http://leighsfiberjournal.blogspot.com
Related Posts:
A Little Quilting
Summer & Winter: Polychrome Rug 1
Summer & Winter: Polychrome Rug 2
Sunday, October 25, 2009
Sheep To Shawl
By Leigh
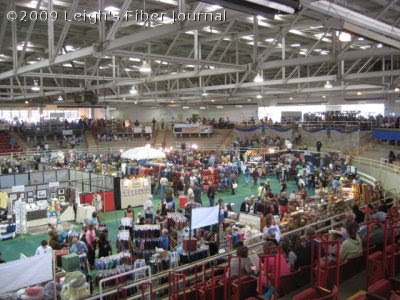
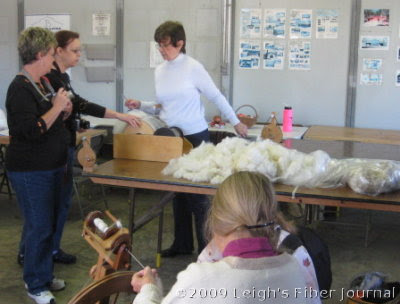
For the past several years my guild has been doing a Sheep To Shawl at SAFF (Southeastern Animal Fiber Fair) at the WNC Ag Center in Asheville, NC. This year I was able to participate.
We had a great location and gorgeous autumn weather. Since this is a local event, most of our active guild members were volunteering in other aspects of the Fiber Fair, but we had four spinners and a weaver to demonstrate the process.
We started with a donated, washed Border Leicester Fleece. Charlene, who coordinated the event, did the drum carding.
A lot of folks were interested in the entire process. This is Barbara, demonstrating spinning and answering questions.
Old fashioned wheel spinning. |
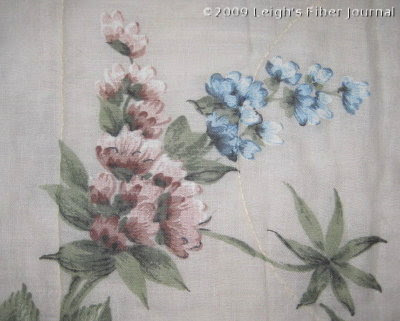
The warp was a combination of 2-ply handspun and commercial wool yarn. There was a little alpaca thrown in as well. The singles we spun that day were used for the weft. The plan for the shawl is to raffle it with proceeds going toward the Blue Ridge Fiber Show.
In the afternoon, we had a shearing demonstration. This is Elspeth, a rescue sheep. She is a registered Shetland, who other than not having been sheared for at least two years, was healthy.
The fleece was in amazingly good condition, with very little cotting or felting. It weighted 11 pounds! Other than a break indicating the next year's growth, it was lovely.
Elspeth got a massage after her ordeal. She wasn't too happy about being there, but calmed down considerably as the shearing progressed.
And the rest of the Fiber Fair?
It was bigger, better, and busier than ever, with more vendors, more classes, and more folks coming to look, buy, learn, and see.
My haul?
My haul?
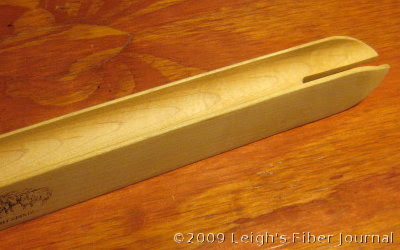
Just this, a 20.5 inch Schacht rag shuttle for the rag rug I plan to weave for our bedroom.
I didn't stay till the end because I had a pretty good drive home. It just felt good to get my wheel out and spin again. Hopefully this winter I can resume spinning as a daily activity. By the fire. Sounds good, doesn't it?
© 25 October 2009 at http://leighsfiberjournal.blogspot.com
Wednesday, October 14, 2009
A Little Quilting
By Leigh
What better thing to do on a drizzly, damp, chilly, dark day than sit by a cozy fire ...
... and do a little sewing.
Thanks to our fireplace project, everything around here has been dusty and disorganized. With the new hardwood dining room floor to be put in next, the forecast is for more of the same, especially when we get to sanding it. So, weaving projects like living room draperies, and even sock knitting (I discovered that I can't find my needles) are on hold at the moment.
Still, I have to do something, which turned out to be an inspiration to make some pillow shams to match a comforter...
... which matches the green walls of our bedroom.
Initially, I had rag rugs in mind, so when I thought about sewing some pillow shams, I thought about making something that I could coordinate with a rag rug. I chose a very simple block pattern...
... and used a progressive color sequence which I can reproduce as a polychrome rag rug.
Quilting was my introduction to the world of fabric and textiles. Though it's been a long time since I've pieced any tops or done any quilting, I still very much appreciate the art.
At first I thought I'd do the quilting by hand. I used to have both a quilting frame and a quilting hoop, but I believe these were left behind along the way. I believe I still have some large embroidery hoops somewhere, but I'm really not sure where at the moment. So, I'm doing something I've never done before...
... quilting by machine. I appreciate how quickly it's going though and this is meant to be a simple project after all.
I'm not really following a pattern, but I did find instructions to sew mitered corners, here. There's lots of other good stuff there too.
© 14 October 2009 at http://leighsfiberjournal.blogspot.com
Related post:
Thursday, October 01, 2009
It Worked!
By Leigh
Remember these?
Remember these?
These are the red warp M's & O's dishtowels I wove awhile back. A way while back. I gave one away, and put the other four in my trunk of handwovens.
It wasn't until after I had problems with another red warp for a waffle weave sampler, that I became concerned about these. The red in that warp bled, (that post here). When I looked at my M's & O's dishtowels later I thought, "Oh gosh, I'll bet these will bleed too."
Actually, I got some good ideas in the comments to that waffle weave post, about various dye grabbing products, though I admit that I didn't try any of them. That is, not until I asked my new DIL about the colors for her kitchen and she mentioned red. I immediately thought of those M's & O's dishtowels and her upcoming birthday. Before I would give them away as a gift, however, I knew I needed to do something about any potential bleeding.
Well, I remembered your suggestions and bought this...
.... it worked!
I will still tell my daughter-in-law to not wash these with anything they don't want to risk turning pink (definitely not my son's favorite color.)
Paula Burch has some really good information on bleeding dyes - here. Evidently the culprit is the direct dyes used by commercial dyers. Unfortunately I have a lot of commercially dyed weaving yarns, so this is something I'll have to keep in mind in the future. At least I have found help for it.
© 1 October 2009 at http://leighsfiberjournal.blogspot.com
Wednesday, September 23, 2009
I'm A Sucker For Sock Yarn
By Leigh
Especially the odds and ends I find in clearance bins. Consequently I couldn't pass up these ...
No, they aren't the same colorway, similar but not the same. Still, these are colors I like, so I bought them both.
Having odd balls of sock yarn isn't a problem for me however. In fact, I have a growing collection of them...
I really need a small project that I can pick up and set down easily. Something light and easy to take with me.
I'm thinking about this as a possible combo for socks...
Whatever happened to my Lucy Neatby Chequerboard Socks? Well, they are on a long term hold at the moment. They need to be fixed and that would require more brain power than I have to spare these days.
Until I get back to those however, these will keep my sock needles from getting rusty.
Related Posts:
At Last, Actual Fiber Content :)
Until I get back to those however, these will keep my sock needles from getting rusty.
© 20 September 2009 at http://leighsfiberjournal.blogspot.com
Related Posts:
At Last, Actual Fiber Content :)
Sunday, September 20, 2009
Light At The End Of The Tunnel
By Leigh
In my case, the tunnel is house renovation, and the light is finally catching a glimpse of what it will be like to have a huge project in the living room done, tearing down the old fireplace and putting in a new hearth and chimney for a wood burning stove. This has not just meant spending most of our time on this, but it has also meant an upheaval of our living quarters. Because deconstruction and working with bricks and mortar is such as dusty, dirty job, we've moved all of the living room furniture to other parts of the house. We've been sporting that "just moved in" look for months now!
The tearing down phase seemed the quickest. The rebuilding part is going much more slowly. Still, we're finally getting to a point where I can visualize having our living room back. And with that, I'm starting to think about weaving for it.
What I'm currently contemplating, is weaving drapery fabric. I've never attempted anything like that before, but when we first bought the place, I immediately started to think about all the things I could weave for it: kitchen, bath, and table linens, rugs, curtains, drapes, throws, upholstery fabric, etc. Although I haven't yet given much thought to design and weave structure, I have been contemplating color.
Here are the colors I have to work with...
The colors are roughly accurate on your computer monitor.
Plus, I've been collecting paint chips for wall color ........
image fail of paint chips
......... well, never mind the paint chips. They would neither photograph nor scan anywhere near their actual color. Suffice it to say that they are coordinating pale to light neutrals for my walls. I also have one burgundy chair and my furniture is a medium/dark cherry.
I'm inspired enough with this that I would like to dig through my stash and pull out various colors of yarns to compare with my sofa, rug, cushions, and chair. Unfortunately, my stash is another matter, because I can't find all my yarns! Thanks to the current state of chaos in our home due to our project, some yarns are in my studio hidden behind piles of boxes, others are still packed away ............. somewhere.
Though we still have a long way to go on any number of house projects (especially kitchen and bathrooms), weaving is something to contemplate as cooler weather approaches. As much as I've loved being out of doors this summer, I am also looking forward to spending time indoors this winter, cozy with that new wood burning stove, and fibernating.
Plus, I've been collecting paint chips for wall color ........
......... well, never mind the paint chips. They would neither photograph nor scan anywhere near their actual color. Suffice it to say that they are coordinating pale to light neutrals for my walls. I also have one burgundy chair and my furniture is a medium/dark cherry.
I'm inspired enough with this that I would like to dig through my stash and pull out various colors of yarns to compare with my sofa, rug, cushions, and chair. Unfortunately, my stash is another matter, because I can't find all my yarns! Thanks to the current state of chaos in our home due to our project, some yarns are in my studio hidden behind piles of boxes, others are still packed away ............. somewhere.
Though we still have a long way to go on any number of house projects (especially kitchen and bathrooms), weaving is something to contemplate as cooler weather approaches. As much as I've loved being out of doors this summer, I am also looking forward to spending time indoors this winter, cozy with that new wood burning stove, and fibernating.
© 20 September 2009 at http://leighsfiberjournal.blogspot.com
Wednesday, September 16, 2009
Coming Soon, To A Spinning Wheel Near You
By Leigh
Did anybody else know that this Saturday is World Wide Spin In Public Day? If so then consider this a confession about how infrequently I get to go blog visiting anymore. Anyway, I found the button and link over at Janet's blog and thought I'd at least help spread the word.
Lately I can barely find my spinning wheels and fiber let alone use them. Why? Well, putting in a new hearth for our wood heatstove has meant putting all the living room furniture in the dining room and my studio. Not to mention the dust! September 26th though, is our annual Guild retreat and I'm really looking forward to that.
© 16 September 2009 at http://leighsfiberjournal.blogspot.com
Sunday, August 30, 2009
August Guild Meeting
By Leigh
I don't usually talk much about my weaver's guild meetings, but I absolutely have to tell you about yesterday's. (OK, lately I haven't been talking much about fiber arts at all, but if you've been following my other blog and know about the fireplace, then you'll understand that my studio is full of living room furniture and boxes at the moment!)
We always start with a business meeting, followed by Show-&-Tell and then a program. For many, Show-&-Tell is a big favorite. It gives everyone a chance to share what they've been doing and it is always inspirational.
For some reason, there were a lot of double weave projects shown. I've been thinking a lot about double weave lately, having taken a class on it a long time ago. It just seems to be drawing me to a self-study this winter.
Then Bobbie Kelsten showed us her double weave pick-up pieces; Hamsa Houseblessing wallhangings which she had recently completed. Bobbie's work is gorgeous, and she sells it at the North Carolina Arboretum gift shop. She was also recently juried into the Southern Highlands Craft Guild.
Anyway, I was absolutely drooling over those pieces and thinking how much I really wanted one. Then she said, "...and I want to give one of these to Leigh for her studio, for everything she has done for the Guild." I couldn't believe my ears!
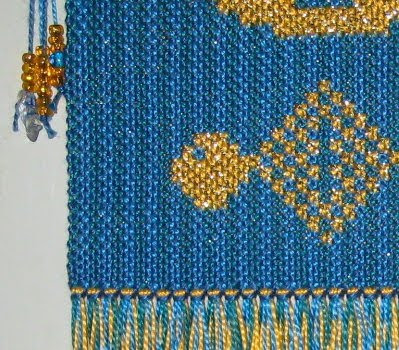
You can click on the above image to enlarge, but here is a detail shot too....
It's approximately 6.5 by 17 inches, including fringe.
And here is the blessing that comes with it......
I don't usually talk much about my weaver's guild meetings, but I absolutely have to tell you about yesterday's. (OK, lately I haven't been talking much about fiber arts at all, but if you've been following my other blog and know about the fireplace, then you'll understand that my studio is full of living room furniture and boxes at the moment!)
We always start with a business meeting, followed by Show-&-Tell and then a program. For many, Show-&-Tell is a big favorite. It gives everyone a chance to share what they've been doing and it is always inspirational.
For some reason, there were a lot of double weave projects shown. I've been thinking a lot about double weave lately, having taken a class on it a long time ago. It just seems to be drawing me to a self-study this winter.
Then Bobbie Kelsten showed us her double weave pick-up pieces; Hamsa Houseblessing wallhangings which she had recently completed. Bobbie's work is gorgeous, and she sells it at the North Carolina Arboretum gift shop. She was also recently juried into the Southern Highlands Craft Guild.
Anyway, I was absolutely drooling over those pieces and thinking how much I really wanted one. Then she said, "...and I want to give one of these to Leigh for her studio, for everything she has done for the Guild." I couldn't believe my ears!
You can click on the above image to enlarge, but here is a detail shot too....
It's approximately 6.5 by 17 inches, including fringe.
And here is the blessing that comes with it......
Bobbie, thank you! It will always have a place of honor in my studio. I feel very blessed indeed.
© 30 August 2009 at http://leighsfiberjournal.blogspot.com
Tuesday, July 21, 2009
Beaded Fringe Scarf
By Leigh
Ta-dah! I've actually finished something! My summer & winter beaded fringe scarf....
To relax after working hard all day, Dan and I have resumed a long time habit - he reads aloud while I do handwork. He just finished reading Little Britches by Ralph Moody to me, and I just finished my scarf.
I've already written quite a bit about this scarf. You can find the project details here, and details about the fringe, here.
Related Posts:
Differential Shrinkage Fail
Beaded Fringing
I've already written quite a bit about this scarf. You can find the project details here, and details about the fringe, here.
© 21 July 2009 at http://leighsfiberjournal.blogspot.com
Related Posts:
Differential Shrinkage Fail
Beaded Fringing
Friday, July 03, 2009
Beaded Fringing
By Leigh
I confess. I haven't done anything with those socks. The suggestions and tips you all gave me were extremely helpful, but the fact of the matter is that correcting them will require too much thinking. I'm simply too busy to do much thinking these days.
However, thanks to some very cool fringing instructions over at Lynette's blog, I have this to show......
You may or may not recall that this is the cotton and rayon, summer & winter scarf I wove in an unsuccessful attempt at differential shrinkage. I still liked it however, especially the reversibility.
This is the first time I've tried working with beads like this. The method is easy but I confess thought that it is slow going because I am twisting the fringe by hand. Someday I'll get a fringe twister, but probably not any time soon. Even so, it's a relaxing activity in the evenings, doesn't require too much energy or brain power, and I'm liking the results. I don't usually wear scarves, but this one I think I actually will.
Posted 3 July 2009 at http://leighsfiberjournal.blogspot.com
Related Posts:
At Last, Actual Fiber Content :)
One Thing Leads To Another
Differential Shrinkage Fail
Slo-Mo Fringe Twisting
I confess. I haven't done anything with those socks. The suggestions and tips you all gave me were extremely helpful, but the fact of the matter is that correcting them will require too much thinking. I'm simply too busy to do much thinking these days.
However, thanks to some very cool fringing instructions over at Lynette's blog, I have this to show......
You may or may not recall that this is the cotton and rayon, summer & winter scarf I wove in an unsuccessful attempt at differential shrinkage. I still liked it however, especially the reversibility.
This is the first time I've tried working with beads like this. The method is easy but I confess thought that it is slow going because I am twisting the fringe by hand. Someday I'll get a fringe twister, but probably not any time soon. Even so, it's a relaxing activity in the evenings, doesn't require too much energy or brain power, and I'm liking the results. I don't usually wear scarves, but this one I think I actually will.
Posted 3 July 2009 at http://leighsfiberjournal.blogspot.com
Related Posts:
At Last, Actual Fiber Content :)
One Thing Leads To Another
Differential Shrinkage Fail
Slo-Mo Fringe Twisting
Friday, June 26, 2009
Unveiling My Studio Set-Up
By Leigh
This is actually a duplicate post. I published almost the exact same thing on my homesteading blog because it's appropriate for both blogs, though for different reasons. That part of my life is certainly demanding most of my attention these days, but I am still a weaver and fiber person at heart.
After a lot of thought and some trial & error, I've finally settled on a set-up for my studio. This was formerly the "sun room," claimed as my studio on first sight.
The room is long and narrow, about 9.5 by 20 feet, and this presented some challenges. My loom takes up roughly 6 by 5.5 feet worth of floor space, so where to put it took some deliberation. I finally decided to start with it near the living room entrance, as the width of the double French doors afford a little room there.
Part of the problem is having enough floor space to walk around all sides of the loom. With this set-up I have 18 inches of space in back of the loom, and 20 inches on the left side. I'm going to work with this awhile, and if it's not adequate I'll make adjustments.
The long tube on the floor behind the loom is a reed holder. It was handy previously, but it's in the way now. I'll have to come up with another way to store my reeds.
To the right of the loom I left the floor open, and used a book shelf to define both studio and office space for myself without blocking the windows.
All of my spinning, dyeing, knitting, crochet, sewing, and design books are on those shelves, along with a few weaving books and a box or two of equipment. Behind the bookshelf .....
That's not a permanent home for my warping board, just a handy place to keep it. Eventually the closet will be replaced with more shelves.
My Sterilite stackable drawers (full of weaving yarns) are in front of the door which goes out to the screened in front porch. Though I like the idea of being able to use this door, I really don't need it. In the corner between the closet and my stackables is my tri-loom and raddle.
These shelves were left in the house. I was able to get a lot of my yarns out of boxes and stashed here. I really like being able to have at least some of my yarns visually handy.
The other little shelf unit contains most of my weaving books and is handy for my bobbin winder. Hopefully the space between this shelf and the loom will be adequate for entering and exiting the rest of the room.
The rest of my stash: weaving yarns, handspun yarns, commercial knitting yarns, and all my fleeces and other spinning fibers, (as well as my sewing machine, serger, and dye equipment) are in the spare room.
Being a "try it and see" sort of person, I figured that the only way to know how well this Hopefully I'll have something to show you on that front soon.
Related Posts:
My New Studio
The State of My Studio
Studio Progress
The rest of my stash: weaving yarns, handspun yarns, commercial knitting yarns, and all my fleeces and other spinning fibers, (as well as my sewing machine, serger, and dye equipment) are in the spare room.
Being a "try it and see" sort of person, I figured that the only way to know how well this Hopefully I'll have something to show you on that front soon.
© 26 June 2009 at http://leighsfiberjournal.blogspot.com
Related Posts:
My New Studio
The State of My Studio
Studio Progress
Subscribe to:
Posts (Atom)