Saturday, September 29, 2007

On Sock Heels - A Contemplation

This year's pair of summer socks is almost done. I should have a photo to show in a day or two. The heels turned just fine and I've knitted my way up both legs and have just enough blue to complete the K2P2 cuffs.

A couple of posts ago, I showed you the toe-up sock toe that I really like. I've experimented with others but keep going back to that one. Not that I am exceptionally experienced when it comes to sock knitting. Off the top of my head I can recall about 17 or 18 pairs of socks that I've knit, but that's about it. I suppose that's enough pairs to settle on sock parts that one likes.
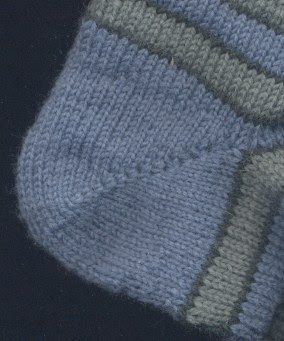
A short row sock heel.However, my pleasure and confidence in the toe does not extend to the heel. And I've experimented with those as well. This one is a short row heel, one that I often use. But I've knitted heels with flaps too. For the longest time I've assumed that I preferred the short row heel. But with this pair of socks, I've finally decided that I'm not so sure.

The reasons I've liked the short row heels is because they are the quickest and they use less yarn. I think they make a neat looking heel, as long as I keep the yarn snugged up as I do the wraps. Otherwise gaps develop. I have insisted to myself that these are decorative, but even so, I like a snug heel.

The biggest problem I've had with this heel is that gaps are left when knitting in the round resumes. This is usually eliminated by picking up an extra stitch or two on the first round after finishing the heel. I've been semi-successful with this, but it often looks a little sloppy to me. Of course, it might help if I could figure out whether to start the turn on a knit or purl row. No matter which I choose, it still doesn't seem to come out right, so perhaps it really doesn't matter (?) Another minus for this heel is that unless one uses a nylon reinforcing yarn in addition to the main yarn, it tends to wear out faster. But then there's the matter of getting a reinforcing yarn to match!

Heel flaps, on the other hand, take longer to knit and require more yarn. Usually these are knitted on cuff down socks, but can be used on toe-ups in a reverse fashion. One plus is that if one knits it with slip one, knit one (or easier yet, Lucy Neatby's slip one, purl one), the yarn carried across the slipped stitches creates a sturdier heel.

My problem with these heels stems from the fact that no matter what I do, my knit and purl tensions are never the same. This results in a rather trapezoidal shaped flap, instead of a nice neat square one. I can't say that this effects the fit of the sock noticeably, but it still bugs me. Oh, and I've managed to get a gap with this heel as well.

Before I conclude, I think that I should admit that I've never tried an "afterthought heel." For some reason I'm a little leery of this heel, though I don't know why. I suppose that I should be brave sometime and give it a try just to see what it's like. Of course, knowing me, I'll have to give it three or four tries before I get the hang of it, and I'm not sure that I want three or four more pairs of socks with goofy looking heels.

Perhaps I should have named this post "In Search of the Perfect Sock Heel." I know that I certainly haven't found it. Has anyone? Does such a thing even exist? I'm open to suggestions.

Wednesday, September 26, 2007

Last of the Zig Zag Afghans

I think this is it for the Christmas twill afghans.

For now at least. I think I am least satisfied with this one, mostly because I beat in the weft rather inconsistently. The evidence of this is seen in the stripyness.

As you can see, one side has predominant blue warp zig zags, the other, white weft zig zags. I was pretty random with the treadling and simply changed direction when I felt like it.

Particulars for the project:
  • Red Heart acrylic worsted weight knitting yarn
  • Sett 8 ends per inch
  • Straight twill threading
  • 352 warp ends
  • 44 inch width in reed, 37 inch completed project width
  • 60 inches long excluding fringe

Now that I have the series of afghans done, it is time to redirect my weaving energies. In November, Stacey Harvey Brown will be teaching an Advancing Twills class for the Online Guild. I am definitely planning to participate in that. So that gives me all of October to work on something else. What will it be? I'm not sure! I'll let you know as soon as I figure it out. :)


Related Post:

Sunday, September 23, 2007

7th Shetland Sample - Peeps

I am a sucker for lamb's fleece. Of course it is almost always soft, but there is something else about it, something that evokes the "awwww" factor in me. This fleece was no exception.

Shetland lamb staples.This lovely sample is from a Shetland lamb named Peeps. It is the last of the original Shetland fleece samples from Cathy. The staples in this pic are from the washed batch. Before washing, the fleece actually looked fawn in color. My, but how could a little lamb get so dirty. I can envision a very playful little fellow.

This fleece was dual coated. The length varied from three to five inches. The crimp was anywhere from three to seven per inch, depending on what part of the sample I measured. Some of the tips had sweet little curls on them (not really pictured here.) Despite all the dirt, there was very little vegetable matter (VM) in it. I lost nine-tenths of an ounce of weight in washing out the lanolin and dirt, but was delighted in the lovely color and luster.

I experimented a bit with the size for the singles, before figuring out that about 30 wraps per inch gave me a 2-ply the size I was aiming for. I used my Kromski Minstrel (which seems to be the wheel I always reach for, even though I have an Ashford Traditional too), and the 8.5:1 spinning ratio.

The results were over 103 yards of lovely soft, 16 WPI 2-ply.

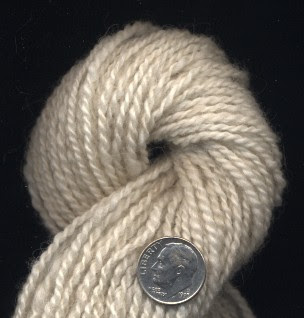
Finished 2-ply yarn.It has a lovely hand and luster. It is moderately elastic. Compared to the other two white Shetland samples, Peeps is more of an oyster or pearl color. I know that's not a Shetland sheepy term, but if you take a careful look at the three yarns below, you can see three different whites!

Comparing 3 Shetland whites.The colors above are fairly accurate and the difference is subtle. You may remember that Aurora was the one with the canary stain, and Angie was the white lamb. Peeps is more of an off-white, perhaps having a hint of the palest fawn? I'm not sure! It has been interesting however, to compare them.

What's next? I'm going to start working on the next batch of Shetland fleece samples, also from Cathy. More on those soon.

© 2007 Leigh's Fiber Journal

Thursday, September 20, 2007

A Toe Up Sock Toe

Even though I haven't yet finished the first of this year's summer socks,

This is how far I've gotten with the 1st sock.
I've started on the second. This is because I want to make sure I have enough yarn to knit the cuffs the same length. Once I turn the heel I'll try to knit evenly on both pairs until I either run out of yarn or am happy with the height of the cuffs.

I don't use a specific sock pattern when I knit socks. I just use a variety of sock parts and formulae that have worked well in the past. Occasionally I try something new, but I always come back to my basic way of doing things.

I like toe up socks. I like them for the reason I mentioned above; to make sure I don't run out of yarn. I also like being able to try them on easily at any stage of knitting. But especially, I like this particular toe.

I use a percentage formula based on a swatch. Originally I used this formula:

Measurement x Gauge - 10% = number of stitches needed

This formula has evolved over the years however as I realized that I had to factor in my personal knitting tension (tight for socks), the way I like my handknit socks to fit (snug), and the fact that my square knitted swatches don't work out to the same gauge as knitting in the round (IOW, my purl and knit stitches aren't the same tension.)

I do use this formula as my starting point however. For these socks, I knitted my swatch to a gauge of 10 stitches per inch on size US1 needles. The first measurement I used was the ball of my foot, nine inches. So,

9 inches x 10 stitches per inch = 90 stitches - 10% = 80 stitches

To start my toe, I cast on about 30% of this number (90 x .3), in this case 24 stitches.

Stitches cast on.
Then I transfer the stitches to two new needles, alternating stitches so that every other stitch is on a different needle.........

Stitches alternately transferred to 2 needles.
Next I start knitting around, increasing the first and last stitches on each needle. I increase by knitting in front and back of the stitch. The next round is knitted even (straight around without any increases.) I transfer some of the stitches to two more needles as soon as possible. These two rows are repeated until the stitches are increased to the number I want.

Completed toe.For the ball of my foot, I find that the gauge minus ten percent fits too loosely. I actually like 20 to 25 percent better. For these socks, I found that 68 stitches gave me the snug fit I like.

I like the way this toe looks when it is complete. It is a nice solid, but attractive toe, and no grafting required (though I confess that I find the Kitchner stitch fun to do.) And most importantly, it's not terribly awkward to get started.

Of course, now that the scorching summer heat has waned into cool nights and pleasant days, my mind is turning to other knitting projects. Bigger ones. Ones that will help keep my lap warm when it's chilly out. Still, socks are a wonderful tote-along project. And I am anxious to wear these soon.

Tuesday, September 18, 2007

Attaching Warp to the Front Apron Rod

Lovely royal blue Red Heart tied onto the front apron rod.
I have long been a proponent of lashing the warp onto the front apron rod. This is not how I learned to warp a loom, but was a much welcome solution to an early problem I had: getting an even tension. For a reason I didn't realize at the time (but came to understand later), I really struggled evening out the tension when I tied on a warp. One part or another of it was always loose, no matter how many times I tightened up those knots. When I learned how to lash a warp rather than tying it, I was won over after the first try. I used it for 7 years, until recently.

Lashing on (also called lacing on) has some of good advantages: it doesn't use as much warp as tying does and so is good for scant, expensive, or handspun warp; it's good for slippery warps; or for warps that are so dense as to crowd the apron rod when tied on.

The disadvantage is that it requires a stout, smooth cord about ten times the width of the warp for lacing. It's also a nuisance to correct threading errors, but these are a nuisance anyway, in my opinion.

When I started my series of afghans, I discovered that I didn't have a lashing cord ten times the 44 inch width of the warp. All of my lashing cords were considerably shorter. I suppose I could have waited until I could get more cord, but being the impatient sort who was really chomping at the bit to start weaving on my new loom, I decided to tie the warp on.

To my delight it worked quite well. The warp behaved, the tension behaved, and the knots behaved. As I've woven my way through several afghans, I've tied each warp onto the front apron rod.

At first I thought that my success was due to the fact that I have quite a bit more weaving experience under my belt than the last time I tried tying. But as I reflected, I realized that a lot of my problem back then had been due to the type of yarn I was weaving with: rayon. Rayon is slippery! But I had gotten a bunch of rayon yarn really cheap (as in a dollar a cone) so I used it. Lashing on improved my tension problems, and when I switched to cotton yarns I lashed them on too.

The acrylic yarns I've been using for the afghans tie on nicely. The yarn grips well, so that I only need a half knot as I'm tensioning the warp. (On the other hand, the warp for the wool afghan was definitely slipperier, so that I needed a surgeon's knot.)

It's funny how things can come full circle and all for the better. I have also been hand tensioning these afghan warps, because I don't have enough half gallon milk jugs to use as weights. So even with techniques I thought I had abandoned, my warp tension has been good. It is rewarding to know that I can get the same results either way. It's a real confidence booster. Plus, now I'll always have a good answer for my Dan when he asks, "Who's winning, you or the warp?"

Sunday, September 16, 2007

From Dishtowel to Cushion

Well, I couldn't stand it anymore. My blog template was driving me nuts by randomly omitting the template graphics and spontaneously reformatting itself. So I started with a brand new template, tweaked it and customized it. I don't know what it looks like on anyone else's computer, but at the moment it looks okay on mine. Of course web browsers are notorious for interpreting html codes anyway they feel like. Blogger recommends Firefox, which I've used for years. However, if anything looks off center or otherwise odd, please let me know.

Anyway, remember these Summer & Winter dishtowels? One of them had a treadling error in it. This would have been fine for a dishtowel for me, but I happened to find some 12 by 16 inch pillow inserts at the craft store and thought that some of the dishtowels might make nice cushion fronts. So I made this:

Cushion cover from handwoven summer & winter fabric.
The colors always struck me as being better suited to upholstery anyway. It was woven with 8/2's unmercerized cotton, and so made a nice, sturdy fabric. The back is a commercial navy blue fabric.

The only thing I wasn't happy with was the corners. The commercial pillow form's own stuffing wanted to stay bunched in the center of the pillow rather than fill out to the corners. Oh well. Maybe next time I'll use loose polyfil and stuff it myself.

Friday, September 14, 2007

Knitting With Silk Hankies

Handknit silk treasure bag.By Leigh

Last Saturday was the Western North Carolina Fiber / Handweavers Guild's annual retreat. I signed up for Sheila Church's workshop on knitting with silk hankies.

If you've read my blog for awhile, you may recall that about a year and a half ago, I participated in a silk spinning workshop via the Online Guild of Weavers, Spinners, and Dyers. There were silk hankies in the silk goody pack I ordered for it, but I have to admit that I haven't done anything with them yet. What I have been interested in however, is learning how to knit from these hankies without spinning them. This workshop taught us how to do that. The project we created was a clever little treasure bag. Mine is pictured on the left.

Silk hankies are made from silk cocoons. There is an excellent explanation with photos of this on Wormspit.com.

Dyed silk hankies.
Actually working with the hankies was similar to working with silk caps.

A look at the layers.They come in layers. Usually they are undyed, but our workshop kits came with dyed silk hankies in a choice of colors.

Separating the layers.Layers are separated individually be peeling the top layer back at the corner of the hankies. A quick jerk pulls the entire layer off the top....

Top layer separated.Next a hole is poked through the center of the layer......

Poking a hole in the layer...... and the layer is stretched......

Attenuating the roving...... and stretched until it is the desired thickness.

Ready to knit.Since the silk fibers are so long, it is easier to attenuate it to the desired knitting size. Of course it could also be spun at this point. We learned to add a little twist while casting on, but after that we knitted the roving as is.

© 14 Sept. 2007 at http://leighsfiberjournal.blogspot.com

Related Post -
Silk Caps & What to do With Them - spin hankies the same way

Tuesday, September 11, 2007

Shetland Sampling Continued - Angie

OK. Let's see. I have to stop and think for a moment about where I am in the scheme of spinning the Shetland fleece samples that Cathy sent me. What I do know is that this one, Angie, is the second to the last of the...... let's see, seven original samples she sent me.

Samples of the 2 types of staples found in this Shetland fleece.This one is a dual coated lamb fleece. A thorough washing revealed a lovely white with a lustrous outer coat. There were actually two types of staples in the sample, the dual coated ones being triangular in shape, and the shorter ones being more rectangular.

Angie's white Shetland lamb yarn.I started out with 1.8 ounces of raw fleece, and lost about 1/2 ounce of lanolin and dirt after washing.

The fiber length ranged from 3 to 6 inches, the shorter parts being downier. The crimp measured 2 to 3 per inch. The color was consistent throughout. It was sound, including the tips.

I prepared the fleece as I have the others, with my drum carder. I spun it the same way I've spun all the others as well, on my Kromski Minstrel with the 8.5 to 1 ratio spinning whorl. After a little sampling, I settled on singles at 30 WPIs. This gave me a 2-ply yarn of 16 WPI, which is my target size. My yardage is almost 76 yards for 1.2 ounces of washed fleece.

As you can see from the scan at the left, it is the most inconsistent Shetland yarn I've spun so far. This was because I found myself absent mindedly spinning finer and finer. At one point I measured my singles at 37 wraps per inch. Of course, when a thin single is plied with a thicker single, the result is more textured. It's a technique used for spinning some designer yarns, but this wasn't supposed to be that!

So now I have one sample left to spin from the original seven. It is also white. I also have samples from a second batch of Shetland fleeces, also from Cathy. These are white, black, and fawn. I've decided that some of the white will have to be dyed. I'm thinking about a light blue at the moment, but I'm open.

© 2007 Leigh's Fiber Journal

Sunday, September 09, 2007

Done!

Afghan done!


The final measurements excluding fringe are 36 inches by 48 inches, which are perfect for a lap robe. Here is the side I looked at while I weaved......


I really like how this looks and thought that this would be the "front" until I got it off the loom and had a chance to look at the other side for awhile .......


Now I think that I like this side better.

The fringe is twisted, and is a concession to the fact that I have a terrible time getting them all even ......


It is my "if you can't lick 'em, join 'em" approach.

Things have been really busy around here, and I haven't been home much to get caught up on the computer. However, I really wanted to show you all the completed project. I also have some more Shetland yarn to show. Hopefully soon!

Wednesday, September 05, 2007

Afghan Progress

Weaving on the warp I showed you in my last post has commenced and here's what it looks like so far:

Beginning the weaving on the next afghan.
The idea for the stripes was inspired by Susan, who has also been experimenting with twills recently. She wove two striped scarves which I absolutely loved. Or course, my twill threading is different from hers, so the look is totally different, but I like the way it is turning out.

I am a little disappointed that the bumpy texture of the handspun is flattened out under tension, and hoping it will reveal itself once the afghan is off the loom.

The commercial yarn, which is wool, is somewhat slipperier than acrylic I've been using on the other afghans. This surprised me. The handspun is hairier / fuzzier, but fortunately isn't sticking to itself as I weave.

The zig zags were a last minute inspiration. The threading is a straight twill, 1 through 8. My treadling is 8 through 1, twice, (I started treadling on the right side. Why? I don't know!), then 2, 3, 4, 5, 6, 7 and back to 8 - 1 again. This requires minimal concentration, so as I weave I'm considering the fringe. I have an idea but will have to see how well it works.

Cathy asked if I plan to keep this afghan for myself. I assume so. My actual plan is that if I finish it in time for my next guild meeting, I will enter it in our member's show. I've never entered anything in a show before. I've thought about it, but have never taken the step. Of course, this also assumes that the final product has no glaring imperfections. Even so, this being an unjuried show, the pressure for perfection is greatly diminished.


Related Posts:
Next Afghan Warp - Something Different
Done!

Tuesday, September 04, 2007

Next Afghan Warp - Something Different

Something different as in I'm not weaving this next one with Red Heart acrylic! Rather, I'm using a combination of KnitPicks Wool of the Andes knitting yarn, and some of my handspun North Ronaldsay.

I've just finished warping the loom .........

Loom warped for the next afghan.
.... and am anxious to begin weaving. There is a wonderful textural contrast between these two types of yarns ....

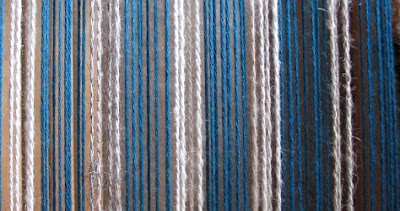
A close up of the 2 types of yarn I'm using.
The Wool of the Andes is 4-ply and very smooth. Also quite soft. The North Ronaldsay, on the other hand is 2-ply. That alone gives it a bumpier texture. Due to the guard hair, it is much coarser. What I found interesting, is that both yarns have the same twist angle.

The North Ron yarn is the same that I used in my Rare Breed Sweater (to be completed as soon as the weather cools down). I had about seven colors to choose from for this afghan, and I opted for some of the lighter shades.

I can't wait to start weaving .......

Saturday, September 01, 2007

Last of the Alpaca Projects

Alpaca fiber from my 4th fleece.By Leigh

Well, this was the last of the projects I promised in trade for the alpaca fleece!

This last fleece was lovely. The color is actually redder than the scan shows. Four to five inches is pretty much the average length, and the crimp measures eight per inch. As you can see it had some VM. It also had some short cuts. The fleece is fairly consistent throughout, except for a courser section of britch, which is the fiber that grows around the rear end. Even the britch wool was softer than the sheep's wool britch I've seen, but I discarded it anyway.

One thing I have learned from working with alpaca over the past several months, is not to judge the luster until the fleece is washed. Rather than wash the fleece however, I spun it first and then washed the yarn, which proved to have a lovely, subtle luster.

Laceweight handspun alpaca yarn.Since I had the made the teddy bear shawl with a bulky handspun, and the alpaca doll and child's cap with a medium weight, I wanted a fine handspun yarn for this last project .

I drum carded the fleece three times and then spun it worsted style on my Kromski Minstrel, with the 8.5:1 ratio whorl. By now I was pretty comfortable spinning this fairly slippery fiber, so the finer yarn was easy to spin. My singles measured 48 wraps per inch, and my 2-ply is 22 wraps per inch.

I washed the yarn in very hot soapy water twice, then rinsed with very hot water as well. The second to the last rinse had a glug of white vinegar in it. The soaking water was very, very dirty, but the yarn washed beautifully.

It took a bit of searching to find the right knitting pattern for this. I really wanted something open and lacy, but to be honest, I really struggle with lace knitting. I seem to make endless mistakes and have to rip out numerous times.

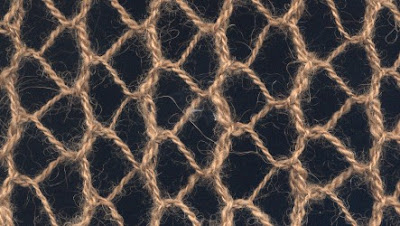
After scouring my knitting books, spinning magazines, and free patterns on the web, I found this Lacy Shawl pattern. The stitch is a very easy *yo, k2tog*, but gave the open look I was looking for.

Scarf closeup to show stitch detail.
Full view of finished alpaca scarf.I knitted a scarf instead of a shawl which was quicker. I used US13 knitting needles.

I admit that I still had some problems, until I began to pay close attention as to how each stitch was made and where the needle needed to be, in relation to the yarn. After that I was able to catch potential problems and correct them before they became actual mistakes.

After blocking the scarf measured about 6 by 54 inches.

I had enough success with it so that I am willing to try this type of knitting again. Perhaps I may conquer it yet. I should probably try to hunt up my Samoyed scarf, which keeps getting abandoned when I become frustrated with the knit 3 togethers. This time I'll even use a lifeline.

I have absolutely loved working with this fiber. I have learned a lot and my spinning skills have grown. But then, that's one of the joys of handspinning, isn't it?


Related Posts:
2nd Summer Project - Alpaca
Alpaca Project #2
Alpaca Tri-loom Teddy Bear Shawl