I can't decide if my experimentation is actually accomplishing anything or if
I'm merely creating more work for myself. Now that I have been converted to the
back-to-front warping method, I am doing some fine tuning and problem solving.
The bottom line here is warp tension, which was what motivated me to try b2f in
the first place. I've been very happy with my results so far, though there are
still a few things I'm trying to work out.
When I used to warp front to back, I would hand tension my warp. After
my first b2f warp, I decided to try using weights instead. When I did, I discovered that my warp
tension was more even and weaving was more enjoyable.
Half gallon
milk jugs filled with water work well as weights, so my next questions have been
concerning how to tie them on and where to place them.
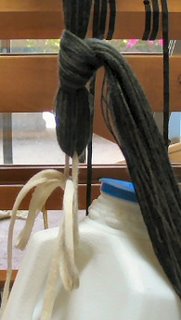
To tie them
on, I've settled on the method pictured on the left.
I'm tying a slip
knot in the warp bout and using a shoe lace through the knot's loop and the milk
jug handle. I first tried to knot the warp itself through the jug handle, but
this resulted in too much slippage. I'm sure there's a more conventional way to
do this and I'll give it a try just as soon as someone tells me what it is.
Where
to place the jugs has required a little more experimenting.
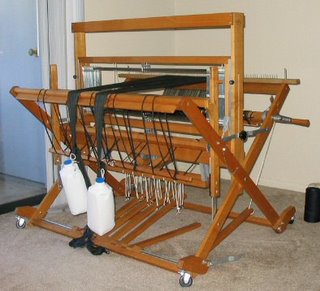
The
problem with a set up like this . . .
. . . with the weighted warp hanging over the breast beam, is
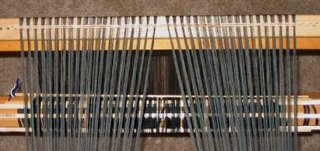
this......
If the warp winds on over the back beam with the two bouts at such an
angle, then a gap is created in the warp on the warp beam. No good.
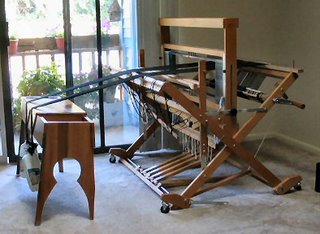
So
I tried this . . .
. . . in hopes of decreasing that angle by giving some length to the
warp. As you can see, I did this by hanging the weights over my bench. But!
Notice that the bench wants to tip over as I wind on. It's ever so slight in
this photo, but it will go all the way over, believe me. This is also no
good.
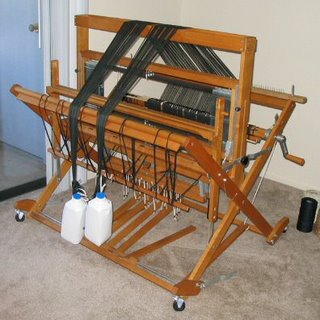
So, at someone's suggestion (Peg's I think?) I tried running
the weighted warp over the top of my castle like this . . .
. . . which worked much better except for one small problem, the
placement of my raddle. The warp ends couldn't lie flat in the raddle teeth
because of the angle of the warp. I should have secured the raddle to the top of
the castle, which is what I shall do next time. This will also take care of
another problem I had previously, discussed
here. Fortunately the warp wound on without incident and I'm ready for the next
step.
© 2006 Leigh's Fiber Journal
Related Post:
 When I used to warp front to back, I would hand tension my warp. After
my first b2f warp, I decided to try using weights instead. When I did, I discovered that my warp
tension was more even and weaving was more enjoyable.
8 comments:
Nice presentation, Leigh! I too have tried and experimented with warping assists over the years. One suggestion to replace the shoelaces: Those big plastic shower curtain rings work well.
Spreading the warp: Katie Meek has a monograph style book on warping w/ a trapeze. Charleen did an entry at: http://www.fibernut.com/blog/archives/000356.html
My looms are in the dining room, so there won't be a trapeze hanging from the ceiling anytime soon.
Valerie, thank you for that suggestion about the plastic shower curtain rings! And for the book info and link. Like you, I'm not able to set up a warping trapeze, but I would certainly love to.
Living in a relational Irish society, I tend to use the 'bring a friend to help warp your loom' method. Extra set of hands, cup o' tea, bit of a chat. Lovely! And sometimes, it may take more than an extra set, as my latest post attests. PS, how did you know that the Lord of the Rings cloak was made of Gotland? That is just amazing!
Cheryl, the Spring 2002 issue of Spin-Off has an article on "The Stansborough Gotland Sheep" of New Zealand. The Stansborough Farm worked with The Lord of the Rings film makers to spin, weave, and design the main character's cloaks.
Nice pictures. I use S-hooks. One end through the slip knot of the warp, the other through some string tied to the plastic bottles. I use soda bottles- whatever works. I use more bottles, so there is less spread. Probably no more than 4-6" of warp per bottle. Very fast to loosen and let more warp out. Anyway, I get pretty good tension with this system too. And since I'm often warping at midnight, after a long day of work, I cant really have anyone else in for a chat and tea.
I was also going to say S hooks, although I use them to weight my floating selvage yarns. I am intrigued by the different methods of warp tensioning. We were taught to use the "extra set of hands" method back in school, and then years later someone showed me "wind 3/4 turn and then tension by grabbing 1 inch bundles and tugging down all the way across the back beam". This sometimes works well, others times, not so much. I think for my next warp, I will try the weight method you have shown.
S-hooks is a great idea and probably more manageable with my fumble-fingers. I will try making smaller bouts as well as I can see that advantage. Just need to buy more 1/2 gallons of milk :)
I have also tried everything in the book for warping, including bribing my daughters when they were younger! I now mainly use the method Jackie has described and as she says - sometimes it works well, sometimes not so well. It would be extra nice though to have an interested friend over to coffee! This is something the internet hasn't done for us.
Post a Comment