Showing posts with label computer. Show all posts

Monday, November 03, 2008

Hurrah for Hardy! Hurrah for Wine!

By Leigh

You may or may not know that I use Ubuntu Linux for my operating system. I have been absolutely, totally happy with it, except for one thing: weaving software, most of which is written for Windows. Except for the Advancing Twills workshop, where I had to do my drawdowns by hand, this actually hasn't bothered me too much. Plus, I haven't relished the learning curve that comes with any new software. I do have Windows as a dual boot on my computer, but I haven't found my need for weaving software worth the nuisance of that.

I did try ArahWeave, which is written for Linux. You can read that post (with lots of screenshots) here. ArahWeave however, though free and loaded with features, is a dobby loom program and so didn't meet my immediate needs.

Still, sometimes a weaving program would be handy. Such as for the Towel Exchange I'm participating in, because I need to include the draft on the project sheets we're going to exchange. This is when a program like Wine would come in handy.

Wine (acronym for Wine Is Not an Emulator) is free, open source software which enables Windows programs to run on Linux, Mac, etc. It has been included in all the versions of Ubuntu I've had. However, when I downloaded WeaveDesign awhile back, I couldn't get it to run with Wine. Disappointing, but not enough to take the time to do anything about it.

With the towel exchange due date coming up however, I decided to try it once again on my latest version of Ubuntu, 8.04 aka Hardy Heron. I can't tell you how excited I was when WD opened up, ready to use. And here it is .....

Ta-Dah!  A Windows program on my Linux machine!
One thing about WeaveDesign however, is that I can't use it for skeleton tie-ups, such as I'm using with my latest summer & winter weaving. It won't allow me to click on more than one treadle per shed. But with the success I've now had in getting WD to open up in Wine, I'm encouraged to begin exploring other weaving programs and downloading some demos. Any suggestions?


Related Posts:
Weaving Software for Linux
ArahWeave Continued
More Weaving Software That Can Run On Linux

Tuesday, July 29, 2008

Computer Hex Code Dyeing 5: 1st Success?

By Leigh

I'm not sure whether or not I can actually call this a success or not, but here it is.

My latest experiment and target color.I will say with confidence that this is the closest I've gotten so far to my target blue. Is it exact? Even making allowances for the difference in media and electronic interpretations, I have to say no. Can I get any closer? I don't know.

Same dye proportions, different DOSThe recipe used the same color proportions as I used for the sample on the right (turquoise MX-G, 76%; red MX-5B, 10%; and black MX-CWA, 14%.) With that series of samples, I experimented with adjusting the amounts of fuchsia and turquoise. This lighter blue sample was the closest match to my cedar waxwing photo.

For this newest sample, I dyed the yarn to a darker depth of shade (DOS), in this case 8%. Previously, my samples were 4% DOS.

So, is 8% DOS dark enough to match the target color? From what I've read, the 8% DOS is considered "very dark" or "very intense." Can a darker DOS be achieved? I haven't found a reference to anything darker. Some of you with more dyeing experience will be able to answer that.

Other possible experiments could include trying a different red (MX-8B), or a different black.

My conclusions from these exercises so far, is that a color's computer hex code can be used as a starting point for dyeing with Procion MX dyes. However, the density of the dye powders effects their relative strength and has to be accounted for. Is there a specific ratio or some sort of formula for this? I don't know. Can one be developed? I don't know that yet either. Will I continue experimenting? Oh yes.

©  29 July 2008 by Leigh 

Related Posts:
Dye Recipes From Computer Color Codes: A Theory
Computer Hex Code Dyeing 1: Palettes From Pictures

Monday, July 21, 2008

Computer Hex Code Dyeing 4: 2nd Samples - Getting Closer?

Well, Peg was absolutely correct when she said that I was learning a lot. Indeed!

After learning how slow Pro MX turquoise is, I decided that I needed another mini-skein using my original recipe. This time I left it in the dyepot for 2 days, allowing the turquoise to do it's thing. Below is a comparison of those two skeins. They follow exactly the same recipe, with the same proportions of Turquoise MX-G, Red MX-5B (fuchsia), and Black MX-CWA. The only difference is the amount of time the skeins were allowed to soak in the dyebath.

Still too purple. But I had also learned that the Procion fuchsia dyes are strong, so that a little goes a long way. So for my next series of experiments, I began to adjust the amount of fuchsia.

Since I needed 50 milliliters of dye solutions for each skein, I knew that I couldn't simply use less fuchsia. I would have to make up the difference by increasing something else, either the turquoise or the black. Increasing the black didn't seem to be the answer, so I made up the difference with the turquoise.

Here are the results from that (target color is on the left):

Click on above image to enlarge

For each sample, I decreased the fuchsia by half. So the top is 100% of the fuchsia called for, the second is a half, third is a quarter, and bottom is one eighth the amount of fuchsia. Each sample soaked for about 48 hours.

Obviously, none of them are anywhere near the color I was aiming for. Next steps might include finer adjustments of the turquoise and fuchsia. Or experimenting with depth of shade. In fact, Diane has been doing a similar series of hex code dyeing experiments with depth of shade on silk and muslin fabric. Her first set of swatches starts here. They are very interesting so I encourage you to go take a look.

One thing I noticed from my 2nd set of samples, is that the third one looks similar to another color in my original palette, #1470C4 ....

However, part of the problem with these experiments is that there is no way to accurately analyze the results. Why? Because there is no way to establish the "exact" overall hue of the yarn. In order to use my computer to determine the hex code for the yarn, I can use a color picker. However, a color picker will only grab the color from one of millions of pixels which make up a picture. Take a look at a tiny detail from the same yarn photo, enlarged enough to show the pixels.

You can see why it's easy to create an almost infinite palette from just one photo! You can also see why there is no accurate way to choose the exact color which matches the overall appearance of the yarn. This points to another problem, i.e. having to go through multiple layers of color interpretation -- eye > camera > photograph > photo software > computer monitor > eye. In the end, they can only be analyzed visually.

So, to do that, here is the original photo with my 2nd sample skeins.

Technically exact? No. Visually accurate? Close! And you know what? I feel that now at least, I'm somewhere in the ball park instead of wandering around the parking lot.

Conclusions? None yet, but I am still intrigued enough to continue experimenting along this line.

Next ..... Computer Hex Code Dyeing 5: 1st Success?

Related posts:
Dye Recipes From Computer Color Codes: A Theory
Computer Hex Code Dyeing 1: Palettes From Pictures
Computer Hex Code Dyeing 2: Wrestling With Recipes
Computer Hex Code Dyeing 3: 1st Samples - No Joy

Computer Hex Code Dyeing 5: 1st Success?

Originally published July 21, 2008

Saturday, July 12, 2008

Computer Hex Code Dyeing 3: 1st Samples - No Joy

Since my last post, I've dyed my first samples. I have to report that while I got some gorgeous colors, they are nowhere near my target samples. They're not even close enough for me to plead computer discrepancies! ;)

Here they are:

My not-blue purples.Target (see "Palettes From Pictures"):
#0025B9
cyan - 1.0
magenta - 0.8
black - 0.2

Using those numbers to calculate percentages, these are the recipes I used based on a 1% stock solution. As you can see, I experimented a little with different fuchsias and blacks.

Sample #1:
Turquoise MX-G - 24 mls
Fuchsia MX-5B - 19 mls
Black CWA - 7 mls

Sample #2:
Turquoise MX-G - 24 mls
Fuchsia MX-8B - 19 mls
Black CWA - 7 mls

Sample #3:
Turquoise MX-G - 24 mls
Fuchsia MX-5B - 19 mls
Black 602A - 7 mls

Sample #4:
Turquoise MX-G - 24 mls
Fuchsia MX-8B - 19 mls
Black 602A - 7 mls

Nowhere near the target color. In fact, these samples are actually closer to the prediction I got from the Dye Mixer Applet.

Click on image to enlarge.

In comparing my four samples, the color differences are subtle, in fact barely discernible on my computer monitor. Most notably, the fuchsia 5B samples (1 & 3) appear a little cooler than the fuchsia 8Bs (2 & 4). Not much difference between the blacks however. I also note that I didn't stir well enough, as the color is spotty. About the only thing I am satisfied with is the depth of strength (DOS).

Comparing them to the target color, they are obviously purple. Too purple, which means the fuchsia was too strong.

The second color I tried to duplicate was the gold: 

My not-gold oranges.Target:
#EE9628
magenta - 0.37
yellow - 0.83
black - 0.07

Sample #1
fuchsia 8B - 19.5 mls
yellow 8G - 32.5 mls
black CWA - 3 mls

Sample #2
fuchsia 8B - 19.5 mls
yellow 3RA - 32.5 mls
black CWA - 3 mls

For these, the only color I experimented with was the yellow. #1 is the cool yellow sample, and #2 used a warm yellow. But! Neither one is anywhere near my target color. And again, the fuchsia dominated, creating orange. (I did do a better job stirring during the leveling phase though.)

These experiments affirm what I wondered about, and what many of you confirmed in the comments; that equal weights of various Procion MX colors are not equal in dyeing strength.

So it would seem that the next logical step would be to experiment with the proportions. It would be wonderful if I could come up with some concrete numbers for these differences, but that remains to be seen.

Next ....... Computer Hex Code Dyeing 4: 2nd Samples - Getting Closer

Related Posts:
Dye Recipes From Computer Color Codes: A Theory
Computer Hex Code Dyeing 1: Palettes From Pictures
Computer Hex Code Dyeing 2: Wrestling With Recipes
Computer Hex Code Dyeing 4: 2nd Samples - Getting Closer
Computer Hex Code Dyeing 5: 1st Success?

Originally published July 12, 2008

Wednesday, July 09, 2008

Computer Hex Code Dyeing 2: Wrestling With Recipes

Questions! (And my proposed answers.)

The first question is what to do with those numbers:

#0025B9
cyan - 1.0
magenta - 0.8
black - 0.28


Do they need to be percentages? Proportions? Weights?

To test the numbers on my various colors, I have been plugging them into the Dye Mixer Applet. Sometimes the applet results matched the html sample, sometimes they didn't. After a little research, I have learned some interesting things about the applet in this comment on Paula Burch's Dye Forum. Namely, that the "mix amount" numbers only give approximate results. Considering the samples that didn't match, that's a relief. I also learned that those numbers don't indicate any specific unit of measurement. That's not a relief, that's a "now what."

The CMYK (cyan, magenta, yellow, & key black) color model that I'm trying to use, is for printing inks on paper. The numbers stand for percentages of each color. So for computer color #0025B9 (above), the printer would reproduce it on paper by using 100% cyan, 80% magenta, and 28% black inks. Obviously this cannot be translated directly into proportions for a dye recipe, because then I would have to be working with 208%.

For my first experiment I've decided to calculate these as percentages of their total 208. This gives me:

Cyan (for which I will substitute turquoise) - 48%
Magenta (for which I'll substitute fuchsia) - 38%
Black - 14%

Which lead me to another question, what unit of measurement? 48 teaspoons (or even 48 eighth teaspoons), is out of the question here in terms of dye amounts. And from what I have learned from the DyersLIST archives, Procion MX dyes do not all weigh the same anyway. This means that a teaspoon of one color doesn't necessarily weigh the same as a teaspoon of another color. So, kitchen measurements are definitely out and metric measurements are definitely in.

The next question is on mixing. Do I mix the individual powders to make one dye stock, or do I make up individual dye stocks and then mix them? Considering that I will likely need to do quite a bit of sampling, mixing individual dye stocks makes more sense. Plus, it is safer to work with the dyes in solution rather than in powdered form. True, solutions won't keep all that long, but without the activator (soda ash), I should be able to use them up quickly enough.

And then there's the question of how well fuchsia will substitute for magenta and and turquoise for cyan. Also, which yellow is best? And what about black? There is no true Procion MX black as all the various blacks are mixtures of other colors. I think only experimentation can answer this for me.

Here's my plan:
  1. Measure mini-skeins of 12.5 grams each as samples. Based on the yards per pound, I have calculated that my yarn has 5.55 yards per gram, so I will need to measure out 69 and 1/3 yards per mini-skein.
  2. Mix up 1% stock solutions for the individual colors and mix the colors based on the percentages I calculated. I'm doing 1% instead of the usual 2% as it will be easier to work with the hex code numbers this way.
  3. Start with a dark depth of shade (dos), since the color #0025B9 (above) is a fairly deep blue. I will make adjustments from there.
Here are my calculations (from this pdf help sheet from the University of Hertfordshire):
% shade ÷ % dye stock x WOF (dry weight of fabric) = total mls of dye stock 4% ÷ 1% x 12.5 gms = 50 mls total dye stock to add to dye bath
So for each color I need:
  • Turquoise: 48% of 25 ml = 24 ml
  • Fuchsia: 38% of 25 ml = 19 ml
  • Black: 14% of 25 ml - 7 ml
One last question I have is based on some of the research I've been doing. That the depth of hue can vary amongst the various Procion MX colors, even if the same weight /amount of dye is being used. I hope I'm saying that right. I found this as a question in the DyersLIST archives, but with no clear answer. I've seen this somewhat with my own experiments: I got a bright yellow but a softer red, even though I used the same amount of dye powder for each color. I got a red more equal in intensity to the yellow by doubling the amount of dye powder. Am I making sense? I'm probably not using all these terms accurately, but I hope you get my drift.

Anyway, I don't have any concrete facts to work with here, so I'm not going to worry about for now. I figure that I can't correct my course if I don't begin the journey.

I have absolutely no idea where I will end up colorwise, but at least I'm making a start.

Next .... Computer Hex Code Dyeing 3: 1st Samples - No Joy

Related Posts:
Dye Recipes From Computer Color Codes: A Theory
Computer Hex Code Dyeing 1: Palettes From Pictures
Computer Hex Code Dyeing 3: 1st Samples - No Joy
Computer Hex Code Dyeing 4: 2nd Samples - Getting Closer
Computer Hex Code Dyeing 5: 1st Success?

Originally published July 9, 2008

Monday, July 07, 2008

Computer Hex Code Dyeing 1: Palettes From Pictures

The first step in testing my theory, was to choose some colors to work with. Rather than use a computer image, I decided to start with hard copy picture. There are a couple of reasons for this. One is what Jane mentioned in the comments to that post; that computer monitors do not display colors accurately. Even though computer technology has advanced beyond the traditional "web safe" colors, computer color vision just isn't that accurate. (For an interesting article on this, "Is Your Computer Color Blind?," click here for )

The other reason is that it will be easier to compare and share my results.

The photo I chose was from an old Audubon Society calendar. My first problem was getting it into the computer without a whole lot of color distortion. I quickly discovered that my scanner couldn't do it. [Note: I have an HP OfficeJet 5600 series All-in-One. The scanner stinks. The best scanner I ever had was an Epson Perfection.]

I discovered that photographing the picture in natural light rendered the best color reproduction after inputting to the computer.

There are a number of ways to create a color palette from a photo. I could have done it one color at a time at a site like LunaPic, or with my photo editing software's color picker tool. However, I wanted to show you two websites which automatically create palettes for free.

First at Color Hunter. All I had to do was upload the photo and click on "upload image."

Click on image to enlarge.You can click on these screenshots to enlarge them. Color Hunter offers two options for their color palettes, vibrant (above), and dull (below.)

Click on image to enlarge.Both seem to coordinate with the photo quite well.

Another option is Big Huge Labs Palette Generator:

Click on image to enlarge.The Big Huge Labs palette is closer to Color Hunter's dull palette, though the hex code numbers are not the same. And considering the number of colored pixels there are to choose from in any photo, this isn't surprising.

I arbitrarily chose the Color Hunter vibrant palette to work with first. I picked three colors and wrote down their hex codes. Then I went to the Color Converter and plugged in those codes to get the CMYK proportions. (Like I did in this photo from my previous post.)

I rounded the proportions to hundredths, because that's what my own photo editing software does.

So, here are the colors I've chosen to start experimenting with:

#0025B9
cyan - 1.0
magenta - 0.8
black - 0.28


#1470C4 cyan - 0.91
magenta - 0.5
black - 0.11


#EE9628 magenta - 0.37
yellow - 0.83
black - 0.07


The next step will be to try to figure out how to translate these numbers into recipes. Since the test run with the Dye Mixer Applet wasn't all that accurate .....

Click on image to enlarge....... I have several doubts and a lot of questions.

Next ..... Computer Hex Code Dyeing 2: Wrestling With Recipes

Related post: Dye Recipes From Computer Color Codes: A Theory
Computer Hex Code Dyeing 2: Wrestling With Recipes
Computer Hex Code Dyeing 3: 1st Samples - No Joy
Computer Hex Code Dyeing 4: 2nd Samples - Getting Closer
Computer Hex Code Dyeing 5: 1st Success?

Originally published July 7, 2008

Tuesday, July 01, 2008

Dye Recipes From Computer Color Codes: A Theory

Creating color schemes from photos is one way in which fiber and textile artists find inspiration for their work. Kris's Color Stripes blog is a wonderful example of color palettes that can be obtained from photos.

What I've been wondering however, is how to duplicate the colors from my own palettes onto fibers, fabrics, and yarns. I've been thinking that there must be a way to create dye formulae to match colors from a photo. After a lot of poking around on the internet, I've come up with an idea which I plan to try soon. Here it is in a nutshell.

Computers use what is known as hexadecimal codes to interpret color. These are based on the RGB (red, green, blue) color model which is the same model used to mix colored lights. Why RGB instead of the traditional artists' RYB (red, yellow, blue)? Because devices like digital cameras, scanners, and computers interpret colors like lights rather than paints.

Hexidecimal (or hex) codes use values from 0 to 9 or A to F and look like this: #40E0D0 or #EE82EE. The first two places refer to red, the middle two to green, and the last two to blue values. A hash mark always precedes them. By changing the codes, a web designer can determine the colors for background, text, links, etc on a web page. Several websites have charts of these codes, such as this one at december.com, or this one at web.forret.com.

Obviously dyes don't work like lights, so potential recipes would have to be interpreted in a different model. For my experiments, I'm going to try the CMYK (cyan, magenta, yellow, key or black) model. Why? Well for one thing, according to my experiments, dyes don't mix like paints do. For another, it's easier to convert hex codes to CMYK codes rather than RYB codes.

Most photo editing software can pick out individual colors and give you the hex code. Many of them (like The GIMP) can give you the CMYK code too. But you don't need your own editing software to pick colors from your own photos. There are many online editors that can do it for you.

I found the one below at LunaPic.

[NOTE: You can click on any of these photos to enlarge.]

I had the choice of either using their free photo, or uploading my own. Wherever I click on the photo, the color picker isolates that color and displays it at the top, along with it's hex code.

Next, I need to convert the hex code to a CMYK code. This can be done Peter Forret's online Color Converter.

I type in the hex code at the bottom and click the RGB -> CM.... button. At the top, the color displays as several swatches. Under that, the CMYK and RGB codes are given.

My theory is that by substituting fuchsia for magenta, and turquoise for cyan, those CMYK values should give me proportions for my dye recipe. But how to test? With Olli Niemitalo's free, online Dye Mixer Applet (which is also available for downloading).

There is a column on the left side of the dye mixer applet entitled "Dye." If I click on any "blank," I get a drop down menu with a number of different types of dyes and colors to choose from, including several Procion MX dyes. The choices are somewhat limited, but hopefully I can get an idea of whether or not I am on track. A color swatch for each individual color is displayed at the right.

The "Mix Amount" column in the center lets me adjust dye amounts with either a slider, or by plugging in actual values. I input the CMYK values from the Color Converter. At the bottom of the applet, I can see the mixed swatch.

How well does the mixed swatch match the original chip from LunaPic? It's not exact. There might be several reasons for this.

One thing I notice is that the color swatches on the right for the individual dyes display lighter hues than the CMYK key on the color converter. I can note too, that my mixed swatch on the applet, appears to be a lighter hue than the original color I'm trying to match.

Another problem is the dye color choices available in the dye mixer applet. There are two reds and four yellows to choose from, and none of them matches the CYMK key. However! The mixed swatch is enough in the ball park that I am encouraged to take this a step further and try some dye experiments. Looks like I've got my work cut out for me, doesn't it?

Next ..... Computer Hex Code Dyeing 1: Palettes From Pictures

Related Posts: Summary of Procion MX Dye Experiments - Learning how dye colors work together Computer Hex Code Dyeing 1: Palettes From Pictures - using free online tools
Computer Hex Code Dyeing 2: Wrestling With Recipes
Computer Hex Code Dyeing 3: 1st Samples - No Joy - but a starting point
Computer Hex Code Dyeing 4: 2nd Samples - Getting Closer
Computer Hex Code Dyeing 5: 1st Success? - achieving the closest match so far

Originally published July 1, 2008

Thursday, January 17, 2008

ArahWeave Continued

By Leigh

OK. Continuing on from my last post.

Editing in ArahWeave

Opening up the "Edit Weave" window is as simple as right clicking. It automatically pops up.

Click to biggify.Click on any photo to enlarge.

You can click on the above or any other photo in this post to biggify. Blogger resizes photos to fit the post column. Usually I resize and optimize my photos myself, to save kilobytes. However, I want you to be able see more detail with enlargements.

The editor can show the drawdown in black and white as above, or in color, as below.

Click to biggify.
Changes can be made by clicking on the drawdown and treadle plan......

Click to biggify.
Multiple editing features can be opened simultaneously .......

Click to biggify.
This program has more bells and whistles than you can shake a stick at. But! There's a glitch. Two actually, for me anyway. Take a look at the close-up of the Edit Weave window.

Click to biggify.
Since ArahWeave is written for dobby weavers, the tie-up is fixed and there is a peg plan, instead of a treadling sequence. The question is then, can I convert the dobby peg plan to a treadling order? Several other weaving software programs (such as WeaveIt Pro and WeaveMaker) do it, so it must be possible. True, the treadling possibilities would be far more limited, but if I want this software to be useful to me, I'll either have to figure out how to do that, or get a dobby loom (which I don't see in either my near nor distant future.)

So. I have a study project before me.

On another note, we have an ice storm forecast for our early morning hours here. Ice storms are bad in this area, as they often cause power outages either from ice coated tree branches falling on power lines, or from heavy ice on the lines themselves. If it would continue as snow, everything would be okay, but at 2 am the precipitation has already changed to freezing rain. I guess what I'm trying to say is, if you don't hear from me for awhile, it is because our electricity is out!


Related Post:
Weaving Software For Linux
Hurrah for Hardy! Hurray for Wine!
More Weaving Software That Can Run On Linux

Wednesday, January 16, 2008

Weaving Software for Linux

By Leigh

About the only thing I have lamented with my Linux OS, has been the inability to have weaving software. It's all written for PC's or Mac's! When I mentioned this in one of my Advancing Twill posts (that post here), Laritza suggested that I give the free ArahWeave Demo a try. So I did.

Back in my Windows OS days, I tried two free programs, WinWeave (the home page for which seems to have disappeared) and WeaveDesign. However, I was never able to get these to work with an emulator in Linux. ArahWeave however, installed easily and works like a dream.

I also downloaded the 163 page user's manual, which is very well written and easy to follow. It's going to take awhile to work my way through it, but here are a few photos, to give you an idea of some of the program basics.

The ArahWeave icon opens the program up in one simple window -


Under the "Files" menu, a "Browse Fabric" window can be opened. There are over 600 fabric files in the demo, including 300 tartans. I was even able to find my own clan tartan (Kennedy) -


The above photo shows browsing in the icon view. Hover the cursor over any fabric icon, and tool tip pop-up box appears,


with everything you'd ever need to know about that fabric.

One can also select the list view to choose fabrics from.


This contains the same information, across columns like a spreadsheet.

The zoom feature allows examination of the fabric anywhere from 1/16 size, up to 16 times the original (1600%).


Above is 1:1 or 100%. Below is 10:1, or 1000%.


There are also four different ways to view the fabric at any given zoom level. Above is called "shaded integer." Shading helps the eye differentiate between warp and weft, and shows the interlacement.


This one in black and white is called "Weave View."


There are also eight levels of fabric simulation, to give the viewer an idea of the density of the threads. The density (sett), can be changed via the "thread pattern" menu.


Here it is again, with the sett increased by about a third.

When sized at 100%, the simulation mode give a nice three dimensional look to the fabric -


The fabric can also be viewed in the integer mode -


In this mode, one square represents one warp or weft thread.

Next time, I'll talk a little about the editing features. Click here for that post.


Related Posts:
ArahWeave Continued
Hurrah for Hardy! Hurray for Wine!
More Weaving Software That Can Run On Linux

Thursday, January 11, 2007

Electronic Inspiration

The Online Guild Computer Design Workshop has been so much fun! I am very impressed with the results.

Remember the markers? Who would have thought "patchwork quilt" unless one saw this:

Yup. That came from the marker picture.

So did this.......

........ by Jane Deane in the UK. I love both the woven effect of the strips as well as the design on them.

Or this lovely ikat-like image by Karen Madigan in Australia.......

Yes! This is still the markers! Karen has more examples of what she's done with the computer on her blog, and explained a bit about how she does them. Click on her name above to check it out.

Here is another photo workshop participants worked with:

Here's what Rosemary in Portual came up with.....

Needlepoint anyone? Or how about a cross stitch? Tapestry? Or maybe paint some knitting yarns?

Linda Wilson
in Canada turned it into this......

What a lovely painted warp that would make. But of course, that's one of her specialties. She has another really neat example on her blog as well.

And Petra in Germany created this......

..... from the same desert scene. I don't have a clue as to how I would interpret that in textiles, but I am drawn to it none the less. I will probably contemplate it for some time to come.

So it's been busy, but rewarding. I can't wait to find out what the next part of the workshop will bring.

© 2007 Leigh's Fiber Journal

Monday, January 08, 2007

Online Guild Workshop Update

My Computer Design Workshop for the Online Guild has gotten off to an enthusiastic start. As my friend Ann stated, computers are the one thing all OLG members have in common. Even though we all work in different fiber and textile media, we are all computer users, so everyone who wishes is able to participate.

It hasn't been without problems however. I have learned that one can't simply copy-and-paste some word processor documents into emails. Various formatting features are reinterpreted by both Yahoo and various email programs as weird little characters instead of what they're meant to be, i.e. bold text, italics, etc.

Then there's plain text versus html in emails. A link is a link is a link, right? Wrong! This turned into an exercise of discovering how many different ways one can access a website if the link won't work. Formatting is a problem in the plain text versus html arena too.

The goal of the workshop is to learn to take a selected image like this ......


And transform it into a source of inspiration for textile design. Perhaps something like this.....


The challenge has been trying to communicate this process without pictures or without actually being able to demonstrate it. Combine that with the various computer operating systems members use, plus their various levels of computer experience, not to mention the different photo editing programs, and I wonder what I've gotten myself into!!!

Fortunately, this is an exceptionally friendly, helpful, and encouraging group; both to me, as I struggle to explain things clearly, and to one another, with our various operating systems, questions, and software. One thing I especially admire about them is their eager willingness to learn.

That may sound odd, but in the past I have had membership in groups where one's level of personal knowledge almost seemed to be some sort of status symbol. This in turn, represented placement in an invisible pecking order. Those who deemed themselves somewhere near the top never seemed open to learning new things, especially from someone else deemed lower in the order. Eventually I felt that I didn't fit in and went my own way.

As with most things, I tried to walk away with something useful from that experience. Therefore, my hope for myself is that I may always be in the process of learning; that my sense of self esteem is never be based on how much I know, but on who I am. And that I never base who I am on skills or possessions, because those things can be lost through physical disability or the circumstances of life. Of course all this is easier said than done, but I'm working on it.

© 2007 Leigh's Fiber Journal

Friday, June 02, 2006

b2f, Warp Sleyed

By Leigh

I feel like I’m finally getting somewhere! My warp is finally sleyed, all 864 ends of it.

My warp is finally sleyed, all 864 end of it.


So far I’m thoroughly sold on warping back to front. Threading the heddles was much, much easier and so was sleying the reed. Although it was a little confusing at first to figure out the order of my ends, since the cross was on lease sticks, I’ve had much less difficulty keeping everything in order.

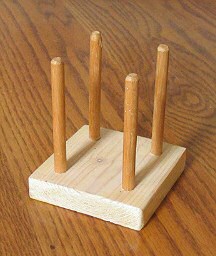
Homemade warp cross holderWhen warping front to back, I would hold the cross either in my hand or in a one of those homemade things pictured at left, (which I’m sure has a name but I don’t have a clue as to what that name is. I would tie it to my breast beam to hold the cross while I sleyed the reed.) However, it didn't matter which way I held the cross, fine or slippery warp ends could slide around or slip down, and I would often have trouble figuring out which one was next.

In warping b2f, the cross is on lease sticks, which not only keep the warp in strict order, but also enabled me to walk away as necessary. I could come back and pick up where I left off with no problem.

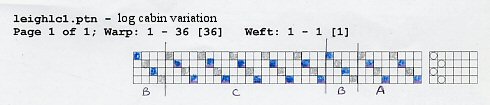
Leigh's log cabin variation draft.


My draft is a log cabin variation which I worked out on WinWeave. I found one log cabin variation in Helene Bress’s The Weaving Book. However, when I worked up its drawdown on WinWeave I wasn’t satisfied with it and began doodling. Eventually I came up with one I liked and am using it. The treadling will be tromp as writ (aka as drawn in. IOW it is treadled the same way it is threaded.) Since the colors alternate across the warp, I was able to measure the two colors together. I only had to take care that I was threading in the correct color order. I have checked, checked, and double-checked, so hopefully I got it right.

Next ....... b2f, Weaving The Header