Friday, October 31, 2008

Cotton Spinning Finished For Now

By Leigh

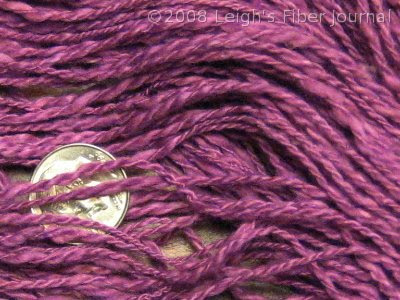
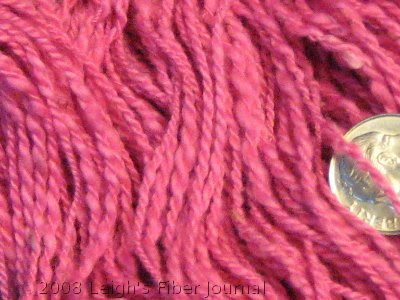
I have finished spinning two more colors from my Procion MX cotton lint dye experiments. The dime in each photo reflected the flash, which is annoying, but the yarn colors are pretty accurate, so I decided I could live with the dime.

Procion MX Turquoise MX-G, med DOS

1 part Procion Red MX-8G
1 part Procion Yellow MX-8G
medium DOS

Here are all the skeins I have spun this summer:

Thirteen in all, each roughly 100 grams each. I still have more dyed cotton lint to spin, mostly from the Procion MX exhaust experiments. However, I'm ready to get back to some winter type projects such as knitting on my Shetland Sampler Cardi, and combing and spinning the Polwarth/Alpaca blend.

I've been toying with the possibility of weaving with my cotton yarns, but nothing concrete is in my mind yet. For now, they will be lovingly stored away, but be assured that an idea for them will be slowly percolating in my mind.

Posted 31 Oct. 2008 at http://leighsfiberjournal.blogspot.com

Related Posts:
Summery of Procion MX Dye Experiments
Spinning Cotton Lint - a how to
More On Cotton Spinning - Readers' Q & A

Wednesday, October 29, 2008

S&W Samples 1: Traditional Treadlings

By Leigh

These samples differ somewhat from my first experience with summer & winter because of my loom. The treadling patterns are the same, but now I am able to experiment with more blocks because I have more shafts.

All of these were threaded for a 3-block summer & winter on five shafts. For each sample I tried a different treadling, as you can see.

3-block S&W in brick patternThis sample alternates the pattern sheds in a 1 - 2 - 1 - 2 sequence.


3-block S&W in O's patternThis one treadles the pattern sheds in a 1 - 2 - 2 - 1 order.


3-block S&W in X's patternThis is a 2 - 1 - 1 - 2 treadling sequence.


3-block S&W in dukagång patternThis one treadles only one pattern shed per block, 1 - 1 - 1 - 1.

The other thing that has been different has been the skeleton tie-up. It has meant having to use both feet for the pattern sheds, so I was slow at first. I did gain some speed as I became more comfortable with the treadling.

One thing I figured out was that it would be easier to keep track of the treadling sequence if I had tied up both the tabby and tie-down shafts on one side, so that instead of this .......

Countermarche skeleton tie-up.... the treadles were tied like this ......

revised CM  skeleton tie-upThe alternating pattern & tabby treadling alternates both feet with one foot. With the second tie-up, I could leave my right foot on the pattern shed, and use the left to alternate between the tabbies and tie-down shafts. It would be easier to keep track of the pattern treadle that way!

If you're like me, then that probably didn't make sense, but it will if you ever have to do it! In the end, experience really is the best teacher; for my next S&W warp, I'm definitely going to change the tie-up.

Posted 29 Oct. 2008 at http://leighsfiberjournal.blogspot.com

Related Posts:
Summer & Winter: 1st Dishtowels
Summer & Winter: Treadling
S&W Samples 2: Tabby Treadling Order
Skeleton Tie-Ups for Countermarche Looms

Monday, October 27, 2008

Skeleton Tie-Ups for Countermarche Looms

By Leigh

It didn't take me long to figure out that this skeleton tie-up......

Skeleton tie-up for 3 block S&W.... (which I'd worked out here) wouldn't work with my countermarche loom. The problem? The way the treadles are tied up.

The above tie-up draft is for a rising shed loom like a jack loom. With this type of loom, the only shafts tied to the treadles are the ones which need to be lifted in order to weave a draft.

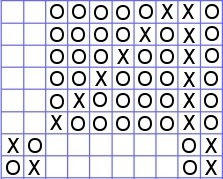
A countermarche loom on the other hand, creates a shed by lifting some shafts and lowering the rest. This requires all the shafts to be tied so that each shaft is activated (either up or down) for each shed. The above tie-up could be re-written for a countermarche tie-up, which uses X's and O's instead of shaft numbers.

Key:
O = rising shafts
X = sinking shafts

Not so easy to read, is it? Which is why I prefer working with rising shed tie-up drafts, which are easy to mentally adapt for a countermarche (CM) loom. In fact, almost any rising shed draft can be used on a countermarche loom, except in the case of a tie-up like that skeleton above.

Why's that? Well, suppose a shed requires lifting shafts 1 and 3 together. According to the above CM tie-up, treadle 1 (1st column) is tied so that it raises shaft 1 (indicated by the O) and lowers shaft 3 (indicated by the X). Treadle 3 (3rd column) is the opposite. So, if I press both treadles together, they counteract each other and I get no shed because I can't raise and lower a shaft at the same time!

I wish I could tell you that I was clever enough to figure out the CM skeleton tie-up all by myself, but I'm not. It was Madelyn v.d. Hoogt to the rescue! On page 79 in her The Complete Book of Drafting for Handweavers, are 8-shaft skeleton tie-ups for both countermarche and jack looms.

The skeleton tie-up for an 8-shaft CM looks like this:

revised CM  skeleton tie-upThe blank squares are not tied up! The first two treadles are for the tabbies, the second two are for the tie-down shafts, and the remaining are for the pattern shafts. Because the tie-down shafts are tied independently from the pattern shafts, it is possible to tread both at the same time.

All in all, the footwork is a little awkward, but I'm gradually getting the hang of it. Between that and keeping track of two shuttles, it may be a bit slow going, but I've never been a lightning fast weaver anyway.

Posted 27 Oct. 2008 at http://leighsfiberjournal.blogspot.com

Related Posts:
Skeleton Tie-Ups for Jack Looms
Summer & Winter: Tie-Up
Comparing Looms: Jack & Countermarche

Friday, October 24, 2008

Color Coding Steel Heddles: Readers' Suggestions

By Leigh

This is a follow-up to my last post, Color Coding Texsolv Heddles. Connie asked about ideas for doing the same with steel heddles. I didn't try this when I had a loom with steel heddles, but there were some excellent ideas in the comments. Here they are:
Janice said, "I have large-eye wire heddles on my loom. In order to see them I painted above and below the eye where the twisted wire part of the heddle is. And, every 10th heddle I painted around the eye as well. It took a few days to do all the heddles, I put two coats on them, but they are really easy to see, now, and they look pretty too."
Trapunto suggested, "...a dab of white out or nail polish for metal heddles? Say, on every other shaft?"
Amelia said, "A local friend just used fingernail polish on her twisted eye metal heddles .... I decided to go with permanent marker on mine"
Phiala had some good advice ..... "I would try either the enamel paint used by modelmakers .... or the new alcohol inks intended for use on non-porous surfaces. The paint would be bright and opaque, while the ink would be less-visible but easier to apply and use because it doesn't produce a raised surface.... In either case .... degrease the metal before applying the colorant, either with one of the degreasers sold for painting, or just washing carefully."
Kimmen (no blog) says, "I went to the local beauty supply place and found a bunch of wildly colored nail polishes for $1/bottle. Worked fine on the metal heddles, and was less expensive than model makers paint.

You really only need 3 colors- leave 1 harness plain, then paint the next 3 different colors. The 5th harness is plain, and repeat the colors..... the color repeats are 4 harnesses apart, and you wont mix them up..... I used repeated the colors on other looms and find I like that better, especially when you are doing patterns that lift in pairs. It's easier to figure out the pairings, and I can color code my draft easily."
Meg in Nelson offered, "I tied embroidery floss at the top of every 10th heddle, through the loop. Though individual heddle eyes are not color-coded, if you shake the shaft a bit while threading, it's easy to know which shaft you're on. This was my 4-shaft loom, and Shaft 1 has red marks, Shaft 2 blue, Shaft 3 yellow and Shaft 4 green. "
Neki Desu suggested, "Craft paints such as Pebeo or even better Lumiere work well. Just paint the eye."

If anyone has other ideas, please let me know and I'll be glad to add them!


Related Posts:
Color Coding Texsolv Heddles

Wednesday, October 22, 2008

Color Coding Texsolv Heddles

By Leigh

The idea of color coding heddles pops up in various weaving discussions from time to time. It always seemed like a useful idea to me, especially if it helps prevent threading errors. Most recently, it came up on the Yahoo Weaving list, so I took some notes and decided to give it a try in preparation for my next S&W sampler.

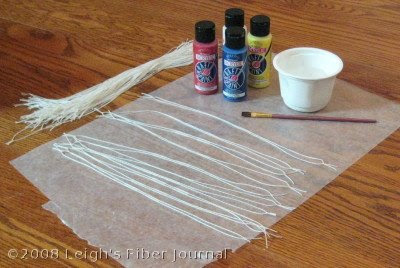
Materials for this are super simple. The consensus seemed to be to use acrylic paints, so I got the cheapest ones I could find at my local craft store.

Supplies needed to color code Texsolv heddles.The only other supplies were water and brushes.

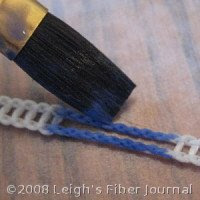
The slow way to color the heddles.I mixed a bit of the paint with a bit of water and started by dabbing around the heddle eyes.

I can't tell you how tedious this quickly became. I wasn't sure how many texsolv heddles I actually have, but with 8 shafts, I knew that it was a bunch and that this was going to take a long time. A very long time.

Being the impatient sort Having a long list of things to do that day, I decided that my time would be more efficiently spent if I tried idea.

A quicker way to do it.Her method involved diluting the paint and soaking entire heddles in the mixture. I don't have a clue as to the ratio of water to paint that I used. Some colors seemed to stick better than others, so I would add another squirt of paint depending upon how the heddles were looking at the moment.

Here's what they look like on my loom.

Newly painted heddles on the loom.I left the heddles on the first and last shafts white. I used six other colors for shafts 2 through 7.

Since then I've threaded my S&W sampler warp and it was so much easier to pick out the next shaft in the threading order! I like texsolv, but the heddles are pliant so it's sometimes difficult to tell exactly what shaft a particular heddle is on.

My other hope is that this will help when I need to adjust the shed. Again, it's sometimes difficult to tell what shaft an incorrectly threaded warp end is threaded on. Color coding the entire heddle should help with that too.

Next is tying up the treadles and then I'll be weaving. Cally has started on a summer & winter adventure as well, and her results are inspiring. I'm anxious to get weaving too.

For a few more ideas on how to color Texsolv heddles, check out the comments at the end of this post.

Posted 22 Oct. 2008 at http://leighsfiberjournal.blogspot.com

Related Posts:
Adjusting the Loom With Texsolv
Warping the Glimakra: Adjusting the Shed

Friday, October 17, 2008

Summer & Winter: Treadling

By Leigh

S&W Intro (a)

Threading (a)

Tie-Up (a)

Now we get to treadling. Here are the "rules." Summer & winter treadling:

  • Alternates tabby and pattern sheds
  • Includes a tie-down thread with each pattern thread. A treadle may be tied up so that both are lifted together, or for skeleton tie-ups, the weaver must treadle these together.
Each S&W unit can create two pattern sheds because it contains two tie-down ends. The pattern threads can be lifted with either of the tie-down threads. The texture of the fabric depends upon the order that these sheds are treadled in.

Below are some examples to explain what I mean. I dug the photos out from a previous post, because they illustrate the four traditional S&W treadlings for a 4-shaft, 2-block S&W.

In the first example, the treadling alternates the two pattern sheds (each shed with it's own tie-down end).

Traditional summer & winter treadling.Pattern shed 1 (with first tie-down end)
Tabby a
Pattern shed 2 (with 2nd tie-down end)
Tabby b
Repeat

This is often referred to as 1-2-1-2 treadling, referring to the alternating tie-downs. It creates a "brick" effect, so called because the pattern weft in the rows gives the appearance of a traditional brick pattern (which you can't see in the above photo) :(

Next is the X's treadling. You can see the X's in that pattern below.

X's summer & winter treadling.This requires paired pattern shafts for each block: 2-1-1-2:

Pattern shed 2
Tabby a
Pattern shed 1
Tabby b
Pattern shed 1
Tabby a
Pattern shed 2
Tabby b

The next one is the O's treadling, which is also a paired treadling, except that it starts on the other pattern shaft. So it is treadled 1-2-2-1.

O's summer & winter treadling.Pattern shed 1
Tabby a
Pattern shed 2
Tabby b
Pattern shed 2
Tabby a
Pattern shed 1
Tabby b

The last one is the "columns" or dukagång treadling.

Dukagång summer & winter treadling.This one uses only one pattern shed for the entire treadling block: 1-1-1-1 or 2-2-2-2. Either:

Pattern 1
Tabby a
Pattern 1
Tabby b
Pattern 1
Tabby a
Pattern 1
Tabby b

or

Pattern 2
Tabby a
Pattern 2
Tabby b
Pattern 2
Tabby a
Pattern 2
Tabby b

Skeleton tie-up treadling for any of the above requires the use of both feet. For example:

Tabby a (right foot)
Pattern + Tie-down 1 (both feet)
Tabby b (right foot)
Pattern + Tie-down 2 (both feet)
Etc.

Tabby treadling can be notated in several different ways. Sometime it isn't notated at all; the weaver is expected to be familiar enough with the structure to know to use it. Sometimes the draft will just say "use tabby", indicating that the weaver is to throw alternating tabby shots after each pattern shot.

Well, I don't know if anyone else understands S&W any better now, but I think I do. The review has done me good, and I'm excited about taking the next step in this journey.


Related Posts:
Summer & Winter: A Basic Definition
Summer & Winter: Threading
Summer & Winter: Tie-Up
Summer & Winter: Structure and Theory

Wednesday, October 15, 2008

Summer & Winter: Tie-Up

By Leigh

I started this Summer & Winter series with a basic definition, and then discussed threading and profile drafts. Next comes the treadle tie-up.

Tie-ups determine which shafts are lifted to create various sheds. For a project or pattern from a book or magazine, we tie-up the treadles as the draft indicates. But what if we want to explore all treadling possibilities?

Summer & winter weaves a pattern tied to a plain weave ground. This means that two treadles must be tied up for plain weave, which are used for the tabby picks between the pattern picks. The rest of the treadles are free for any combination.

A complete tie-up gives the weaver all possible sheds for the given threading. For S&W it must:

  • allow for plain weave and tabby treadling*
  • allow for pattern treadling
  • combine every pattern or combination of pattern shafts, with first one and then the other tie-down shaft
For a 4-shaft, 2-block S&W, a complete tie-up would look like this:

The tie-down shafts are tied to treadles 1 and 2. The pattern sheds are tied to treadles 3 though 8, and the tabby sheds are tied to treadles 9 and 10. With this tie-up, all possible sheds are available to the weaver.

This is fine if we have ten treadles, but what if we don't!??! Does that mean that the only way to explore all the treadling possibilities for a 2-block S&W is to periodically change the tie-up?

No, it means we need to use a skeleton tie-up to accommodate the number of treadles actually available.

What is a skeleton tie-up? Click here to find out.

[*I'm using the terms plain weave and tabby in a modern sense, where plain weave usually refers to a structure itself (over one, under one, etc), and tabby being the use of plain weave shots alternated with pattern shots, such as in summer & winter, crackle, or overshot. ]

Posted 15 Oct. 2008 at http://leighsfiberjournal.blogspot.com

Related Posts:
Summer & Winter: A Basic Definition
Summer & Winter: Threading
Summer & Winter: Treadling
Summer & Winter: Structure and Theory
Skeleton Tie-Ups for Jack Looms
Skeleton Tie-Ups for Countermarche Looms

Skeleton Tie-Ups for Jack Looms

By Leigh

A skeleton tie-up is a bare bones tie-up which allows the greatest number of sheds with the least number of treadles. For summer & winter, that means that the tie-down shafts are each tied to their own treadle, and the pattern shafts are tied to different treadles. This requires two or more treadles being pressed at the same time in order to create the correct sheds. I've just learned how to figure these out, so hopefully I can explain it to you.

I'm going to start my study of tied unit weaves with a 3-block summer & winter, so that's what I'll use as an example. The first thing I did was to figure out a complete tie-up, which shows all possible sheds for three S&W blocks. It looks like this....

.... and requires 18 treadles.

In the complete tie-up, the pattern shafts (3 through 5) are always paired with first one tie-down shaft and then the other. For example, 1 - 3 then 2 - 3. However, if shaft 3 is tied-up by itself and treadled together with one of the tie-down shafts (1 or 2), then the same sheds can be made, but with one treadle tie-up eliminated. To do the same for each combination of shafts, the skeleton tie-up looks like this:

This skeleton tie-up for jack looms requires only ten treadles. All the shed combinations are possible by using two treadles at a time, except the tabby sheds, which are tied to the two treadles on the right ( 9 and 10.)

More blocks would require more treadles, so you can see why folks would be tempted to get a dobby loom!

Posted 15 Oct. 2008 at http://leighsfiberjournal.blogspot.com

Related Posts:
Skeleton Tie-Ups for Countermarche Looms
Summer & Winter: Tie-Up

Monday, October 13, 2008

Summer & Winter: Threading

By Leigh

In my last post (Summer & Winter: A Basic Definition), several threading characteristics were mentioned. While threading alone does not make the weave what it is, it is still a very important part of it.

Summer & winter is a unit weave. Threading units consist of the least number of threads necessary to define a weave. For summer & winter, each threading unit must:

  • Have four warp ends which:
    • Include both tie-down ends
    • Use only one of the pattern ends
  • Alternate tie-down and pattern ends
For four shafts, that give us two units to work with:

Shafts 1 through 4More shafts would give us more units:

Shafts 5 through 8Etc. Designing comes in deciding which units to use, and how many times to repeat them.

As you can see, the number of units we can use depends upon the number of shafts we have available. I can have two less units than I have shafts. In the example above, shafts 1 and 2 are being used for the tie-down ends leaving shafts 3 through 8 to make the pattern. To use all eight units, I would need a 10-shaft loom.

One thing that units lend themselves to, is profile drafts, which I've attempted to explain in a separate post, here.

Posted 13 Oct. 2008 at http://leighsfiberjournal.blogspot.com

Related Posts:
Summer & Winter: A Basic Definition
Summer & Winter: Tie-Up
Summer & Winter: Treadling
Profile Drafts
Summer & Winter: Structure and Theory

Profile Drafts

Profile drafts are a shorthand form for writing weaving drafts. With them, a weaving pattern is laid out in blocks rather than thread by thread. Profiles can be written for threading, tie-up, and treadling. I'm just going to try and explain threading profiles, because they are more common and I understand them better.

The first question we need to answer is, what is a block? A block is a repeatable section of an overall pattern. Blocks consist of units, which are smallest number of threads needed make the weave unique. (More on that in this post.) Blocks can have as many repeats of a unit as the weaver desires.

As an example, let's look at this summer & winter dishtowel I wove about a year and a half ago. It is a simple 4-shaft design, using a Fibonacci sequence in both the threading and the treadling.

Below is the thread by thread draft for one pattern repeat. You can click on it to enlarge it.

Here is a profile of the same draft.

Each square in the profile represents a threading unit. If you compare it to the thread-by-thread draft, you see that from the right, unit A is threaded once, then unit B twice, then A three times, etc. The profile has two rows, because it uses only two blocks. The first row is for block A, the second for block B, and so on for additional blocks.

The beauty of a profile, is that its pattern can be adapted to any block weave. For example, here's the same profile in M's & O's (click to enlarge)

Or, a Multiple Tabby Weave (click to enlarge)

As you can see, profile drafts are not only easy to read and write, but are very versatile as well.


Related Posts:
Shadow Weave Profiles

Friday, October 10, 2008

Summer & Winter: A Basic Definition

By Leigh

I decided that the best place to begin my study of tied weaves is with a review of summer & winter. This isn't the first time I've woven S&W, and hopefully thanks to that experience, I am better able to understand it now.

Before I get started however, I'd better warn ya'll that I'm fixin' to get a bit weave geeky here. I'm doing this to try to wrap my head around the technical definition of S&W, which isn't necessary to weave it, but which is helpful in understanding it and designing for it. My plan is to write a basic definition in this post, followed by a series of posts dedicated to summer & winter threading, tie-up, and treadling. My hope is that by trying to explain it to someone else, I'll gain a better understanding of it myself.

So here goes. A basic definition might be:

Summer & winter is a two shuttle weave which weaves a pattern tied to a plain weave ground cloth. This is achieved by assigning two shafts (commonly 1 and 2) to serve as "tie down shafts" which hold the pattern in place. The remaining shafts are "pattern shafts," and are used to create the desired pattern. The shafts are threaded so that the tie down and pattern warp ends alternate (td-P-td-P). One shuttle is used for the tabby weft, which is usually similar to the warp. The second shuttle is used for a heavier, pattern weft.

Recently I've learned that a more accurate name for summer & winter is Single 2-Tie Unit Weave.

Single - because each threading unit uses only one pattern shaft

2-Tie - because each unit uses two tie down shafts

Unit Weave - because it uses units to produce the pattern. For S&W, it is a four thread unit.

OK. So what's a unit? I first attempted to define this when I was weaving M's & O's.

A unit is the smallest number of warp and weft threads needed make the weave unique. For a 4-shaft S&W, two warp units are required.

4-shaft S&W units.In going back to the definition of S&W above, we see that each unit uses two tie-down shafts, both 1 and 2. Each unit also features only one pattern shaft, either 3 or 4. We also see that the tie-down and pattern shafts alternate (1-3-1-2 or 1-4-1-2).

The weft must be woven similarly: tabby-pattern-tabby-pattern. It is the interaction (interlacement) of the warp and weft threads which make S&W uniquely itself.

If we had more shafts, then we could have more threading units, but the above two are all that are needed to weave summer & winter. The units can be repeated as many times as one wishes to create "blocks", which in turn create the overall pattern of the piece. Treadling can vary too, as long as it follows a tabby-pattern-tabby-pattern sequence.

OK. So that's it for a basic definition. Next I'll try to elaborate on S&W threading.

Bibliography
A Weaver's Book of 8-Shaft Patterns, edited by Carol Strickler
Complete Book of Drafting for Handweavers, Madelyn v.d. Hoogt
Eight Shafts: A Place to Begin, Shelp and Wostenberg
CWTW Fall 2008 Newsletter, Su Butler
CWTW S&W Lesson 1, Su Butler

Posted 10 Oct. 2008 at http://leighsfiberjournal.blogspot.com

Related Posts:
Summer & Winter: Threading
Summer & Winter: Tie-Up
Summer & Winter: Treadling
Summer & Winter: Structure and Theory

Tuesday, October 07, 2008

A 2nd Little Space Dyed Yarn Blanket

By Leigh

The trouble with enjoying my weaving is that I start to get ideas. I wonder, "what if I did this," or "what if I changed that." So too with the spaced dyed yarn weaving. As I worked on the 1st space dyed yarn blanket, the wheels were already turning with ideas for another.

Here's what the turning wheels produced over the weekend:

Space Dyed Yarn Blanket #2Click pic for a slightly larger view.

This one definitely has a more plaid-like look than the first one.

Catzee helps me photograph the new afghan.Cat included for size
A few close ups:


I did nothing special to line up the color sequences of the space dyed yarn. I measured and wove as it came off the skein.

The Particulars:
  • Yarn: Red Heart TLC, worsted weight acrylic knitting yarn
  • Structure: plain weave
  • Warp ends: 360
  • Sett: 8 epi
  • Picks Per Inch: 8
  • Width on loom: 45 inches
  • Length on loom: didn't measure
  • Finished size: 39 x 44 inches woven, with crochet edging 41 x 46 inches
  • Wet finishing: soak in warm water for about an hour, then machine wash and dry with a dryer sheet to soften the hand.
  • Edge finishing: machine zig zagged cut edges, then crochet shells
    • Row 1 - single crochet
    • Row 2 - shells - *5 DC in one stitch, skip 2 stitches, one SC, skip 2 more*, repeat
The difference in the effects of the space dyed yarns is from two things:
  1. Color value - the first blanket's yarns had more light and dark contrast
  2. Color transition - the change of colors in the first blanket's yarns are more obvious. In this blanket, the color changes are subtle.
These last two exercises in weaving with space dyed yarns have inspired me to want to try doing my own warp painting and space dyeing. In fact next month, Karen Madigan is going to give an Online Guild workshop I plan to participate in, "Easy Warp Painting and Ikat."

However, what I'm supposed to be doing at the moment, is getting ready for the Complex Weavers Tied Weaves Study Group which commenced this month. And I am, I promise. In fact I've begun a review of summer & winter weave. I'll see how well I can write that out next time.


Related Posts:
Space Dyed Yarns & Plain Weave
Space Dyed Blankie Done

Saturday, October 04, 2008

Space Dyed Blankie Done

By Leigh

My experiment using (commercial) space dyed yarns in both warp and weft is off the loom and finished.
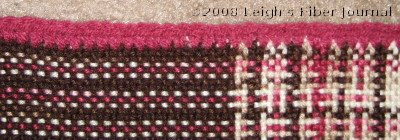
Leigh's space dyed blankie
The Particulars:
  • Yarn: Red Heart TLC, worsted weight acrylic knitting yarn
  • Structure: plain weave
  • Warp ends: 360
  • Sett: 8 epi
  • Picks Per Inch: 8
  • Width on loom: 45 inches
  • Length on loom: didn't measure
  • Width after finishing: 39 inches
  • Wet finishing: soak in warm water for about an hour, then machine wash and dry with a load of towels. A dryer sheet helped soften the hand nicely.
  • Edge finishing: machine zig zagged cut edges, then single crochet around entire blanket.
  • Finished size: 39 by 43 inches
Close-up
Yarn changes in the weft resulted from guesstimations for the various amounts I had of each yarn.


It was what I call fun weaving: fast and entertaining. It's also been a reminder of how much I love working with color, and this is something I don't intend to forget as I move on to the next project.


Related Posts:
Space Dyed Yarns & Plain Weave
Good Ol' Plain Weave

A Note About Watermarks

By Leigh

Thank you to everyone who responded to my question in this post about the watermark on my photo. Personally, I don't like them. I find them annoyingly distracting, so it was interesting to me that some of you never really noticed it.

I had an interesting chat with Dorothy about that photo, and she showed me how easy it is to obliterate a watermark from a photo. Mine was fairly small, but with some skill and a clone tool, even a large one could be removed. As she said in the comments, "(The) best way to protect pictures is keep them off the internet." However, that would defeat the purpose of a fiber and textile blog!

If I had my own website I might be concerned about another type of photo theft called "hotlinking" or "inline linking." This is when someone steals a photo by linking directly to it's original location from their website. The image shows up on their site, but it uses the bandwidth of the original website (bandwidth theft), which is paid for by the owner of the photo! You can read more about this here. Any sort of watermark would be helpful in this case, as the photo is never tampered with by the thief.

My personal experience however has been having entire posts (including photos) taken by a scraping website (post about my experience here.) Posts and photos from dozens of other blogs had been stolen and reposted there too, some with copyright notices and watermarks still intact. Unfortunately scraping is very common. It is also somewhat indiscriminate, as it is based on keywords rather than actual content.

Because scrapers essentially just copy and paste entire posts and articles, these are rarely edited to disguise the actual author. For that reason I've taken measures to not only let readers know that my posts are copyrighted, but to always include links back to myself so they know where the posts came from. For this same reason I plan to leave a small, unobtrusive watermark on my pix. If the post is scraped, then the watermarks will be another clue back to me. If someone really wants to steal individual photos they will crop out, or clone over the watermark regardless of its size or prominence.

There are no real answers to this type of problem. I want to take measures, but one thing I don't want to do is to have so many security checks as to take the joy out of blogging!

So there you have it. I appreciate everyone's honest feedback. You all are the best!

Posted 4 Oct. 2008 at http://leighsfiberjournal.blogspot.com

Related Posts:
Stolen Content
Update on Stolen Content (& a little more info)

Wednesday, October 01, 2008

Cotton Lint Spinning Progress

By Leigh

I wanted to give you all a quick update on my cotton lint spinning.

Handspun Procion MX dyed cotton lintClick photo to biggify

Eight 100 gram skeins are spun, with at least two purples to go. The differences in the oranges and greens are subtle, but this seemed to be the best photo to catch them.

I also have several other colors, which used the printers' primaries including the pastels from my exhaust experiments. At the moment I'm mostly interested in a rainbow set of colors, though I don't have a specific project in mind for them.

On another note, I learned how to do a sort of watermark with The GIMP. Now I need your opinions. Does it distract too much from the photo????????

Posted 1 Oct. 2008 at http://leighsfiberjournal.blogspot.com

Related Posts:
Summary of Procion MX Dye Experiments
Spinning Cotton Lint